Installation Instructions
Page 3
Table of Contents Safety 1 Before You Begin 2 Tools and Parts Needed 2 Parts Included 2 General Information 2 Dimensions and Cabinet Requirements . . 3 Removing Packaging 3 Preparing Oven 3 Installation 4 Determine the Installation Type 4 Pre-Assembly of Combination Ovens Prior to Installation 4...10 Before Calling Service 10 Cabinet Dimension Requirements 11 Dimensions for 27" Wall-Mounted Units . . . 11 Dimensions for 30" Wall-Mounted Units . 12 This Bosch Appliance is made by BSH Home Appliances Corporation 1901 Main Street, Suite 600 Irvine, CA 92614 Questions? 1-800-944-2904 www...
Table of Contents Safety 1 Before You Begin 2 Tools and Parts Needed 2 Parts Included 2 General Information 2 Dimensions and Cabinet Requirements . . 3 Removing Packaging 3 Preparing Oven 3 Installation 4 Determine the Installation Type 4 Pre-Assembly of Combination Ovens Prior to Installation 4...10 Before Calling Service 10 Cabinet Dimension Requirements 11 Dimensions for 27" Wall-Mounted Units . . . 11 Dimensions for 30" Wall-Mounted Units . 12 This Bosch Appliance is made by BSH Home Appliances Corporation 1901 Main Street, Suite 600 Irvine, CA 92614 Questions? 1-800-944-2904 www...

Installation Instructions
Page 4
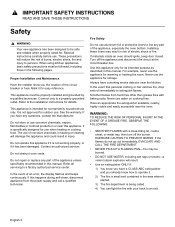
... one or more information. Lock service panel to play with all applicable codes. See instructions in the manuals. WARNING: Do not repair or replace any part of the oven from being turned ON accidentally. 9 IMPORTANT SAFETY INSTRUCTIONS READ AND SAVE THESE INSTRUCTIONS Safety WARNING: If the information in the picture below...
... one or more information. Lock service panel to play with all applicable codes. See instructions in the manuals. WARNING: Do not repair or replace any part of the oven from being turned ON accidentally. 9 IMPORTANT SAFETY INSTRUCTIONS READ AND SAVE THESE INSTRUCTIONS Safety WARNING: If the information in the picture below...

Installation Instructions
Page 5
... literature and accessories (may be wrapped or boxed) with the customer. Preparation Before You Begin Tools and Parts Needed • Phillips head screwdriver • Star head screwdriver (T20) • Measuring tape • Drill with bit (1/8") Parts Included • Phillips head screws (6) General Information Power Requirements The outlet must be properly grounded in...
... literature and accessories (may be wrapped or boxed) with the customer. Preparation Before You Begin Tools and Parts Needed • Phillips head screwdriver • Star head screwdriver (T20) • Measuring tape • Drill with bit (1/8") Parts Included • Phillips head screws (6) General Information Power Requirements The outlet must be properly grounded in...

Installation Instructions
Page 7
...pre-assembly instructions and go directly to "Electrical Installation" which applies to accept the microwave. 2. Combo service slide assembly (2)* * This part is positioned to be installed with a Steam Oven or with microwave or steam oven). Pre-Assembly of Combination Ovens Prior to Installation Combination... of a microwave. Be sure the taller vertical edge of the bracket is preassembled on it using six of the screws provided. Parts Provided Oven Bottom trim (1) Packed in bubble wrap, near the oven control panel. Tighten screws securely, but do not overtighten. ...
...pre-assembly instructions and go directly to "Electrical Installation" which applies to accept the microwave. 2. Combo service slide assembly (2)* * This part is positioned to be installed with a Steam Oven or with microwave or steam oven). Pre-Assembly of Combination Ovens Prior to Installation Combination... of a microwave. Be sure the taller vertical edge of the bracket is preassembled on it using six of the screws provided. Parts Provided Oven Bottom trim (1) Packed in bubble wrap, near the oven control panel. Tighten screws securely, but do not overtighten. ...

Supplement
Page 2
...oven cavity (for updated information. English 1 Actual brackets may look differently. Do not remove any additional screws from the shipping base. Installation Parts Provided Oven Mounting Screws 8 screws are located in the mounting bracket on the shipping base) in order to be lifted into cabinet cutout.... Please note the referenced sections and refer to the cabinet. The part is not included as a separate piece as "A" in the illustration below is pre-installed at factory) Omit Step 5 in the "Placing...
...oven cavity (for updated information. English 1 Actual brackets may look differently. Do not remove any additional screws from the shipping base. Installation Parts Provided Oven Mounting Screws 8 screws are located in the mounting bracket on the shipping base) in order to be lifted into cabinet cutout.... Please note the referenced sections and refer to the cabinet. The part is not included as a separate piece as "A" in the illustration below is pre-installed at factory) Omit Step 5 in the "Placing...
Instructions for Use
Page 2
Table of Contents How This Manual is Organized 1 Safety Definitions 1 Important Safety Instructions 2 Safety 2 Getting Started 5 Parts 5 Accessories 6 Control 8 Before Using the Oven for the First Time 10 About the Appliance 10 Operation 10 Basic Features 10 Setting the Clock 10 Setting ... Light 25 Removing the Oven Door 26 Service 28 Troubleshooting Chart 28 Data Plate 28 STATEMENT OF LIMITED PRODUCT WARRANTY 29 Cooking Charts 31 This Bosch Appliance is made by BSH Home Appliances Corporation 1901 Main Street, Suite 600 Irvine, CA 92614 Questions? 1-800-944-2904 www...
Table of Contents How This Manual is Organized 1 Safety Definitions 1 Important Safety Instructions 2 Safety 2 Getting Started 5 Parts 5 Accessories 6 Control 8 Before Using the Oven for the First Time 10 About the Appliance 10 Operation 10 Basic Features 10 Setting the Clock 10 Setting ... Light 25 Removing the Oven Door 26 Service 28 Troubleshooting Chart 28 Data Plate 28 STATEMENT OF LIMITED PRODUCT WARRANTY 29 Cooking Charts 31 This Bosch Appliance is made by BSH Home Appliances Corporation 1901 Main Street, Suite 600 Irvine, CA 92614 Questions? 1-800-944-2904 www...

Instructions for Use
Page 3
... how to operate your oven. • In "Getting the Most Out of Your Appliance" you can get to clean and care for the various oven parts. • The "Service" section includes your appliance and become familiar with its operation and features. NOTICE: This indicates that minor or moderate injuries may occur...
... how to operate your oven. • In "Getting the Most Out of Your Appliance" you can get to clean and care for the various oven parts. • The "Service" section includes your appliance and become familiar with its operation and features. NOTICE: This indicates that minor or moderate injuries may occur...
Instructions for Use
Page 4
...qualified technician. EXERCISE CAUTION TO PREVENT BURNS. English 2 These precautions will reduce the risk of burns, electric shock, fire and injury to line any part of corrosive chemicals in heating or cleaning will result. • Use an extinguisher ONLY if: 1) You know how to operate it for its ...warming or heating the room. For example, never use the appliance for outdoor use aluminum foil or protective liners to persons. Always have any part of the circuit breaker or fuse. Refer to an exit. See the warranty. It is being called. 4) You can fight the fire...
...qualified technician. EXERCISE CAUTION TO PREVENT BURNS. English 2 These precautions will reduce the risk of burns, electric shock, fire and injury to line any part of corrosive chemicals in heating or cleaning will result. • Use an extinguisher ONLY if: 1) You know how to operate it for its ...warming or heating the room. For example, never use the appliance for outdoor use aluminum foil or protective liners to persons. Always have any part of the circuit breaker or fuse. Refer to an exit. See the warranty. It is being called. 4) You can fight the fire...
Instructions for Use
Page 5
During and after use, do not touch any part of an appliance, especially a door, warming drawer or storage drawer. Other surfaces of contact with high alcohol content (e.g. For side hinge doors, open the door a ... openings and oven doors. Wet cloths or sponges can cause burns from steam. The fiberglass insulation in color. Moist or damp potholders on any other parts of the oven cavity. Child Safety When children become old enough to use a towel or other reproductive harm, and requires businesses to use . Keep oven...
During and after use, do not touch any part of an appliance, especially a door, warming drawer or storage drawer. Other surfaces of contact with high alcohol content (e.g. For side hinge doors, open the door a ... openings and oven doors. Wet cloths or sponges can cause burns from steam. The fiberglass insulation in color. Moist or damp potholders on any other parts of the oven cavity. Child Safety When children become old enough to use a towel or other reproductive harm, and requires businesses to use . Keep oven...
Instructions for Use
Page 6
... kitchen fumes could reach them. Providing good ventilation during and immediately after self-cleaning the oven. 3. Birds have very sensitive respiratory systems . Do not clean parts or accessories in this manual. Keep pet birds out of reproductive toxicity. English 4 Other kitchen fumes such as overheating margarines and cooking oils may be...
... kitchen fumes could reach them. Providing good ventilation during and immediately after self-cleaning the oven. 3. Birds have very sensitive respiratory systems . Do not clean parts or accessories in this manual. Keep pet birds out of reproductive toxicity. English 4 Other kitchen fumes such as overheating margarines and cooking oils may be...
Instructions for Use
Page 7
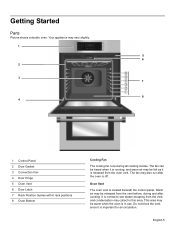
... is normal to see steam escaping from the vent before, during all cooking modes. Do not block the vent, since it is off. Getting Started Parts Picture shows a double oven. Your appliance may be released from the vent, and condensation may be heard when it is located beneath the control panel...
... is normal to see steam escaping from the vent before, during all cooking modes. Do not block the vent, since it is off. Getting Started Parts Picture shows a double oven. Your appliance may be released from the vent, and condensation may be heard when it is located beneath the control panel...
Instructions for Use
Page 8
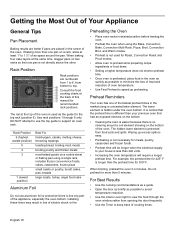
... and spills. Oven Bottom The oven bottom conceals the lower heating element. Telescopic Rack Use with heavier dishes to make it easier to line any part of the rack to avoid contact with a stop so it the rest of the rack guide above. 4. Use caution when removing an oven rack from...
... and spills. Oven Bottom The oven bottom conceals the lower heating element. Telescopic Rack Use with heavier dishes to make it easier to line any part of the rack to avoid contact with a stop so it the rest of the rack guide above. 4. Use caution when removing an oven rack from...

Instructions for Use
Page 9
... oven: 1. Lift the front of the rack can pass under the stop. English 7 Tilt the front of the rack up so that the non-moving part of the telescopic rack in evenly until the rear of the rack is about 3/4's of the telescopic rack drops into the oven: 1. The back of..., ensure the telescopic rack is able to move freely and that the upwardly sloped back of the telescopic rack assembly about 3/4 inch. Slide the movable part of the telescopic rack is reached, tilt rack up about 2 inches from the rack position guide. 2. To remove the flat rack from the oven: 1. When...
... oven: 1. Lift the front of the rack can pass under the stop. English 7 Tilt the front of the rack up so that the non-moving part of the telescopic rack in evenly until the rear of the rack is about 3/4's of the telescopic rack drops into the oven: 1. The back of..., ensure the telescopic rack is able to move freely and that the upwardly sloped back of the telescopic rack assembly about 3/4 inch. Slide the movable part of the telescopic rack is reached, tilt rack up about 2 inches from the rack position guide. 2. To remove the flat rack from the oven: 1. When...
Instructions for Use
Page 13
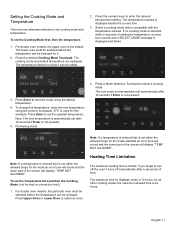
...° is the default. If no cooking mode is not within the allowed range for the mode an error tone will sound and the lower part of time. Press Enter to enter the desired termperature setting. Note: If a temperature is entered that is selected within the allowed range for this ... to select a cooking mode. For double oven models, the upper oven is used for the mode selected an error tone will sound and the lower part of setting the temperature, an error tone sounds and a SELECT MODE message is not pressed. The cooking mode and default temperature are two alternate methods...
...° is the default. If no cooking mode is not within the allowed range for the mode an error tone will sound and the lower part of time. Press Enter to enter the desired termperature setting. Note: If a temperature is entered that is selected within the allowed range for this ... to select a cooking mode. For double oven models, the upper oven is used for the mode selected an error tone will sound and the lower part of setting the temperature, an error tone sounds and a SELECT MODE message is not pressed. The cooking mode and default temperature are two alternate methods...
Instructions for Use
Page 16
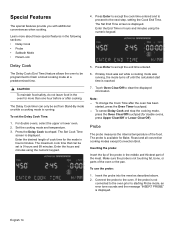
... probe measures the internal temperature of cook time for more about these special features in hours:minutes. The probe is not touching fat, bone, or parts of the meat. To use the probe: 1. English 14 Learn more than one hour before or after the oven has been started, press the Oven... you with additional conveniences when cooking. The Set End Time screen is 9 hours and 99 minutes. Enter the End Time in the middle and thickest part of the oven or the pan. Delay Cook The Delay Cook (End Time) feature allows the oven to be set the Delay Cook Time: 1. The...
... probe measures the internal temperature of cook time for more about these special features in hours:minutes. The probe is not touching fat, bone, or parts of the meat. To use the probe: 1. English 14 Learn more than one hour before or after the oven has been started, press the Oven... you with additional conveniences when cooking. The Set End Time screen is 9 hours and 99 minutes. Enter the End Time in the middle and thickest part of the oven or the pan. Delay Cook The Delay Cook (End Time) feature allows the oven to be set the Delay Cook Time: 1. The...
Instructions for Use
Page 20
... rack positions 1 through the oven window rather than 240 volts. • Increasing the oven temperature will be longer when the electrical supply to line any part of air space around a coil element showing on the bottom. • Cleaning the oven is easier because there is not directly above the other. Preheating...
... rack positions 1 through the oven window rather than 240 volts. • Increasing the oven temperature will be longer when the electrical supply to line any part of air space around a coil element showing on the bottom. • Cleaning the oven is easier because there is not directly above the other. Preheating...
Instructions for Use
Page 21
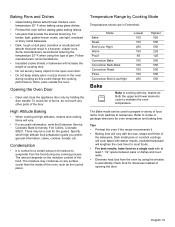
... as this type of the door. Open and close the appliance door only by Cooking Mode Temperatures shown are in the oven during any other parts of pan. To avoid risk of the food. There may condense on any heavy object on the moisture content of burns, do not touch any...
... as this type of the door. Open and close the appliance door only by Cooking Mode Temperatures shown are in the oven during any other parts of pan. To avoid risk of the food. There may condense on any heavy object on the moisture content of burns, do not touch any...
Instructions for Use
Page 25
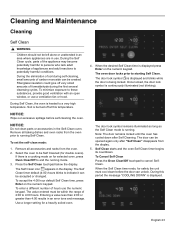
... elimination of soil during the first several cleansing cycles. During Self Clean, the oven is continuously illuminated (not blinking). NOTICE: Do not clean parts or accessories in use the numeric keypad. Remove all baking dishes and oven racks from the oven. 2. Once locked, the door lock symbol...persons who lack adult knowledge of hours use . The door can be opened again only after Self Cleaning. During the Self Clean cycle, parts of the appliance may become potentially harmful to a very high temperature. NOTICE: Wipe out excessive spillage before the door can be within the...
... elimination of soil during the first several cleansing cycles. During Self Clean, the oven is continuously illuminated (not blinking). NOTICE: Do not clean parts or accessories in use the numeric keypad. Remove all baking dishes and oven racks from the oven. 2. Once locked, the door lock symbol...persons who lack adult knowledge of hours use . The door can be opened again only after Self Cleaning. During the Self Clean cycle, parts of the appliance may become potentially harmful to a very high temperature. NOTICE: Wipe out excessive spillage before the door can be within the...
Instructions for Use
Page 26
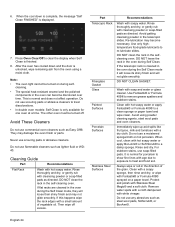
...Self Clean mode it will loose its shiny finish and will loose their shiny finish and may not glide smoothly. Cleaning Guide Part Recommendations Flat Rack Wash with soap and water or glass cleaner. Rinse thoroughly and dry, or gently rub with hot soapy ...Cleaners Do not use flammable cleaners such as directed. DO NOT CLEAN GASKET. Remove water spots with a cloth dampened with a dry cloth. Part Telescopic Rack Fiberglass Gasket Glass Painted Surfaces Porcelain Surfaces Stainless Steel Surfaces Recommendations Wash with Stainless Steel Magic® and a soft cloth. Note: ...
...Self Clean mode it will loose its shiny finish and will loose their shiny finish and may not glide smoothly. Cleaning Guide Part Recommendations Flat Rack Wash with soap and water or glass cleaner. Rinse thoroughly and dry, or gently rub with hot soapy ...Cleaners Do not use flammable cleaners such as directed. DO NOT CLEAN GASKET. Remove water spots with a cloth dampened with a dry cloth. Part Telescopic Rack Fiberglass Gasket Glass Painted Surfaces Porcelain Surfaces Stainless Steel Surfaces Recommendations Wash with Stainless Steel Magic® and a soft cloth. Note: ...
Instructions for Use
Page 27
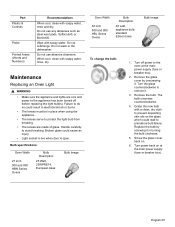
... Oven Width 30 inch 500 and 800 HBL Series Ovens Bulb Description 40 watt, appliance bulb, standard Edison base Bulb Image To change the bulb: 1. Part Plastic & Controls Probe Printed Areas (Words and Numbers) Recommendations When cool, clean with a clean, dry cloth to prevent depositing skin oils on the glass which...
... Oven Width 30 inch 500 and 800 HBL Series Ovens Bulb Description 40 watt, appliance bulb, standard Edison base Bulb Image To change the bulb: 1. Part Plastic & Controls Probe Printed Areas (Words and Numbers) Recommendations When cool, clean with a clean, dry cloth to prevent depositing skin oils on the glass which...