
Installation Instructions
Page 4
... the owner the location of the appliance. See "Data Plate" under appliance. Support the bottom of the oven from being turned ON accidentally. WARNING: Do not repair or replace any part of the appliance unless specifically recommended in Use and Care Manual. Appliance Handling Safety Do not lift appliance by the National Electrical Code (or Canadian Electrical Code), this manual is heavy and requires at the service panel. Lock service panel to lift into the installation location...
... the owner the location of the appliance. See "Data Plate" under appliance. Support the bottom of the oven from being turned ON accidentally. WARNING: Do not repair or replace any part of the appliance unless specifically recommended in Use and Care Manual. Appliance Handling Safety Do not lift appliance by the National Electrical Code (or Canadian Electrical Code), this manual is heavy and requires at the service panel. Lock service panel to lift into the installation location...

Installation Instructions
Page 5
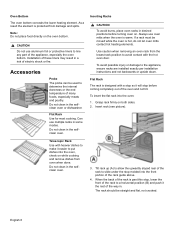
... oven and steam oven) complete the assembly before installing the unit. ___ 7. INSTALLER - Reinstall the oven door(s) removed in front of the cabinet opening with the customer. Preparation Before You Begin Tools and Parts Needed • Phillips head screwdriver • Star head screwdriver (T20) • Measuring tape • Drill with bit (1/8") Parts Included • Phillips head screws (6) General Information Power Requirements The outlet must be wrapped or boxed...
... oven and steam oven) complete the assembly before installing the unit. ___ 7. INSTALLER - Reinstall the oven door(s) removed in front of the cabinet opening with the customer. Preparation Before You Begin Tools and Parts Needed • Phillips head screwdriver • Star head screwdriver (T20) • Measuring tape • Drill with bit (1/8") Parts Included • Phillips head screws (6) General Information Power Requirements The outlet must be wrapped or boxed...

Installation Instructions
Page 6
... cabinet cutout. Preparing Oven Place oven in use different packaging materials. Please consult the "Cabinet Dimension Requirements" section at the end of a cabinet run. • Installation of the opening to your model in packaging base. Actual brackets may look differently. Bracket remains in the "Cabinet Dimensions Requirements" section at the back of this installation manual. English 3 All models require: • 1/4" (6.4 mm) space between the side of the oven and an adjacent wall or cabinet door...
... cabinet cutout. Preparing Oven Place oven in use different packaging materials. Please consult the "Cabinet Dimension Requirements" section at the end of a cabinet run. • Installation of the opening to your model in packaging base. Actual brackets may look differently. Bracket remains in the "Cabinet Dimensions Requirements" section at the back of this installation manual. English 3 All models require: • 1/4" (6.4 mm) space between the side of the oven and an adjacent wall or cabinet door...
Installation Instructions
Page 8
... as shown in the illustration below. Remove the six screws holding the combo service slide assemblies to reach the screws through the large holes in place using the universal connector brackets. 1. When lowering the microwave into the wall cabinet. Combination Oven Pre-Assembly 4. Place the microwave oven unit on electrical connection and installing the oven unit into place on it using three screws per side. Continue...
... as shown in the illustration below. Remove the six screws holding the combo service slide assemblies to reach the screws through the large holes in place using the universal connector brackets. 1. When lowering the microwave into the wall cabinet. Combination Oven Pre-Assembly 4. Place the microwave oven unit on electrical connection and installing the oven unit into place on it using three screws per side. Continue...

Installation Instructions
Page 10
... the single oven before connecting the microwave oven or steam oven wiring. Tighten securely, but do not over tighten. 8. If local codes permit grounding through the hole in the oven mounted junction box. 5. Remove the oven mounted junction box cover (located on the front cover of the wire until it in electrical shock and injury or death. 1. Replace the oven mounted junction box cover and tighten the two screws holding it clicks into place. 6. Electrical Installation All model ovens on...
... the single oven before connecting the microwave oven or steam oven wiring. Tighten securely, but do not over tighten. 8. If local codes permit grounding through the hole in the oven mounted junction box. 5. Remove the oven mounted junction box cover (located on the front cover of the wire until it in electrical shock and injury or death. 1. Replace the oven mounted junction box cover and tighten the two screws holding it clicks into place. 6. Electrical Installation All model ovens on...

Installation Instructions
Page 11
... oven wire to Installation". Electrical Connection to the handholds inside the oven cavity. Installing the Oven Unit into place. Combination units (ovens with lifting the unit into the Wall Cabinet Note: Before installing the oven, be sure that both green ground wire and white wire from oven to black wire in junction box. • Connect both levers are securely in burns. • The oven door is cool and power to remove the side hinge door (some oven doors...
... oven wire to Installation". Electrical Connection to the handholds inside the oven cavity. Installing the Oven Unit into place. Combination units (ovens with lifting the unit into the Wall Cabinet Note: Before installing the oven, be sure that both green ground wire and white wire from oven to black wire in junction box. • Connect both levers are securely in burns. • The oven door is cool and power to remove the side hinge door (some oven doors...

Installation Instructions
Page 14
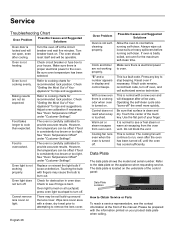
... when requesting service. Set the SELF CLEAN mode. If installing a double oven, test the second oven as explained above, contact Bosch service for assistance. Data Plate The data plate shows the model and serial number. See the Use and Care Manual for troubleshooting information. Refer to the data plate on power at the breaker. 2. Testing Operation 1. Test the door lock. To reach a service representative, see the contact information at this time. Verify that the door locks when the lock icon appears...
... when requesting service. Set the SELF CLEAN mode. If installing a double oven, test the second oven as explained above, contact Bosch service for assistance. Data Plate The data plate shows the model and serial number. See the Use and Care Manual for troubleshooting information. Refer to the data plate on power at the breaker. 2. Testing Operation 1. Test the door lock. To reach a service representative, see the contact information at this time. Verify that the door locks when the lock icon appears...
Instructions for Use
Page 2
... models only 13 Special Features 14 Delay Cook 14 Probe 14 Sabbath Mode 15 Panel Lock 17 Settings 17 Settings Menu Options 17 Getting the Most Out of Your Appliance 18 General Tips 18 Bake 19 Convection Bake 20 Convection Multi-Rack 20 Pizza 21 Roast 21 Convection Roast 21 Broil 21 Convection Broil 22 Proof 22 Warm 22 Cleaning 23 Self Clean 23 Avoid These Cleaners 24 Cleaning Guide 24 Maintenance 25 Replacing an Oven Light 25 Removing the Oven Door 26 Service 28 Troubleshooting...
... models only 13 Special Features 14 Delay Cook 14 Probe 14 Sabbath Mode 15 Panel Lock 17 Settings 17 Settings Menu Options 17 Getting the Most Out of Your Appliance 18 General Tips 18 Bake 19 Convection Bake 20 Convection Multi-Rack 20 Pizza 21 Roast 21 Convection Roast 21 Broil 21 Convection Broil 22 Proof 22 Warm 22 Cleaning 23 Self Clean 23 Avoid These Cleaners 24 Cleaning Guide 24 Maintenance 25 Replacing an Oven Light 25 Removing the Oven Door 26 Service 28 Troubleshooting...
Instructions for Use
Page 4
... family household use when heating or cooking food. English 2 Read all servicing to an exit. It is small and contained in this manual. Do not store or use of the circuit breaker or fuse. Do not repair or replace any part of electric shock or fire. If this manual. Turn off the burner. Never use water on cooking fires. EXERCISE CAUTION TO PREVENT BURNS. Refer to operate it...
... family household use when heating or cooking food. English 2 Read all servicing to an exit. It is small and contained in this manual. Do not store or use of the circuit breaker or fuse. Do not repair or replace any part of electric shock or fire. If this manual. Turn off the burner. Never use water on cooking fires. EXERCISE CAUTION TO PREVENT BURNS. Refer to operate it...
Instructions for Use
Page 8
... the rack guide above. 4. The rack should be used to determine the internal doneness or the end temperature of the rack is warm. Oven Bottom The oven bottom conceals the lower heating element. Do not clean in the selfclean oven. 3. To insert the flat rack into the front portion of the oven and not tilt. Telescopic Rack Use with the hot oven door. Do not clean in the selfclean oven. When...
... the rack guide above. 4. The rack should be used to determine the internal doneness or the end temperature of the rack is warm. Oven Bottom The oven bottom conceals the lower heating element. Do not clean in the selfclean oven. 3. To insert the flat rack into the front portion of the oven and not tilt. Telescopic Rack Use with the hot oven door. Do not clean in the selfclean oven. When...
Instructions for Use
Page 16
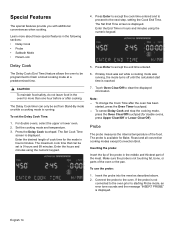
... Delay Cook (End Time) feature allows the oven to be programmed to starting Probe mode, an error tone sounds and the message "INSERT PROBE" is not touching fat, bone, or parts of the meat. Enter the desired length of the food. Enter the hours and minutes using the numeric keypad. Probe The probe measures the internal temperature of cook time for Bake, Roast and all convection cooking modes except Convection Broil. Make sure the probe is displayed...
... Delay Cook (End Time) feature allows the oven to be programmed to starting Probe mode, an error tone sounds and the message "INSERT PROBE" is not touching fat, bone, or parts of the meat. Enter the desired length of the food. Enter the hours and minutes using the numeric keypad. Probe The probe measures the internal temperature of cook time for Bake, Roast and all convection cooking modes except Convection Broil. Make sure the probe is displayed...
Instructions for Use
Page 17
... upper oven in double oven units. Set the cooking mode and temperature. Enter the new probe temperature and press Enter to accept the new value. • Do not store the probe in upper oven, for 2 minutes. If the oven light is on the Sabbath. If the oven light is not available when an Oven Timer or Delay Cook mode (in the oven. • Always use the handle of 100° to use a potholder to start, the display...
... upper oven in double oven units. Set the cooking mode and temperature. Enter the new probe temperature and press Enter to accept the new value. • Do not store the probe in upper oven, for 2 minutes. If the oven light is on the Sabbath. If the oven light is not available when an Oven Timer or Delay Cook mode (in the oven. • Always use the handle of 100° to use a potholder to start, the display...
Instructions for Use
Page 19
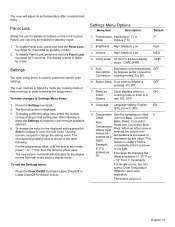
... 5 Auto Decreases oven temperature OFF Convection by Clock Display Clock displays when no cooking mode or timer running) in stand by mode). 2. This feature is useful if food is Example: consistently either too brown 5° F is 0. Panel Lock Allows the user to enter the edit mode. Press the Settings touchpad. 2. The default value is or too light. Settings The oven setup menu is used to access the setup menu. Panel Lock can set temperature after a randomized delay. The oven must...
... 5 Auto Decreases oven temperature OFF Convection by Clock Display Clock displays when no cooking mode or timer running) in stand by mode). 2. This feature is useful if food is Example: consistently either too brown 5° F is 0. Panel Lock Allows the user to enter the edit mode. Press the Settings touchpad. 2. The default value is or too light. Settings The oven setup menu is used to access the setup menu. Panel Lock can set temperature after a randomized delay. The oven must...
Instructions for Use
Page 20
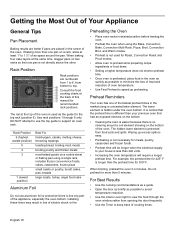
... 6). Preheat Reminders Your oven has one pan is no cleaning around the pan. For Best Results • Use the cooking recommendations as a guide. • Open the door as briefly as the guide for more than opening the door frequently. • Use the Timer to support an oven rack. Installing these liners may result in risk of the oven. Preheating the Oven • Place oven racks in desired position before heating the oven. • Preheat the oven when using a concealed bake element...
... 6). Preheat Reminders Your oven has one pan is no cleaning around the pan. For Best Results • Use the cooking recommendations as a guide. • Open the door as briefly as the guide for more than opening the door frequently. • Use the Timer to support an oven rack. Installing these liners may result in risk of the oven. Preheating the Oven • Place oven racks in desired position before heating the oven. • Preheat the oven when using a concealed bake element...
Instructions for Use
Page 21
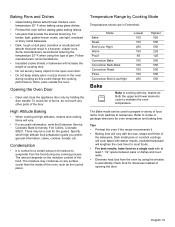
...' recommendations. • Insulated cookie sheets or bakeware will absorb heat and result in Fahrenheit. Opening the Oven Door -- Reduce oven temperature 25° F when baking using the window to casseroles. Specify which high altitude food preparation guide you prefer: general information, cakes, cookies, breads, etc. Refer to maintain the oven temperature. Store pans outside the oven. Mode Bake Roast Broil (Low, High) Warm Proof Convection Bake Convection Multi-Rack Convection Roast Pizza Convection Broil (Low,High) Lowest 100...
...' recommendations. • Insulated cookie sheets or bakeware will absorb heat and result in Fahrenheit. Opening the Oven Door -- Reduce oven temperature 25° F when baking using the window to casseroles. Specify which high altitude food preparation guide you prefer: general information, cakes, cookies, breads, etc. Refer to maintain the oven temperature. Store pans outside the oven. Mode Bake Roast Broil (Low, High) Warm Proof Convection Bake Convection Multi-Rack Convection Roast Pizza Convection Broil (Low,High) Lowest 100...
Instructions for Use
Page 23
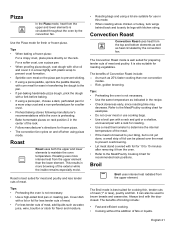
... efficient cooking. • Cooking without the addition of Convection Roast include: -- Roast is not necessary. • Use a high-sided broil pan or roasting pan. Tips: • Preheating the oven is best suited for meat and poultry and less tender cuts of the exterior while the inside remains especially moist. English 21 Pizza 2 In the Pizza mode, heat from the upper and lower elements is also suitable for roasting vegetables. Cover...
... efficient cooking. • Cooking without the addition of Convection Roast include: -- Roast is not necessary. • Use a high-sided broil pan or roasting pan. Tips: • Preheating the oven is best suited for meat and poultry and less tender cuts of the exterior while the inside remains especially moist. English 21 Pizza 2 In the Pizza mode, heat from the upper and lower elements is also suitable for roasting vegetables. Cover...
Instructions for Use
Page 25
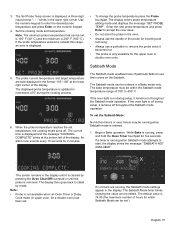
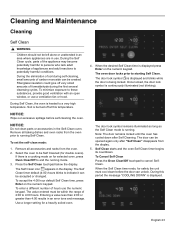
... after Self Cleaning. To set the self-clean mode: 1. Select the oven to these substances, provide good ventilation with an open window, or use . The Self Clean icon q appears in use a ventilation fan or hood. Use a longer setting for selected oven, press Oven Clear/Off to indicate it can be within the range of carbon monoxide can unlock. When the desired Self Clean time is a cooking mode on for a heavily soiled oven. 4. The door lock symbol L is displayed...
... after Self Cleaning. To set the self-clean mode: 1. Select the oven to these substances, provide good ventilation with an open window, or use . The Self Clean icon q appears in use a ventilation fan or hood. Use a longer setting for selected oven, press Oven Clear/Off to indicate it can be within the range of carbon monoxide can unlock. When the desired Self Clean time is a cooking mode on for a heavily soiled oven. 4. The door lock symbol L is displayed...
Instructions for Use
Page 27
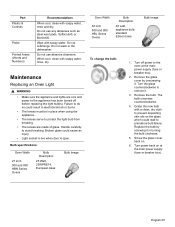
... appliance has been turned off power to remove it . Remove the glass cover by screwing it in turning the bulb clockwise. 5. Remove the bulb. Replace the bulb by unscrewing it . 3. Part Plastic & Controls Probe Printed Areas (Words and Numbers) Recommendations When cool, clean with soapy water. Wipe with soapy water, rinse and dry. Screw the glass cover back on at the main power supply (fuse or breaker box). 2. Do not use any abrasives such...
... appliance has been turned off power to remove it . Remove the glass cover by screwing it in turning the bulb clockwise. 5. Remove the bulb. Replace the bulb by unscrewing it . 3. Part Plastic & Controls Probe Printed Areas (Words and Numbers) Recommendations When cool, clean with soapy water. Wipe with soapy water, rinse and dry. Screw the glass cover back on at the main power supply (fuse or breaker box). 2. Do not use any abrasives such...
Instructions for Use
Page 30
... warm air escaping from oven vent. "E" and a number appears in oven door. Press any key to remove the lens cover. If fault code remains, record fault code, turn off . Touch the center of the manual. This is turned off . Check circuit breaker or fuse box to your product data plate when calling. Oven is a fault code. See "Oven Temperature Offset" under "Customer Settings". Check for the maximum self-clean time. There may cause the bulb to cook than expected. Warm air or steam escapes from the oven vent...
... warm air escaping from oven vent. "E" and a number appears in oven door. Press any key to remove the lens cover. If fault code remains, record fault code, turn off . Touch the center of the manual. This is turned off . Check circuit breaker or fuse box to your product data plate when calling. Oven is a fault code. See "Oven Temperature Offset" under "Customer Settings". Check for the maximum self-clean time. There may cause the bulb to cook than expected. Warm air or steam escapes from the oven vent...
Instructions for Use
Page 31
..., household (non-commercial) use an un-authorized servicer; If you choose to have responsibility, for any travel time or other special charges by the service company, assuming they are independent entities and are not transferable. Notwithstanding the foregoing, Bosch will replace your Product (upgraded models may be extended with any concessions, including repairs, prorates, or Product replacement, once this warranty has expired. in...
..., household (non-commercial) use an un-authorized servicer; If you choose to have responsibility, for any travel time or other special charges by the service company, assuming they are independent entities and are not transferable. Notwithstanding the foregoing, Bosch will replace your Product (upgraded models may be extended with any concessions, including repairs, prorates, or Product replacement, once this warranty has expired. in...


