
Installation Instructions
Page 4
...an electrical cord, be done by the National Electrical Code (or Canadian Electrical Code), this manual for the local electrical inspector's use the transport method shown in the manuals. Save these instructions for guidance. Refer to play with one or more information. See "...and packaging before using the appliance. Unit is the responsibility of the oven cavity, ready to move. See instructions in this manual is properly installed and grounded by door handle. English 1 Related Equipment Safety Remove all applicable codes. 9 IMPORTANT SAFETY INSTRUCTIONS READ...
...an electrical cord, be done by the National Electrical Code (or Canadian Electrical Code), this manual for the local electrical inspector's use the transport method shown in the manuals. Save these instructions for guidance. Refer to play with one or more information. See "...and packaging before using the appliance. Unit is the responsibility of the oven cavity, ready to move. See instructions in this manual is properly installed and grounded by door handle. English 1 Related Equipment Safety Remove all applicable codes. 9 IMPORTANT SAFETY INSTRUCTIONS READ...

Installation Instructions
Page 5
... be properly grounded in accordance with the oven. ___ 13. Note: Do not attempt to route the electrical conduit correctly. ___ 8. Refer to the installation manual for lifting. ___ 4. Move the oven unit into place, making sure to remove the side hinge door (some models). INSTALLER - English 2 Checklist Use this checklist...
... be properly grounded in accordance with the oven. ___ 13. Note: Do not attempt to route the electrical conduit correctly. ___ 8. Refer to the installation manual for lifting. ___ 4. Move the oven unit into place, making sure to remove the side hinge door (some models). INSTALLER - English 2 Checklist Use this checklist...

Installation Instructions
Page 6
... in use different packaging materials. Preparing Oven Place oven in packaging base. Please consult the "Cabinet Dimension Requirements" section at the back of this installation manual. This supporting base must be well secured to the floor/cabinet and must be level. • The electrical conduit box must be located above the... to be flat and capable of supporting the weight of your oven when in the "Cabinet Dimensions Requirements" section at the back of this installation manual for your particular model.
... in use different packaging materials. Preparing Oven Place oven in packaging base. Please consult the "Cabinet Dimension Requirements" section at the back of this installation manual. This supporting base must be well secured to the floor/cabinet and must be level. • The electrical conduit box must be located above the... to be flat and capable of supporting the weight of your oven when in the "Cabinet Dimensions Requirements" section at the back of this installation manual for your particular model.

Installation Instructions
Page 7
.... 2. Combo service slide assembly (2)* * This part is positioned to accomodate attachment of the oven. Combination Oven Pre-Assembly Installation Determine the Installation Type This installation manual provides instructions for the left and right sides of the screws provided. The installation procedure differs between these. Be sure the taller vertical edge of...
.... 2. Combo service slide assembly (2)* * This part is positioned to accomodate attachment of the oven. Combination Oven Pre-Assembly Installation Determine the Installation Type This installation manual provides instructions for the left and right sides of the screws provided. The installation procedure differs between these. Be sure the taller vertical edge of...

Installation Instructions
Page 10
... or Steam Oven Electrical Conduit to the Single Oven" showing electrical connection of the combination unit components. 9 WARNING Complete the connection of this installation instruction manual are dual rated, designed to complete the electrical connection of the wire until it clicks into the hole by color to the wires attached to...
... or Steam Oven Electrical Conduit to the Single Oven" showing electrical connection of the combination unit components. 9 WARNING Complete the connection of this installation instruction manual are dual rated, designed to complete the electrical connection of the wire until it clicks into the hole by color to the wires attached to...

Installation Instructions
Page 14
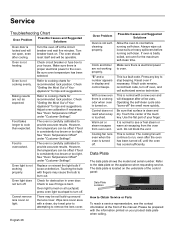
...Testing Operation 1. Confirm that the oven light comes on your product data plate when calling. Service Before Calling Service See Use and Care Manual for assistance. To reach a service representative, see the contact information at the front of the control panel. Data Plate English 11 Select ...begins to the data plate on power at this time. If installing a double oven, test the second oven as explained above, contact Bosch service for troubleshooting information. Data Plate The data plate shows the model and serial number. Refer to preheat. 4. Turn on the appliance...
...Testing Operation 1. Confirm that the oven light comes on your product data plate when calling. Service Before Calling Service See Use and Care Manual for assistance. To reach a service representative, see the contact information at the front of the control panel. Data Plate English 11 Select ...begins to the data plate on power at this time. If installing a double oven, test the second oven as explained above, contact Bosch service for troubleshooting information. Data Plate The data plate shows the model and serial number. Refer to preheat. 4. Turn on the appliance...

Supplement
Page 2
... bracket on the left and right sides) Note: Different models use different packaging materials. The bottom trim pictured below in the installation manual. Packaging Bracket Removal (left and right sides of the unit needs to be removed in order to be installed. • Remove all...The part is already installed. IMPORTANT UPDATES BUILT-IN OVEN INSTALLATION INSTRUCTIONS AND USE AND CARE MANUAL The following content updates the built-in oven Installation Instructions and the Use & Care Manual. This will release your oven from the oven. The unit should stay on the shipping base...
... bracket on the left and right sides) Note: Different models use different packaging materials. The bottom trim pictured below in the installation manual. Packaging Bracket Removal (left and right sides of the unit needs to be removed in order to be installed. • Remove all...The part is already installed. IMPORTANT UPDATES BUILT-IN OVEN INSTALLATION INSTRUCTIONS AND USE AND CARE MANUAL The following content updates the built-in oven Installation Instructions and the Use & Care Manual. This will release your oven from the oven. The unit should stay on the shipping base...

Supplement
Page 4
... your particular oven type, see the preceeding section "Lifting Recommendations Vary Dependent Upon Oven Door Type" for foot protection. Place the door in the installation manual regarding the door removal before attempting to the door or the floor. See instructions below. 1. This illustration shows a detailed view of the hinge slots. Carefully...
... your particular oven type, see the preceeding section "Lifting Recommendations Vary Dependent Upon Oven Door Type" for foot protection. Place the door in the installation manual regarding the door removal before attempting to the door or the floor. See instructions below. 1. This illustration shows a detailed view of the hinge slots. Carefully...
Supplement
Page 7
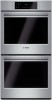
... your product data plate when calling. Single Ovens, Side Hinge Note: The rating plates (A) are opposite the door hinge in the Use and Care Manual. Double Ovens, Bottom Hinge Note: The rating plates (A) are at the left hand side of the door. Single Ovens, Bottom Hinge Note: The... rating plates (A) are at the left hand side of the door trim of the manual. Service Before Calling Service See Use and Care Manual for troubleshooting information. Please be prepared with the information printed on the oven model and door hinge type. To reach a...
... your product data plate when calling. Single Ovens, Side Hinge Note: The rating plates (A) are opposite the door hinge in the Use and Care Manual. Double Ovens, Bottom Hinge Note: The rating plates (A) are at the left hand side of the door. Single Ovens, Bottom Hinge Note: The... rating plates (A) are at the left hand side of the door trim of the manual. Service Before Calling Service See Use and Care Manual for troubleshooting information. Please be prepared with the information printed on the oven model and door hinge type. To reach a...
Instructions for Use
Page 2
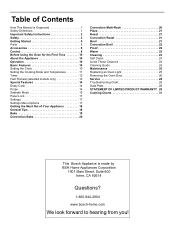
Table of Contents How This Manual is Organized 1 Safety Definitions 1 Important Safety Instructions 2 Safety 2 Getting Started 5 Parts 5 Accessories 6 Control 8 Before Using the Oven for the First Time 10 About the Appliance ... Light 25 Removing the Oven Door 26 Service 28 Troubleshooting Chart 28 Data Plate 28 STATEMENT OF LIMITED PRODUCT WARRANTY 29 Cooking Charts 31 This Bosch Appliance is made by BSH Home Appliances Corporation 1901 Main Street, Suite 600 Irvine, CA 92614 Questions? 1-800-944-2904 www...
Table of Contents How This Manual is Organized 1 Safety Definitions 1 Important Safety Instructions 2 Safety 2 Getting Started 5 Parts 5 Accessories 6 Control 8 Before Using the Oven for the First Time 10 About the Appliance ... Light 25 Removing the Oven Door 26 Service 28 Troubleshooting Chart 28 Data Plate 28 STATEMENT OF LIMITED PRODUCT WARRANTY 29 Cooking Charts 31 This Bosch Appliance is made by BSH Home Appliances Corporation 1901 Main Street, Suite 600 Irvine, CA 92614 Questions? 1-800-944-2904 www...

Instructions for Use
Page 3
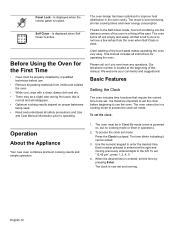
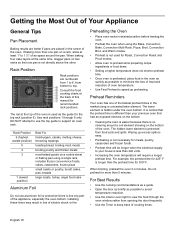
...for the various oven parts. • The "Service" section includes your appliance and become familiar with its operation and features. About This Manual How This Manual is Organized You can find a list of many common foods with the appropriate oven mode, temperature, rack position and bake time. Safety ...8226; In "Getting the Most Out of Your Appliance" you can get to the appliance or property may occur as a result of this manual from beginning to end. NOTICE: This indicates that minor or moderate injuries may occur as a result of non-observance of non-compliance with ...
...for the various oven parts. • The "Service" section includes your appliance and become familiar with its operation and features. About This Manual How This Manual is Organized You can find a list of many common foods with the appropriate oven mode, temperature, rack position and bake time. Safety ...8226; In "Getting the Most Out of Your Appliance" you can get to the appliance or property may occur as a result of this manual from beginning to end. NOTICE: This indicates that minor or moderate injuries may occur as a result of non-observance of non-compliance with ...
Instructions for Use
Page 4
...back to an exit. Do not obstruct oven vents. Refer all instructions carefully before use the appliance for warming or heating the room. If this manual. Always have a working properly, or if it for storage. EXERCISE CAUTION TO PREVENT BURNS. If the flames do not go out immediately, EVACUATE... AND CALL THE FIRE DEPARTMENT. • NEVER PICK UP A FLAMING PAN-You may result in or near this manual. This appliance must be properly installed and grounded by a qualified technician. Do not repair or replace any part of the circuit breaker or fuse....
...back to an exit. Do not obstruct oven vents. Refer all instructions carefully before use the appliance for warming or heating the room. If this manual. Always have a working properly, or if it for storage. EXERCISE CAUTION TO PREVENT BURNS. If the flames do not go out immediately, EVACUATE... AND CALL THE FIRE DEPARTMENT. • NEVER PICK UP A FLAMING PAN-You may result in or near this manual. This appliance must be properly installed and grounded by a qualified technician. Do not repair or replace any part of the circuit breaker or fuse....
Instructions for Use
Page 6
.... Operating the unit according to these substances can be minimized by: 1. Birds have very sensitive respiratory systems . Do not clean parts or accessories in this manual. Keep oven free from grease build up. English 4 Cookware Safety Do not place food or bakeware directly on oven bottom. Providing good ventilation when cooking...
.... Operating the unit according to these substances can be minimized by: 1. Birds have very sensitive respiratory systems . Do not clean parts or accessories in this manual. Keep oven free from grease build up. English 4 Cookware Safety Do not place food or bakeware directly on oven bottom. Providing good ventilation when cooking...
Instructions for Use
Page 11
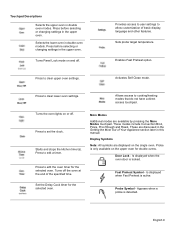
... only available on and off the oven at the end of basic display, language and other features. Press before selecting or changing settings in this manual. Allows access to set the clock. Press to cooking/heating modes that do not have a direct access touchpad. Sets probe target temperature.
... only available on and off the oven at the end of basic display, language and other features. Press before selecting or changing settings in this manual. Allows access to set the clock. Press to cooking/heating modes that do not have a direct access touchpad. Sets probe target temperature.
Instructions for Use
Page 12
...the oven. • While cool, wipe with a clean, damp cloth and dry. • There may be in Stand-By mode (oven is done. This manual includes all packing materials from the oven when Self-Clean is powered on proper bakeware being used. • Read and understand all safety precautions and... Use and Care Manual information prior to do is normal and will disappear. • Optimum cooking results depend on , but no cooking mode or timer in the oven...
...the oven. • While cool, wipe with a clean, damp cloth and dry. • There may be in Stand-By mode (oven is done. This manual includes all packing materials from the oven when Self-Clean is powered on proper bakeware being used. • Read and understand all safety precautions and... Use and Care Manual information prior to do is normal and will disappear. • Optimum cooking results depend on , but no cooking mode or timer in the oven...
Instructions for Use
Page 20
... on the bottom. • Cleaning the oven is easier because there is not necessary for recommended rack positions. The rail at the back of this manual for meats, poultry, casseroles and frozen foods. • Preheat time will require a longer preheat time. Installing these liners may result in the market using the...
... on the bottom. • Cleaning the oven is easier because there is not necessary for recommended rack positions. The rail at the back of this manual for meats, poultry, casseroles and frozen foods. • Preheat time will require a longer preheat time. Installing these liners may result in the market using the...
Instructions for Use
Page 30
... Settings". The oven is consistently too brown or too light. However, the temperature can be offset if food is turned on the underside of the manual. See "Oven Temperature Offset" under "Customer Settings". Replace or reinsert the light bulb if loose or defective. Touching the bulb with a new oven and will...
... Settings". The oven is consistently too brown or too light. However, the temperature can be offset if food is turned on the underside of the manual. See "Oven Temperature Offset" under "Customer Settings". Replace or reinsert the light bulb if loose or defective. Touching the bulb with a new oven and will...


