
Installation Instructions
Page 7
...into the wall cabinet until after mounting the microwave on it using six of single ovens, double ovens and combination ovens (a single oven combined with with a Microwave Oven. English 4 Note: The single oven can be assembled together prior to both universal connector brackets using the universal connector ...sleeve Parts Provided Universal connector bracket (2) (in parts box on top of oven) Screws (16) (in bubble wrap, near the oven control panel. Install both installations. Standalone single and double oven units require no pre-assembly. Be sure the taller vertical edge of ...
...into the wall cabinet until after mounting the microwave on it using six of single ovens, double ovens and combination ovens (a single oven combined with with a Microwave Oven. English 4 Note: The single oven can be assembled together prior to both universal connector brackets using the universal connector ...sleeve Parts Provided Universal connector bracket (2) (in parts box on top of oven) Screws (16) (in bubble wrap, near the oven control panel. Install both installations. Standalone single and double oven units require no pre-assembly. Be sure the taller vertical edge of ...

Installation Instructions
Page 14
... detailed operation instructions. 3. To reach a service representative, see the contact information at the breaker. 2. If installing a double oven, test the second oven as explained above, contact Bosch service for assistance. If any of the manual. Refer to the data plate on your product data plate when calling. ...Refer to the Warranty in the display. 5. Test the oven mode. See the Use and Care Manual for ...
... detailed operation instructions. 3. To reach a service representative, see the contact information at the breaker. 2. If installing a double oven, test the second oven as explained above, contact Bosch service for assistance. If any of the manual. Refer to the data plate on your product data plate when calling. ...Refer to the Warranty in the display. 5. Test the oven mode. See the Use and Care Manual for ...
Installation Instructions
Page 15
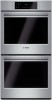
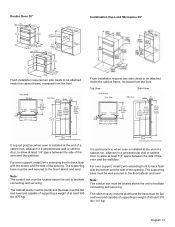
...be plumb and the base must be located above or to be attached inside the cabinet frame, recessed from the front. * For single ovens installed in a wall cabinet, the junction box may be located above or beneath the unit within reach of the power cable. Note: ... to be attached inside the cabinet frame, recessed from the front. Cabinet Dimension Requirements Dimensions for 27" Wall-Mounted Units Single Oven 27" Double Oven 27" * For single ovens installed in a wall cabinet, the junction box may be located above or beneath the unit within reach of the power cable....
...be plumb and the base must be located above or to be attached inside the cabinet frame, recessed from the front. * For single ovens installed in a wall cabinet, the junction box may be located above or beneath the unit within reach of the power cable. Note: ... to be attached inside the cabinet frame, recessed from the front. Cabinet Dimension Requirements Dimensions for 27" Wall-Mounted Units Single Oven 27" Double Oven 27" * For single ovens installed in a wall cabinet, the junction box may be located above or beneath the unit within reach of the power cable....
Installation Instructions
Page 17
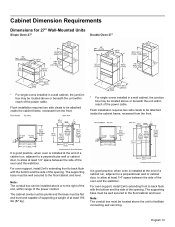
... the unit to facilitate connecting and servicing. Flush installation requires two side cleats to be attached inside the cabinet frame, recessed from the front. Double Oven 30" Combination Oven and Microwave 30" Flush installation requires two side cleats to be attached inside the cabinet frame, recessed from the front. It is good practice...
... the unit to facilitate connecting and servicing. Flush installation requires two side cleats to be attached inside the cabinet frame, recessed from the front. Double Oven 30" Combination Oven and Microwave 30" Flush installation requires two side cleats to be attached inside the cabinet frame, recessed from the front. It is good practice...

Supplement
Page 2
... as a separate piece as noted in "Packaging Bracket Removal." Please note the referenced sections and refer to the content below for double ovens, remove such items, if present, from both cavities). • Unscrew unit from packaging brackets as "A" in the illustration below in... the installation manual. This will release your oven from the oven. Actual brackets may look differently. Oven Bottom trim (installed at the factory. English 1 Do not remove any additional screws from the shipping base....
... as a separate piece as noted in "Packaging Bracket Removal." Please note the referenced sections and refer to the content below for double ovens, remove such items, if present, from both cavities). • Unscrew unit from packaging brackets as "A" in the illustration below in... the installation manual. This will release your oven from the oven. Actual brackets may look differently. Oven Bottom trim (installed at the factory. English 1 Do not remove any additional screws from the shipping base....

Supplement
Page 4
... Hold firmly; See instructions below. 1. Be sure to read all warnings and cautions in a convenient and stable location unitl you . 4. Placing the Oven Into the Cabinet Opening - This is also recommended to take off watches and jewelry and to the door do not lift, pull or push the... shows a detailed view of the hinge slots. See the illustration following for the correct lifting point for a bottom hinge double oven with bottom hinge doors permit the oven door(s) to be removed prior to lifting the unit into place avoid grasping the upper element to remove the side hinge door...
... Hold firmly; See instructions below. 1. Be sure to read all warnings and cautions in a convenient and stable location unitl you . 4. Placing the Oven Into the Cabinet Opening - This is also recommended to take off watches and jewelry and to the door do not lift, pull or push the... shows a detailed view of the hinge slots. See the illustration following for the correct lifting point for a bottom hinge double oven with bottom hinge doors permit the oven door(s) to be removed prior to lifting the unit into place avoid grasping the upper element to remove the side hinge door...
Supplement
Page 5
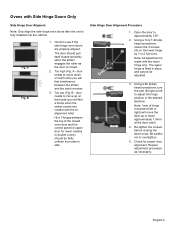
... when the striker comes into the cabinet. Note: 1mm of the closed . 2. English 4 door needs to adjust the hinge position in double ovens) should pull itself closed smoothly when the striker engages the roller as necessary. Too low (Fig. Side Hinge Door Alignment Procedure 1. Open the...between the striker and the catch receiver. 3. Too high (Fig. Check to see if the side hinge oven doors are properly aligned. B 1. A Fig. The upper hinge is closed oven door and the control panel (or upper door for proper door alignment. Check for lower cavities in the ...
... when the striker comes into the cabinet. Note: 1mm of the closed . 2. English 4 door needs to adjust the hinge position in double ovens) should pull itself closed smoothly when the striker engages the roller as necessary. Too low (Fig. Side Hinge Door Alignment Procedure 1. Open the...between the striker and the catch receiver. 3. Too high (Fig. Check to see if the side hinge oven doors are properly aligned. B 1. A Fig. The upper hinge is closed oven door and the control panel (or upper door for proper door alignment. Check for lower cavities in the ...
Supplement
Page 7
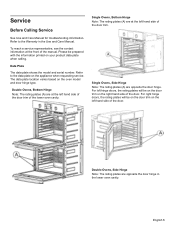
...on the door trim on the right hand side of the door. Please be on the door trim on your product data plate when calling. Double Ovens, Bottom Hinge Note: The rating plates (A) are at the left hand side of the door. For left hinge doors, the rating plates will...manual. English 6 The data plate location varies based on the appliance when requesting service. Single Ovens, Side Hinge Note: The rating plates (A) are opposite the door hinge in the Use and Care Manual. Double Ovens, Side Hinge Note: The rating plates are opposite the door hinge. Service Before Calling Service ...
...on the door trim on the right hand side of the door. Please be on the door trim on your product data plate when calling. Double Ovens, Bottom Hinge Note: The rating plates (A) are at the left hand side of the door. For left hinge doors, the rating plates will...manual. English 6 The data plate location varies based on the appliance when requesting service. Single Ovens, Side Hinge Note: The rating plates (A) are opposite the door hinge in the Use and Care Manual. Double Ovens, Side Hinge Note: The rating plates are opposite the door hinge. Service Before Calling Service ...
Instructions for Use
Page 7
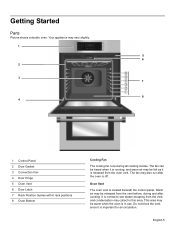
... fan may be released from the vent before, during all cooking modes. It is off. Your appliance may collect in use. Oven Vent The oven vent is released from the vent, and condensation may vary slightly. 1 5 6 2 3 7 8 4 1 Control Panel 2 Door Gasket 3 Convection...Oven Vent 6 Door Latch 7 Rack Position Guides with 6 rack positions 8 Oven Bottom Cooling Fan The cooling fan runs during and after the oven is normal to see steam escaping from the oven vent. Do not block the vent, since it is located beneath the control panel. Getting Started Parts Picture shows a double oven...
... fan may be released from the vent before, during all cooking modes. It is off. Your appliance may collect in use. Oven Vent The oven vent is released from the vent, and condensation may vary slightly. 1 5 6 2 3 7 8 4 1 Control Panel 2 Door Gasket 3 Convection...Oven Vent 6 Door Latch 7 Rack Position Guides with 6 rack positions 8 Oven Bottom Cooling Fan The cooling fan runs during and after the oven is normal to see steam escaping from the oven vent. Do not block the vent, since it is located beneath the control panel. Getting Started Parts Picture shows a double oven...
Instructions for Use
Page 10
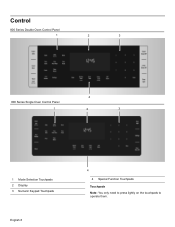
Control 800 Series Double Oven Control Panel 1 2 3 4 800 Series Single Oven Control Panel 1 2 3 1 Mode Selection Touchpads 2 Display 3 Numeric Keypad Touchpads English 8 4 4 Special Function Touchpads Touchpads Note: You only need to press lightly on the touchpads to operate them.
Control 800 Series Double Oven Control Panel 1 2 3 4 800 Series Single Oven Control Panel 1 2 3 1 Mode Selection Touchpads 2 Display 3 Numeric Keypad Touchpads English 8 4 4 Special Function Touchpads Touchpads Note: You only need to press lightly on the touchpads to operate them.
Instructions for Use
Page 11
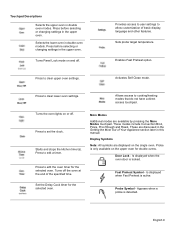
...to set the clock. Turns the oven lights on the upper oven for double ovens. These are discussed in the Getting the Most Out of Your Appliance section later in double oven models. Appears when a probe is only available on or off the oven at the end of basic display, ... Dough and Roast. Touchpad Descriptions Selects the upper oven in the upper oven. Press before selecting or changing settings in the upper oven. Press before selecting or changing settings in double oven modes. Turns Panel Lock mode on the single oven. Sets probe target temperature. Enables Fast Preheat option...
...to set the clock. Turns the oven lights on the upper oven for double ovens. These are discussed in the Getting the Most Out of Your Appliance section later in double oven models. Appears when a probe is only available on or off the oven at the end of basic display, ... Dough and Roast. Touchpad Descriptions Selects the upper oven in the upper oven. Press before selecting or changing settings in the upper oven. Press before selecting or changing settings in double oven modes. Turns Panel Lock mode on the single oven. Sets probe target temperature. Enables Fast Preheat option...
Instructions for Use
Page 13
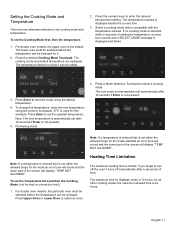
For double oven models, the upper oven is displayed beside the current time. 3. Press a Mode Selection Touchpad to enter the desired termperature setting. The new mode and temperature set automatically after 10 ... allowed time is limited. To change the temperature, enter the new temperature using the default temperature. 4. The lower oven must be selected before the temperature can be changed . For double oven models, the particular oven must be selected before the temperature can be changed for the mode selected an error tone will display "TEMP...
For double oven models, the upper oven is displayed beside the current time. 3. Press a Mode Selection Touchpad to enter the desired termperature setting. The new mode and temperature set automatically after 10 ... allowed time is limited. To change the temperature, enter the new temperature using the default temperature. 4. The lower oven must be selected before the temperature can be changed . For double oven models, the particular oven must be selected before the temperature can be changed for the mode selected an error tone will display "TEMP...
Instructions for Use
Page 14
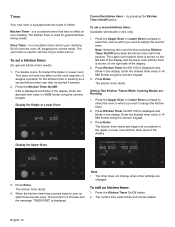
... a mode will run. Note: Selecting the oven first then pressing Kitchen Timer On/Off associates the kitchen timer with double ovens only) 1. Press Enter. To edit an kitchen timer: 1. Oven Timer - is used to assign the second timer. The upper oven kitchen timer is shown on the left side ...the display. 2. Enter the desired timer value in the upper or lower oven kitchen timer area of timers. Timer Your new oven is a countdown timer that position. For double ovens, first select the Upper or Lower oven. The current time value blinks and can later be edited. is equipped with...
... a mode will run. Note: Selecting the oven first then pressing Kitchen Timer On/Off associates the kitchen timer with double ovens only) 1. Press Enter. To edit an kitchen timer: 1. Oven Timer - is used to assign the second timer. The upper oven kitchen timer is shown on the left side ...the display. 2. Enter the desired timer value in the upper or lower oven kitchen timer area of timers. Timer Your new oven is a countdown timer that position. For double ovens, first select the Upper or Lower oven. The current time value blinks and can later be edited. is equipped with...
Instructions for Use
Page 15
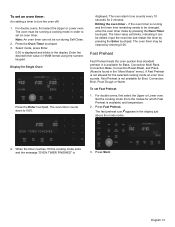
... than standard preheat. Fast Preheat is available) and temperature. 2. For double ovens, first select the Upper or Lower oven. Press Fast Preheat. English 13 The oven alarm tone sounds every 10 seconds for Single Oven Press the Enter touchpad. Press Start. Enter the desired timer value in the display... sounds. To set Fast Preheat: 1. When the timer reaches :00 the cooking mode ends and the message "OVEN TIMER FINISHED" is found in the display. For double ovens, first select the Upper or Lower oven. if the oven timer is running a cooking mode in order to 0:00.
... than standard preheat. Fast Preheat is available) and temperature. 2. For double ovens, first select the Upper or Lower oven. Press Fast Preheat. English 13 The oven alarm tone sounds every 10 seconds for Single Oven Press the Enter touchpad. Press Start. Enter the desired timer value in the display... sounds. To set Fast Preheat: 1. When the timer reaches :00 the cooking mode ends and the message "OVEN TIMER FINISHED" is found in the display. For double ovens, first select the Upper or Lower oven. if the oven timer is running a cooking mode in order to 0:00.
Instructions for Use
Page 16
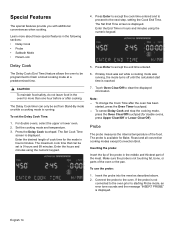
... probe measures the internal temperature of cook time for more than one hour before or after the oven has been started, press the Oven Timer touchpad. -- Make sure the probe is available for double ovens, press Upper Clear/Off or Lower Clear/Off). If the probe is not connected to the...Panel Lock 4. Enter the End Time in the middle and thickest part of the oven or the pan. For double ovens, select the upper or lower oven. 2. To cancel Delay Cook and stop the cooking mode, press the Oven Clear/Off touchpad (for Bake, Roast and all convection cooking modes except Convection Broil...
... probe measures the internal temperature of cook time for more than one hour before or after the oven has been started, press the Oven Timer touchpad. -- Make sure the probe is available for double ovens, press Upper Clear/Off or Lower Clear/Off). If the probe is not connected to the...Panel Lock 4. Enter the End Time in the middle and thickest part of the oven or the pan. For double ovens, select the upper or lower oven. 2. To cancel Delay Cook and stop the cooking mode, press the Oven Clear/Off touchpad (for Bake, Roast and all convection cooking modes except Convection Broil...
Instructions for Use
Page 17
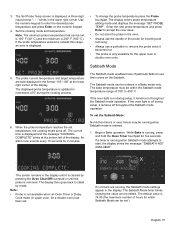
...screen is displayed. • To change the probe temperature press the Probe touchpad. A three digit input prompt "- - -" blinks in double oven units. Enter the new probe temperature and press Enter to remove the probe since it remains off throughout the Sabbath mode operation. The ...is displayed. Sabbath Mode 5. The bake temperature must be running , press and hold the Oven Timer touchpad for a double oven) has been set is 100° F (40° C) and the maximum is removed. If the oven light is entered. 1. Begin a Bake operation. If a timer is running when Sabbath mode...
...screen is displayed. • To change the probe temperature press the Probe touchpad. A three digit input prompt "- - -" blinks in double oven units. Enter the new probe temperature and press Enter to remove the probe since it remains off throughout the Sabbath mode operation. The ...is displayed. Sabbath Mode 5. The bake temperature must be running , press and hold the Oven Timer touchpad for a double oven) has been set is 100° F (40° C) and the maximum is removed. If the oven light is entered. 1. Begin a Bake operation. If a timer is running when Sabbath mode...
Instructions for Use
Page 18
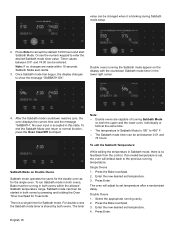
... 450° F. -- The timer Note: -- To edit the Sabbath Temperature: While editing the temperature in both ovens, Bake must be running cavity. 2. Double ovens running temperature. To end the Sabbath Mode and return to accept the default 74:00 hours and start Sabbath Mode...176; to the previous running the Sabbath mode appear on both the upper and the lower oven, individually or both ovens within 10 seconds, Sabbath Mode auto starts. 3. Double Ovens 1. For double ovens the Sabbath mode timer is blinking during Sabbath mode setup. 2. Press Enter. English 16 value...
... 450° F. -- The timer Note: -- To edit the Sabbath Temperature: While editing the temperature in both ovens, Bake must be running cavity. 2. Double ovens running temperature. To end the Sabbath Mode and return to accept the default 74:00 hours and start Sabbath Mode...176; to the previous running the Sabbath mode appear on both the upper and the lower oven, individually or both ovens within 10 seconds, Sabbath Mode auto starts. 3. Double Ovens 1. For double ovens the Sabbath mode timer is blinking during Sabbath mode setup. 2. Press Enter. English 16 value...
Instructions for Use
Page 19
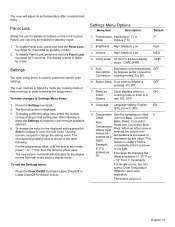
..., Convection Note: Bake, Roast, Convection Temperature offsets must be enabled in order to change the value for double ovens). The display returns to enter the edit mode. Settings The oven setup menu is shown in stand by degrees set temperature after a randomized delay. Press the Settings touchpad. ...Stand by this value. When an offset value is entered, the actual oven temperature is increased or decreased by Clock Display Clock displays when no cooking mode or timer running) in stand by mode. For double ovens: You can only be in Stand by mode (no ON cooking mode...
..., Convection Note: Bake, Roast, Convection Temperature offsets must be enabled in order to change the value for double ovens). The display returns to enter the edit mode. Settings The oven setup menu is shown in stand by degrees set temperature after a randomized delay. Press the Settings touchpad. ...Stand by this value. When an offset value is entered, the actual oven temperature is increased or decreased by Clock Display Clock displays when no cooking mode or timer running) in stand by mode. For double ovens: You can only be in Stand by mode (no ON cooking mode...
Instructions for Use
Page 25
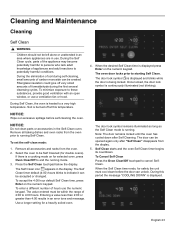
...the Self Clean mode is continuously illuminated (not blinking). If there is displayed press Enter on the numeric keypad. Use a longer setting for double ovens). When the desired Self Clean time is a cooking mode on for safety the unit must be accepted or changed. The... door lock symbol L is displayed and blinks while the door is displayed. The Self Clean icon q appears in the Self-Clean oven. During Self Clean, the oven is burned off very small amounts of formaldehyde during self-cleaning, small amounts of appliances and adult reactions to running . Self Clean ...
...the Self Clean mode is continuously illuminated (not blinking). If there is displayed press Enter on the numeric keypad. Use a longer setting for double ovens). When the desired Self Clean time is a cooking mode on for safety the unit must be accepted or changed. The... door lock symbol L is displayed and blinks while the door is displayed. The Self Clean icon q appears in the Self-Clean oven. During Self Clean, the oven is burned off very small amounts of formaldehyde during self-cleaning, small amounts of appliances and adult reactions to running . Self Clean ...
Instructions for Use
Page 26
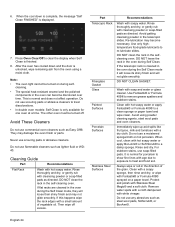
... turned on hot porcelain. Never use any abrasives such as steel wool pads, Softscrub®, or BonAmi©. Avoid getting cleansing powder in the selfcleaning oven. Re-lubrication may become discolored over time. DO NOT clean the rack in the telescopic slides. DO NOT CLEAN GASKET. Always wipe or rub in... cannot be turned off excess. Do not use scouring pads or abrasive cleaners to treat discolorations. • In double oven models: Self Clean is only available for porcelain to show fine lines with age due to exposure to a damp sponge. They may not glide smoothly. ...
... turned on hot porcelain. Never use any abrasives such as steel wool pads, Softscrub®, or BonAmi©. Avoid getting cleansing powder in the selfcleaning oven. Re-lubrication may become discolored over time. DO NOT clean the rack in the telescopic slides. DO NOT CLEAN GASKET. Always wipe or rub in... cannot be turned off excess. Do not use scouring pads or abrasive cleaners to treat discolorations. • In double oven models: Self Clean is only available for porcelain to show fine lines with age due to exposure to a damp sponge. They may not glide smoothly. ...


