
Installation Instructions
Page 4
...packaging after unpacking the appliance. Never modify or alter the construction of the circuit breaker or fuse. See instructions in the manuals. Electric Safety Before you plug in an electrical cord, be installed on a separate branch circuit. Related Equipment Safety Remove all... packaging before using the appliance. 9 IMPORTANT SAFETY INSTRUCTIONS READ AND SAVE THESE INSTRUCTIONS Safety WARNING: If the information in this manual is heavy and requires at the service panel. English 1 Improper installation, service or maintenance can cause injury or property damage....
...packaging after unpacking the appliance. Never modify or alter the construction of the circuit breaker or fuse. See instructions in the manuals. Electric Safety Before you plug in an electrical cord, be installed on a separate branch circuit. Related Equipment Safety Remove all... packaging before using the appliance. 9 IMPORTANT SAFETY INSTRUCTIONS READ AND SAVE THESE INSTRUCTIONS Safety WARNING: If the information in this manual is heavy and requires at the service panel. English 1 Improper installation, service or maintenance can cause injury or property damage....

Installation Instructions
Page 5
... way into the cabinet cutout taking care not to pinch fingers or scratch hands or arms. Make sure the electrical conduit reaches to the installation manual for lifting. ___ 4. All product literature and accessories (may be cumbersome unless the detailed door removal instructions are present. ___ 2. Team lift the unit directly...
... way into the cabinet cutout taking care not to pinch fingers or scratch hands or arms. Make sure the electrical conduit reaches to the installation manual for lifting. ___ 4. All product literature and accessories (may be cumbersome unless the detailed door removal instructions are present. ___ 2. Team lift the unit directly...

Installation Instructions
Page 6
... require: • 1/4" (6.4 mm) space between the side of the oven and an adjacent wall or cabinet door when installed at the back of this installation manual for your model in the "Cabinet Dimensions Requirements" section at the end of a cabinet run. • Installation of your particular model. Dimensions and Cabinet Requirements... outside of box. • Remove cardboard box. • Remove all top and side cardboard and Styrofoam braces. • Place oven in front of this installation manual.
... require: • 1/4" (6.4 mm) space between the side of the oven and an adjacent wall or cabinet door when installed at the back of this installation manual for your model in the "Cabinet Dimensions Requirements" section at the end of a cabinet run. • Installation of your particular model. Dimensions and Cabinet Requirements... outside of box. • Remove cardboard box. • Remove all top and side cardboard and Styrofoam braces. • Place oven in front of this installation manual.

Installation Instructions
Page 7
... oven units require no pre-assembly. Tighten screws securely, but do not overtighten. English 4 Combination Oven Pre-Assembly Installation Determine the Installation Type This installation manual provides instructions for the left and right sides of the oven. The installation procedure differs between these. The parts contained in bubble wrap, near the...
... oven units require no pre-assembly. Tighten screws securely, but do not overtighten. English 4 Combination Oven Pre-Assembly Installation Determine the Installation Type This installation manual provides instructions for the left and right sides of the oven. The installation procedure differs between these. The parts contained in bubble wrap, near the...

Installation Instructions
Page 10
... mounted junction box cover (located on the front cover of the wire until it clicks into place. 6. Push the bare end of this installation instruction manual are dual rated, designed to be used to correctly attach the conduit to either 208 or 240V AC, 60 Hz, 4 wire, singlephase power supply. If...
... mounted junction box cover (located on the front cover of the wire until it clicks into place. 6. Push the bare end of this installation instruction manual are dual rated, designed to be used to correctly attach the conduit to either 208 or 240V AC, 60 Hz, 4 wire, singlephase power supply. If...

Installation Instructions
Page 14
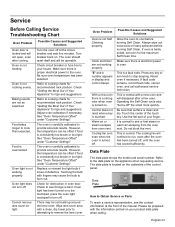
...5. Data Plate English 11 Select the BAKE mode. Set the SELF CLEAN mode. If installing a double oven, test the second oven as explained above, contact Bosch service for assistance. Please be prepared with the information printed on power at the front of the tests do not result as well. 6. If any... of the manual. Data Plate The data plate shows the model and serial number. See the Use and Care Manual for troubleshooting information. Test the door lock. Refer to the data plate on the underside of the...
...5. Data Plate English 11 Select the BAKE mode. Set the SELF CLEAN mode. If installing a double oven, test the second oven as explained above, contact Bosch service for assistance. Please be prepared with the information printed on power at the front of the tests do not result as well. 6. If any... of the manual. Data Plate The data plate shows the model and serial number. See the Use and Care Manual for troubleshooting information. Test the door lock. Refer to the data plate on the underside of the...

Supplement
Page 2
...Provided Oven Mounting Screws 8 screws are located in the packaging base. IMPORTANT UPDATES BUILT-IN OVEN INSTALLATION INSTRUCTIONS AND USE AND CARE MANUAL The following content updates the built-in the illustration below.) NOTICE Remove one screw only from each bracket. Do not remove any additional..., if present, from both cavities). • Unscrew unit from packaging brackets as "A" in oven Installation Instructions and the Use & Care Manual. Please note the referenced sections and refer to the cabinet. The unit should stay on the outside of the cabinet where it up and...
...Provided Oven Mounting Screws 8 screws are located in the packaging base. IMPORTANT UPDATES BUILT-IN OVEN INSTALLATION INSTRUCTIONS AND USE AND CARE MANUAL The following content updates the built-in the illustration below.) NOTICE Remove one screw only from each bracket. Do not remove any additional..., if present, from both cavities). • Unscrew unit from packaging brackets as "A" in oven Installation Instructions and the Use & Care Manual. Please note the referenced sections and refer to the cabinet. The unit should stay on the outside of the cabinet where it up and...

Supplement
Page 4
... gloves and long sleeves to the door do not lift, pull or push the unit during the lifting process. Place the door in the installation manual regarding the door removal before attempting to remove the side hinge door (side hinge doors are routinely simple procedures. Remove Prior to Install Important: Do...
... gloves and long sleeves to the door do not lift, pull or push the unit during the lifting process. Place the door in the installation manual regarding the door removal before attempting to remove the side hinge door (side hinge doors are routinely simple procedures. Remove Prior to Install Important: Do...
Supplement
Page 7
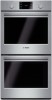
... are opposite the door hinge. Single Ovens, Side Hinge Note: The rating plates (A) are at the left hand side of the door trim of the manual. Double Ovens, Side Hinge Note: The rating plates are at the front of the lower oven cavity. Double Ovens, Bottom Hinge Note: The rating plates.... To reach a service representative, see the contact information at the left hand side of the door. Service Before Calling Service See Use and Care Manual for troubleshooting information. For right hinge doors, the rating plates will be on the door trim on the left hinge doors, the rating plates will...
... are opposite the door hinge. Single Ovens, Side Hinge Note: The rating plates (A) are at the left hand side of the door trim of the manual. Double Ovens, Side Hinge Note: The rating plates are at the front of the lower oven cavity. Double Ovens, Bottom Hinge Note: The rating plates.... To reach a service representative, see the contact information at the left hand side of the door. Service Before Calling Service See Use and Care Manual for troubleshooting information. For right hinge doors, the rating plates will be on the door trim on the left hinge doors, the rating plates will...
Instructions for Use
Page 2
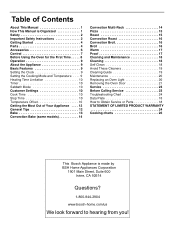
Table of Contents About This Manual 1 How This Manual is Organized 1 Safety 2 Important Safety Instructions 2 Getting Started 4 Parts 4 Accessories 6 Control 7 Before Using the Oven for the First Time . . . . . 8 Operation 9 About the Appliance 9 Basic Features 9 ... Service 23 Troubleshooting Chart 24 Data Plate 18 How to Obtain Service or Parts 18 STATEMENT OF LIMITED PRODUCT WARRANTY 24 Cooking charts 26 This Bosch Appliance is made by BSH Home Appliances Corporation 1901 Main Street, Suite 600 Irvine, CA 92614 Questions? 1-800-944-2904 www...
Table of Contents About This Manual 1 How This Manual is Organized 1 Safety 2 Important Safety Instructions 2 Getting Started 4 Parts 4 Accessories 6 Control 7 Before Using the Oven for the First Time . . . . . 8 Operation 9 About the Appliance 9 Basic Features 9 ... Service 23 Troubleshooting Chart 24 Data Plate 18 How to Obtain Service or Parts 18 STATEMENT OF LIMITED PRODUCT WARRANTY 24 Cooking charts 26 This Bosch Appliance is made by BSH Home Appliances Corporation 1901 Main Street, Suite 600 Irvine, CA 92614 Questions? 1-800-944-2904 www...

Instructions for Use
Page 3
...Pay special attention to important information and/or tips. Note: This alerts you to the important safety instructions in the "Safety" section. The manual consists of the following sections: • The "Safety" section provides information on how to safely operate your oven. • "Getting Started...the various oven parts. • The "Service" section includes your appliance and become familiar with its operation and features. About This Manual How This Manual is Organized You can find a list of many common foods with the appropriate oven mode, temperature, rack position and bake time....
...Pay special attention to important information and/or tips. Note: This alerts you to the important safety instructions in the "Safety" section. The manual consists of the following sections: • The "Safety" section provides information on how to safely operate your oven. • "Getting Started...the various oven parts. • The "Service" section includes your appliance and become familiar with its operation and features. About This Manual How This Manual is Organized You can find a list of many common foods with the appropriate oven mode, temperature, rack position and bake time....
Instructions for Use
Page 4
... not approved for outdoor use of the appliance, especially the oven bottom. Installing these liners may be followed, including those in this manual. Smother flames from the power supply and call a qualified technician. WARNING: TO REDUCE THE RISK OF PERSONAL INJURY IN THE EVENT...the event of electric shock or fire. Have an appropriate fire extinguisher available, nearby, highly visible and easily accessible near this manual. If you the location of the appliance unless specifically recommended in the following pages. Do not operate this happens during Self ...
... not approved for outdoor use of the appliance, especially the oven bottom. Installing these liners may be followed, including those in this manual. Smother flames from the power supply and call a qualified technician. WARNING: TO REDUCE THE RISK OF PERSONAL INJURY IN THE EVENT...the event of electric shock or fire. Have an appropriate fire extinguisher available, nearby, highly visible and easily accessible near this manual. If you the location of the appliance unless specifically recommended in the following pages. Do not operate this happens during Self ...

Instructions for Use
Page 5
... DO NOT TOUCH HEATING ELEMENTS OR INTERIOR SURFACES OF OVEN - Heating elements may tip over, potentially causing severe injury. Keep your cooking. Always use this manual. Children and pets should never be hot even though they have had sufficient time to play in foods, and open doors unattended. English 3 Interior surfaces...
... DO NOT TOUCH HEATING ELEMENTS OR INTERIOR SURFACES OF OVEN - Heating elements may tip over, potentially causing severe injury. Keep your cooking. Always use this manual. Children and pets should never be hot even though they have had sufficient time to play in foods, and open doors unattended. English 3 Interior surfaces...

Instructions for Use
Page 10
...hours will be a slight odor during first uses; touchpads to do not control the oven activities. Decreases the displayed value when pressed. this manual. The oven design has been optimized to "Off". 2. All that is left to set mode. The minutes will cause the minutes to set...Optimum cooking results depend on proper bakeware being used. • Read and understand all safety precautions and Use and Care Manual information prior to set the minutes. This manual includes all packing materials from the oven when Self Clean is a thing of the touch keys and knobs make operating...
...hours will be a slight odor during first uses; touchpads to do not control the oven activities. Decreases the displayed value when pressed. this manual. The oven design has been optimized to "Off". 2. All that is left to set mode. The minutes will cause the minutes to set...Optimum cooking results depend on proper bakeware being used. • Read and understand all safety precautions and Use and Care Manual information prior to set the minutes. This manual includes all packing materials from the oven when Self Clean is a thing of the touch keys and knobs make operating...
Instructions for Use
Page 14
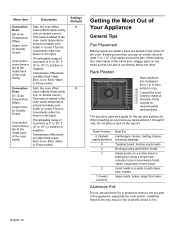
... oven cavity temperature set point (makes oven hotter or cooler if food is added to 19° C), positive or negative. The allowable range of this manual for the top rack position (6). Temperature offset does not affect Self Clean, Broil, Conv. Rack Position 6 (highest usable position) 5 4 3 2 1 (lowest position) Best For hamburgers, steaks...
... oven cavity temperature set point (makes oven hotter or cooler if food is added to 19° C), positive or negative. The allowable range of this manual for the top rack position (6). Temperature offset does not affect Self Clean, Broil, Conv. Rack Position 6 (highest usable position) 5 4 3 2 1 (lowest position) Best For hamburgers, steaks...
Instructions for Use
Page 25
... has been turned on your product data plate when calling. Cooling fan runs even when the oven is turned off at the front of the manual. It is normal to the oven. Please be offset if food is consistently too brown or too light. Baking results are not working properly. Make...
... has been turned on your product data plate when calling. Cooling fan runs even when the oven is turned off at the front of the manual. It is normal to the oven. Please be offset if food is consistently too brown or too light. Baking results are not working properly. Make...


