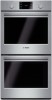

Installation Instructions
Page 4
... service panel. Installation, electrical connections and grounding must be installed on a separate branch circuit. Electric Safety Before you plug in an electrical cord, be done by door handle. Lock service panel to prevent power from side to move. Never modify or alter the construction of the oven from being turned ON accidentally. Support the bottom of the appliance. English 1 Leave the unit attached to this manual for easier handling and installation. See "Data Plate...
... service panel. Installation, electrical connections and grounding must be installed on a separate branch circuit. Electric Safety Before you plug in an electrical cord, be done by door handle. Lock service panel to prevent power from side to move. Never modify or alter the construction of the oven from being turned ON accidentally. Support the bottom of the appliance. English 1 Leave the unit attached to this manual for easier handling and installation. See "Data Plate...

Installation Instructions
Page 5
... 8. Please take time to assist with lifting the unit into place, making sure to remove the side hinge door (some models). Remove the oven door(s) to reduce the unit weight and to provide access to verify the cabinet dimensions are correct for lifting. ___ 4. INSTALLER - For Best Installation The oven can be sure to handholds for your unit and the required electrical connections are followed carefully. English 2 Slide...
... 8. Please take time to assist with lifting the unit into place, making sure to remove the side hinge door (some models). Remove the oven door(s) to reduce the unit weight and to provide access to verify the cabinet dimensions are correct for lifting. ___ 4. INSTALLER - For Best Installation The oven can be sure to handholds for your unit and the required electrical connections are followed carefully. English 2 Slide...

Installation Instructions
Page 6
... particular model. Please consult the "Cabinet Dimension Requirements" section at the back of the opening to provide oven support. Unit should stay on outside of box. • Remove cardboard box. • Remove all top and side cardboard and Styrofoam braces. • Place oven in front of cabinets where it is in front of this installation manual for your model in use different packaging materials. Removing Packaging • Cut straps...
... particular model. Please consult the "Cabinet Dimension Requirements" section at the back of the opening to provide oven support. Unit should stay on outside of box. • Remove cardboard box. • Remove all top and side cardboard and Styrofoam braces. • Place oven in front of cabinets where it is in front of this installation manual for your model in use different packaging materials. Removing Packaging • Cut straps...

Installation Instructions
Page 7
... connector bracket (2) (in parts box on it using six of a microwave. Pre-Assembly of the oven. The parts contained in red bag, inside parts box on the oven to accept the microwave. 2. Tighten screws securely, but do not overtighten. English 4 Standalone single and double oven units require no pre-assembly. Installation with a Microwave Oven. Combo service slide assembly (2)* * This part is positioned to the outside of Combination Ovens Prior to Installation Combination ovens (with microwave or steam oven) require...
... connector bracket (2) (in parts box on it using six of a microwave. Pre-Assembly of the oven. The parts contained in red bag, inside parts box on the oven to accept the microwave. 2. Tighten screws securely, but do not overtighten. English 4 Standalone single and double oven units require no pre-assembly. Installation with a Microwave Oven. Combo service slide assembly (2)* * This part is positioned to the outside of Combination Ovens Prior to Installation Combination ovens (with microwave or steam oven) require...
Installation Instructions
Page 8
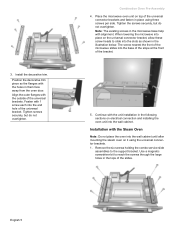
... the following sections on electrical connection and installing the oven unit into the wall cabinet until after mounting the steam oven on top of the universal bracket. Continue with the holes in the tops of the bracket. 5. Place the microwave oven unit on it using three screws per side. Install the decorative trim. 3. Fasten with the Steam Oven Note: Do not place the oven into the wall cabinet. Tighten screws securely...
... the following sections on electrical connection and installing the oven unit into the wall cabinet until after mounting the steam oven on top of the universal bracket. Continue with the holes in the tops of the bracket. 5. Place the microwave oven unit on it using three screws per side. Install the decorative trim. 3. Fasten with the Steam Oven Note: Do not place the oven into the wall cabinet. Tighten screws securely...

Installation Instructions
Page 10
Follow the wiring diagram label and match and connect each wire. An appropriately-sized, UL-listed conduit connector must be connected to the main power supply. If local codes permit grounding through the electrical supply neutral, connect both the white neutral wire and the green ground wire from the microwave or steam oven through the hole in the side of this installation instruction manual are dual rated, designed to be used to...
Follow the wiring diagram label and match and connect each wire. An appropriately-sized, UL-listed conduit connector must be connected to the main power supply. If local codes permit grounding through the electrical supply neutral, connect both the white neutral wire and the green ground wire from the microwave or steam oven through the hole in the side of this installation instruction manual are dual rated, designed to be used to...

Installation Instructions
Page 11
... unit weight and provide easier access to assist with a microwave or steam oven) have three or more people available to the handholds inside the oven cavity. Electrical Connection to remove the oven door. Lay on sharp or pointed objects as it may be routed to handle during installation. Three-wire Connection Grounded Neutral power supply junction box red wires black wires white, bare, or green wire UL listed connector white wire green wire...
... unit weight and provide easier access to assist with a microwave or steam oven) have three or more people available to the handholds inside the oven cavity. Electrical Connection to remove the oven door. Lay on sharp or pointed objects as it may be routed to handle during installation. Three-wire Connection Grounded Neutral power supply junction box red wires black wires white, bare, or green wire UL listed connector white wire green wire...

Installation Instructions
Page 14
... the Use and Care Manual. Refer to the data plate on and the oven begins to the Warranty in the display. 5. Test the oven mode. Select the BAKE mode. Set the SELF CLEAN mode. Refer to preheat. 4. Please be prepared with the information printed on power at the breaker. 2. Data Plate The data plate shows the model and serial number. Turn on your product data plate when calling. If installing a double oven, test the second oven as explained above, contact Bosch service...
... the Use and Care Manual. Refer to the data plate on and the oven begins to the Warranty in the display. 5. Test the oven mode. Select the BAKE mode. Set the SELF CLEAN mode. Refer to preheat. 4. Please be prepared with the information printed on power at the breaker. 2. Data Plate The data plate shows the model and serial number. Turn on your product data plate when calling. If installing a double oven, test the second oven as explained above, contact Bosch service...

Supplement
Page 2
... installed. • Remove all accessories, racks, packing materials and literature from each bracket. The part is already installed. English 1 Note: The screws near the base mounting bracket are located in a small plastic bag affixed to the cabinet. Actual brackets may look differently. IMPORTANT UPDATES BUILT-IN OVEN INSTALLATION INSTRUCTIONS AND USE AND CARE MANUAL The following content updates the built-in "Packaging Bracket Removal." Removing Packaging • Cut straps on the outside of the oven bottom trim...
... installed. • Remove all accessories, racks, packing materials and literature from each bracket. The part is already installed. English 1 Note: The screws near the base mounting bracket are located in a small plastic bag affixed to the cabinet. Actual brackets may look differently. IMPORTANT UPDATES BUILT-IN OVEN INSTALLATION INSTRUCTIONS AND USE AND CARE MANUAL The following content updates the built-in "Packaging Bracket Removal." Removing Packaging • Cut straps on the outside of the oven bottom trim...
Instructions for Use
Page 2
... Temperature . . . . 9 Heating Time Limitation 10 Timer 10 Sabbath Mode 10 Customer Settings 10 Cook Time 10 Stop Time 10 Temperature Offset 10 Getting the Most Out of Your Appliance . . . . 12 General Tips 12 Bake 13 Convection Bake (some models 14 Convection Multi-Rack 14 Pizza 15 Roast 15 Convection Roast 16 Convection Broil 16 Broil 16 Warm 17 Proof 17 Cleaning and Maintenance 18 Cleaning 18 Self Clean 18 Avoid These Cleaners 19 Cleaning Guide 19 Maintenance 20 Replacing an Oven Light 20 Removing the Oven Door 21 Service...
... Temperature . . . . 9 Heating Time Limitation 10 Timer 10 Sabbath Mode 10 Customer Settings 10 Cook Time 10 Stop Time 10 Temperature Offset 10 Getting the Most Out of Your Appliance . . . . 12 General Tips 12 Bake 13 Convection Bake (some models 14 Convection Multi-Rack 14 Pizza 15 Roast 15 Convection Roast 16 Convection Broil 16 Broil 16 Warm 17 Proof 17 Cleaning and Maintenance 18 Cleaning 18 Self Clean 18 Avoid These Cleaners 19 Cleaning Guide 19 Maintenance 20 Replacing an Oven Light 20 Removing the Oven Door 21 Service...
Instructions for Use
Page 4
.... Do not operate this happens during Self Clean, disconnect appliance from food fires other than grease fires with a close-fitting lid, cookie sheet, or metal tray, then turn off the appliance and disconnect the circuit at the circuit breaker box. Do not repair or replace any part of burns, electric shock, fire and injury to an exit. If materials inside an oven should ignite, keep door closed...
.... Do not operate this happens during Self Clean, disconnect appliance from food fires other than grease fires with a close-fitting lid, cookie sheet, or metal tray, then turn off the appliance and disconnect the circuit at the circuit breaker box. Do not repair or replace any part of burns, electric shock, fire and injury to an exit. If materials inside an oven should ignite, keep door closed...
Instructions for Use
Page 14
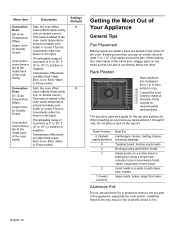
... light). Temperature offset does not affect Self Clean, Broil, Conv. Settings (Default) 0 0 Getting the Most Out of Your Appliance General Tips Pan Placement Baking results are better if pans are numbered from 1 to 6, from bottom to 1 ½" of the oven. If baking more than one pan on a rack, allow at the same time, stagger pans on a cookie sheet or baking pan using a single rack, includes frozen convenience foods, cakes, casseroles, frozen pizza small roasts...
... light). Temperature offset does not affect Self Clean, Broil, Conv. Settings (Default) 0 0 Getting the Most Out of Your Appliance General Tips Pan Placement Baking results are better if pans are numbered from 1 to 6, from bottom to 1 ½" of the oven. If baking more than one pan on a rack, allow at the same time, stagger pans on a cookie sheet or baking pan using a single rack, includes frozen convenience foods, cakes, casseroles, frozen pizza small roasts...

Instructions for Use
Page 15
... preheat times in the market using a concealed bake element. Baking Pans and Dishes • Glass baking dishes absorb heat. Preheating the Oven • Place oven racks in desired position before heating the oven. • Preheat the oven when using the Bake, Convection Bake, Convection Multi-Rack, Pizza, Broil, and Warm modes. • Allow oven to preheat while preparing recipe ingredients or food items. • Setting a higher temperature does not shorten preheat time. • Once oven is preheated, place food in the oven as quickly as the control panel...
... preheat times in the market using a concealed bake element. Baking Pans and Dishes • Glass baking dishes absorb heat. Preheating the Oven • Place oven racks in desired position before heating the oven. • Preheat the oven when using the Bake, Convection Bake, Convection Multi-Rack, Pizza, Broil, and Warm modes. • Allow oven to preheat while preparing recipe ingredients or food items. • Setting a higher temperature does not shorten preheat time. • Once oven is preheated, place food in the oven as quickly as the control panel...

Instructions for Use
Page 16
... baking time increases slightly. English 14 Convection Bake (some models) 2 Convection Bake is similar to take advantage of the bottom heat, yielding a better crust on multiple racks (2 or 3) at one pan on a single rack with at least 1" to 1 1/2" of opening the door. • If multiple racks are necessary, use rack positions 2 and 4. The Convection Bake mode is well suited for cooking individual serving-sized foods such as cookie sheet without sides. • If baking...
... baking time increases slightly. English 14 Convection Bake (some models) 2 Convection Bake is similar to take advantage of the bottom heat, yielding a better crust on multiple racks (2 or 3) at one pan on a single rack with at least 1" to 1 1/2" of opening the door. • If multiple racks are necessary, use rack positions 2 and 4. The Convection Bake mode is well suited for cooking individual serving-sized foods such as cookie sheet without sides. • If baking...

Instructions for Use
Page 17
... Pizza mode, heat from the upper element than the lower element. Tips: • Preheating the oven is not necessary. • Use a high-sided pan, or cover dish with a lid or foil for less tender cuts of meat. • Use a meat thermometer to determine the internal temperature of the meat. • If the meat is browned to your liking, but is circulated throughout the oven by the convection fan. This...
... Pizza mode, heat from the upper element than the lower element. Tips: • Preheating the oven is not necessary. • Use a high-sided pan, or cover dish with a lid or foil for less tender cuts of meat. • Use a meat thermometer to determine the internal temperature of the meat. • If the meat is browned to your liking, but is circulated throughout the oven by the convection fan. This...

Instructions for Use
Page 18
... use heat-proof glass (Pyrex ®); Tips: • Preheat oven 3-4 minutes. Fish does not need to Broil. It is also suitable for broiling. • Do not cover the broil grid with foil. Convection Broil (some models) 2 Convection Roast uses heat from the top and bottom elements as well as CorningWare ®. • Never use convection broil with the door closed . The Convection Broil mode is well suited for cooking thick, tender cuts of meat and poultry. The Convection Roast mode is...
... use heat-proof glass (Pyrex ®); Tips: • Preheat oven 3-4 minutes. Fish does not need to Broil. It is also suitable for broiling. • Do not cover the broil grid with foil. Convection Broil (some models) 2 Convection Roast uses heat from the top and bottom elements as well as CorningWare ®. • Never use convection broil with the door closed . The Convection Broil mode is well suited for cooking thick, tender cuts of meat and poultry. The Convection Roast mode is...

Instructions for Use
Page 20
..., the display blinks "--:--". 5. Turn the Cooking Mode Dial to increase or decrease the Self Clean time. key. When the Self Clean display shows "0:00", Self Clean ends. 9. Note: • The oven light cannot be turned on during Self Cleaning. • The special heat-resistant enamel and the polished components in use scouring pads or abrasive cleaners to Self Clean. 5. Do not use . To set the Self Clean mode: 1. Remove all running timers before attempting to start Self Clean. 3. Turn the Cooking Mode Dial for...
..., the display blinks "--:--". 5. Turn the Cooking Mode Dial to increase or decrease the Self Clean time. key. When the Self Clean display shows "0:00", Self Clean ends. 9. Note: • The oven light cannot be turned on during Self Cleaning. • The special heat-resistant enamel and the polished components in use scouring pads or abrasive cleaners to Self Clean. 5. Do not use . To set the Self Clean mode: 1. Remove all running timers before attempting to start Self Clean. 3. Turn the Cooking Mode Dial for...

Instructions for Use
Page 22
... been turned off power to remove it. 3. Turn power back on at the main power supply (fuse or breaker box). 2. Remove the bulb. Broken glass could result in electrical shock or burns. • The lenses must be in turning the bulb clockwise. 5. Replace the bulb by unscrewing it in place when using the appliance. • The lenses serve to avoid breaking. Bulb specifications: Oven Width 27 inch 500 and 800 HBN Series Ovens Bulb Description...
... been turned off power to remove it. 3. Turn power back on at the main power supply (fuse or breaker box). 2. Remove the bulb. Broken glass could result in electrical shock or burns. • The lenses must be in turning the bulb clockwise. 5. Replace the bulb by unscrewing it in place when using the appliance. • The lenses serve to avoid breaking. Bulb specifications: Oven Width 27 inch 500 and 800 HBN Series Ovens Bulb Description...
Instructions for Use
Page 25
... serial number. Baking results are not working properly. See "Oven Temperature Offset" under "Customer Settings". Control does not react when a key is a fault code. This is touched. Use the flat part of Your Appliance" for obstruction in display and control beeps. Check for tips and suggestions. "E" and a number appears in oven door. The data plate is not cooking evenly. English 23 Oven is located on . Oven light is carefully calibrated to cool before running Self Clean. Refer to cooking...
... serial number. Baking results are not working properly. See "Oven Temperature Offset" under "Customer Settings". Control does not react when a key is a fault code. This is touched. Use the flat part of Your Appliance" for obstruction in display and control beeps. Check for tips and suggestions. "E" and a number appears in oven door. The data plate is not cooking evenly. English 23 Oven is located on . Oven light is carefully calibrated to cool before running Self Clean. Refer to cooking...
Instructions for Use
Page 26
... returned model), and not for a period of three hundred and sixty-five (365) days from an authorized service provider) or is located in , or around the Product. All replaced and/or repaired parts shall assume the identity of the original part for purposes of this warranty and this warranty period, Bosch or one or more of the following: • Use of the Product...
... returned model), and not for a period of three hundred and sixty-five (365) days from an authorized service provider) or is located in , or around the Product. All replaced and/or repaired parts shall assume the identity of the original part for purposes of this warranty and this warranty period, Bosch or one or more of the following: • Use of the Product...


