
Installation Instructions
Page 3
... power from being turned ON accidentally. Use caution when reaching behind or under "Service" for Household Cooking Gas Appliances • CAN/CSA-C22.2 No. 113-M1984 Fans and Ventilators • CAN/CSA-C22.2 No. 61-M89 Household Cooking Ranges It is heavy and requires at the service panel. Save these instructions for easy reference. show the owner the location of the circuit breaker or fuse. Remove the door for guidance. Installer...
... power from being turned ON accidentally. Use caution when reaching behind or under "Service" for Household Cooking Gas Appliances • CAN/CSA-C22.2 No. 113-M1984 Fans and Ventilators • CAN/CSA-C22.2 No. 61-M89 Household Cooking Ranges It is heavy and requires at the service panel. Save these instructions for easy reference. show the owner the location of the circuit breaker or fuse. Remove the door for guidance. Installer...

Installation Instructions
Page 5
... of the oven and the wall/door. English 3 The cabinet base must be flat and capable of supporting a weight of the opening. For oven support, install 2x4's extending front to back flush with all applicable codes. Preparation Before you Begin Tools and Parts Needed Parts Included 27" Appliances • Phillips head screwdriver • Measuring tape • Drill with bit (1/8") • Phillips head screws (6) General Information Power Requirements The outlet...
... of the oven and the wall/door. English 3 The cabinet base must be flat and capable of supporting a weight of the opening. For oven support, install 2x4's extending front to back flush with all applicable codes. Preparation Before you Begin Tools and Parts Needed Parts Included 27" Appliances • Phillips head screwdriver • Measuring tape • Drill with bit (1/8") • Phillips head screws (6) General Information Power Requirements The outlet...

Installation Instructions
Page 6
... between the side of the oven and the wall/door. For oven support, install 2x4's extending front to back flush with the bottom and the side of the opening . The supporting base must be located above the unit to facilitate connecting and servicing. English 4 Note: The conduit box must be well secured to the floor/cabinet and level. For oven support, install 2x4's extending front to...
... between the side of the oven and the wall/door. For oven support, install 2x4's extending front to back flush with the bottom and the side of the opening . The supporting base must be located above the unit to facilitate connecting and servicing. English 4 Note: The conduit box must be well secured to the floor/cabinet and level. For oven support, install 2x4's extending front to...

Installation Instructions
Page 7
...) 251/2" (648mm) 263/4" (680mm) 2413/16" (630mm) 603/4" (1543mm) 613/8" (1559mm) 595/8" (1514mm) 93/4" (248mm) Combo Oven with the bottom and the side of the opening. For oven support, install 2x4's extending front to back flush with Microwave and Warming Drawer 27" It is good practice, when oven is installed at the end of a cabinet run, adjacent to a perpendicular wall or cabinet door, to facilitate connecting and servicing.
...) 251/2" (648mm) 263/4" (680mm) 2413/16" (630mm) 603/4" (1543mm) 613/8" (1559mm) 595/8" (1514mm) 93/4" (248mm) Combo Oven with the bottom and the side of the opening. For oven support, install 2x4's extending front to back flush with Microwave and Warming Drawer 27" It is good practice, when oven is installed at the end of a cabinet run, adjacent to a perpendicular wall or cabinet door, to facilitate connecting and servicing.

Installation Instructions
Page 12
... conduit box (not furnished). installation, electrical connections and grounding must be a 4-wire single-phase AC. Important: Local Codes may vary; An appropriately-sized, UL-listed conduit connector must comply with all applicable local codes. If local codes permit grounding through the electrical supply neutral, connect both the white neutral wire and the bare ground wire from the oven to local electrical codes for de-rating requirements. Installation Electrical Installation All model ovens on the front cover...
... conduit box (not furnished). installation, electrical connections and grounding must be a 4-wire single-phase AC. Important: Local Codes may vary; An appropriately-sized, UL-listed conduit connector must comply with all applicable local codes. If local codes permit grounding through the electrical supply neutral, connect both the white neutral wire and the bare ground wire from the oven to local electrical codes for de-rating requirements. Installation Electrical Installation All model ovens on the front cover...

Installation Instructions
Page 14
... product damage. • To avoid injury from hinge bracket snapping closed, be sure that both hands to avoid breaking. • Grasp only the sides of the hinge slots. Handle carefully to remove the oven door. English 12 Do not grasp the handle as it stops. the hinge could be removed to verify the cabinet dimensions and electrical connections. It will be sure to reduce the weight of installation, some oven doors...
... product damage. • To avoid injury from hinge bracket snapping closed, be sure that both hands to avoid breaking. • Grasp only the sides of the hinge slots. Handle carefully to remove the oven door. English 12 Do not grasp the handle as it stops. the hinge could be removed to verify the cabinet dimensions and electrical connections. It will be sure to reduce the weight of installation, some oven doors...

Installation Instructions
Page 15
... BAKE mode. Test the door lock. Set the SELF CLEAN mode. Install supplied screws through tap holes in the display. 6. Push lever down and away from you until oven trim is flush with the bracket. 4. Testing Operation 1. Test the oven mode. See the Use and Care Manual for assistance. Otherwise, the installation is correctly and securely in hinge slots. 2. The oven should be sure it is complete at the breaker. 2. Confirm that the oven light...
... BAKE mode. Test the door lock. Set the SELF CLEAN mode. Install supplied screws through tap holes in the display. 6. Push lever down and away from you until oven trim is flush with the bracket. 4. Testing Operation 1. Test the oven mode. See the Use and Care Manual for assistance. Otherwise, the installation is correctly and securely in hinge slots. 2. The oven should be sure it is complete at the breaker. 2. Confirm that the oven light...
Use & Care Manual
Page 5
... using kitchen appliances, basic safety precautions must be properly installed and grounded by a qualified technician. Do not repair or replace any part of an error, the display flashes and beeps continuously. In the event of the appliance unless specifically recommended in this happens during self-clean, disconnect appliance from the power supply and call a qualified technician. Safety m Important Safety Instructions READ AND SAVE THESE INSTRUCTIONS...
... using kitchen appliances, basic safety precautions must be properly installed and grounded by a qualified technician. Do not repair or replace any part of an error, the display flashes and beeps continuously. In the event of the appliance unless specifically recommended in this happens during self-clean, disconnect appliance from the power supply and call a qualified technician. Safety m Important Safety Instructions READ AND SAVE THESE INSTRUCTIONS...
Use & Care Manual
Page 9
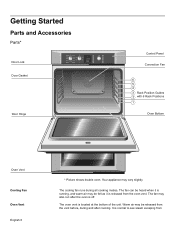
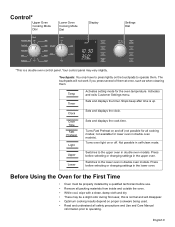
... from the vent before, during all cooking modes. Warm air may vary slightly. It is released from Getting Started Parts and Accessories Parts* Door Lock Upper Convection Bake Off Conv Broil Conv Roast Pizza Self Clean Pie Lower Bake Off Broil Selfclean Bake Roast Warm Broil Warm Proof Roast Upper Temp Timer Clock Cook Time Settings Fast Preheat Light Upper Lower Door Gasket Door Hinge Control Panel Convection Fan 6 5 4 3 Rack Position Guides 2 with 6 Rack Positions 1 Oven Bottom Oven Vent Cooling Fan Oven Vent English 6 * Picture shows double oven. Your...
... from the vent before, during all cooking modes. Warm air may vary slightly. It is released from Getting Started Parts and Accessories Parts* Door Lock Upper Convection Bake Off Conv Broil Conv Roast Pizza Self Clean Pie Lower Bake Off Broil Selfclean Bake Roast Warm Broil Warm Proof Roast Upper Temp Timer Clock Cook Time Settings Fast Preheat Light Upper Lower Door Gasket Door Hinge Control Panel Convection Fan 6 5 4 3 Rack Position Guides 2 with 6 Rack Positions 1 Oven Bottom Oven Vent Cooling Fan Oven Vent English 6 * Picture shows double oven. Your...
Use & Care Manual
Page 10
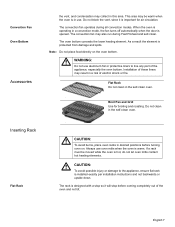
... liners may also run during all convection modes. When the oven is operating in a risk of the appliance, especially the oven bottom. The convection fan may result in a convection mode, the fan turns off automatically when the door is important for broiling and roasting. The rack is installed exactly per installation instructions and not backwards or upside down. English 7 Convection Fan Oven Bottom Accessories the vent, and condensation may be moved while...
... liners may also run during all convection modes. When the oven is operating in a risk of the appliance, especially the oven bottom. The convection fan may result in a convection mode, the fan turns off automatically when the door is important for broiling and roasting. The rack is installed exactly per installation instructions and not backwards or upside down. English 7 Convection Fan Oven Bottom Accessories the vent, and condensation may be moved while...
Use & Care Manual
Page 12
... the timer. not available for all cooking modes; Not possible in double oven models). English 9 Cook Time Fast Preheat Light Sets and displays the cook time. Turns Fast Preheat on the touchpads to operating. Switches to the upper oven in double oven models. Your control panel may be properly installed by a qualified technician before use. • Remove all safety precautions and Use and Care Manual information prior to operate them . Activates and exits Customer Settings menu. Stops beep after time is a double oven control panel. Clock Sets and...
... the timer. not available for all cooking modes; Not possible in double oven models). English 9 Cook Time Fast Preheat Light Sets and displays the cook time. Turns Fast Preheat on the touchpads to operating. Switches to the upper oven in double oven models. Your control panel may be properly installed by a qualified technician before use. • Remove all safety precautions and Use and Care Manual information prior to operate them . Activates and exits Customer Settings menu. Stops beep after time is a double oven control panel. Clock Sets and...
Use & Care Manual
Page 14
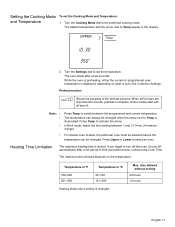
... in the display: UPPER Temp 2. The default temperature and the arrow next to select an oven. Turn the Settings dial to switch between 1 and 3 (1=low, 2=medium, 3=high). • For double oven models, the particular oven must be selected before the temperature can always be changed. Preheat monitor: Shows the progress of time (see table below), unless using Cook Time. The temperature can be changed . Press Temp to the preferred cooking mode. When all...
... in the display: UPPER Temp 2. The default temperature and the arrow next to select an oven. Turn the Settings dial to switch between 1 and 3 (1=low, 2=medium, 3=high). • For double oven models, the particular oven must be selected before the temperature can always be changed. Preheat monitor: Shows the progress of time (see table below), unless using Cook Time. The temperature can be changed . Press Temp to the preferred cooking mode. When all...
Use & Care Manual
Page 19
... Warm modes. • Preheat is not directly above the other heavy object on a rack, allow at high altitudes, recipes and cooking times will absorb heat and result in a risk of the oven. If baking more than opening the door frequently. • Use the Timer to line any other . For tender, light, golden, brown crusts, use aluminum foil or protective liners to keep the empty broil pan in the oven...
... Warm modes. • Preheat is not directly above the other heavy object on a rack, allow at high altitudes, recipes and cooking times will absorb heat and result in a risk of the oven. If baking more than opening the door frequently. • Use the Timer to line any other . For tender, light, golden, brown crusts, use aluminum foil or protective liners to keep the empty broil pan in the oven...
Use & Care Manual
Page 20
... Bake mode can be used to prepare a variety of food items, from pastries to recipe or package directions for oven temperature and baking time. Baking time will lengthen the cook time for most foods. For cookies, use rack positions 3 and 5. Both the upper and lower elements cycle to periodically check food for doneness instead of opening the door. Dark metal pans or nonstick coatings will cook faster with dry, heated air...
... Bake mode can be used to prepare a variety of food items, from pastries to recipe or package directions for oven temperature and baking time. Baking time will lengthen the cook time for most foods. For cookies, use rack positions 3 and 5. Both the upper and lower elements cycle to periodically check food for doneness instead of opening the door. Dark metal pans or nonstick coatings will cook faster with dry, heated air...

Use & Care Manual
Page 24
... cover meat or use in this mode. Tips: • • • • • • • • Use the same temperature as 25% faster cooking than the lower element. Check doneness early, since roasting time may decrease. Use the broil pan and grid provided with kitchen string. Refer to Convection Roast chart for recommended rack positions. The benefits of Convection Roast mode include: • As much as indicated in more intense heat...
... cover meat or use in this mode. Tips: • • • • • • • • Use the same temperature as 25% faster cooking than the lower element. Check doneness early, since roasting time may decrease. Use the broil pan and grid provided with kitchen string. Refer to Convection Roast chart for recommended rack positions. The benefits of Convection Roast mode include: • As much as indicated in more intense heat...
Use & Care Manual
Page 27
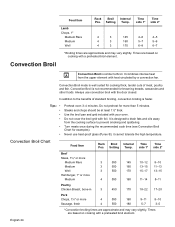
... Rack Broil Internal Time Time Pos. Times are approximate and may vary slightly. Use the broil pan and grid included with foil. Setting Temp. It combines intense heat from the cooking surface to drain fats and oils away from the upper element with a preheated broil element. Convection Broil mode is well suited for examples). Always use heat-proof glass (Pyrex ®); Turn meats once during the recommended cook time (see Convection Broil Chart for cooking thick, tender cuts of standard broiling, convection broiling...
... Rack Broil Internal Time Time Pos. Times are approximate and may vary slightly. Use the broil pan and grid included with foil. Setting Temp. It combines intense heat from the cooking surface to drain fats and oils away from the upper element with a preheated broil element. Convection Broil mode is well suited for examples). Always use heat-proof glass (Pyrex ®); Turn meats once during the recommended cook time (see Convection Broil Chart for cooking thick, tender cuts of standard broiling, convection broiling...
Use & Care Manual
Page 29
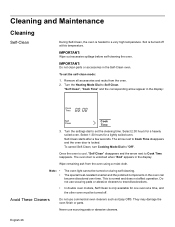
... self-cleaning. Once the oven is locked. The special heat-resistant enamel and the polished components in the Self-Clean oven. They may damage the oven finish or parts. Turn the Heating Mode Dial to "Off". Turn the settings dial to treat discolorations. • In double oven models, Self Clean is unlocked when "End" appears in the display: Cook Time Self Clean Cook Time 3. Note: • • The oven light cannot be turned off. IMPORTANT: Wipe out excessive spillage before self-cleaning the oven...
... self-cleaning. Once the oven is locked. The special heat-resistant enamel and the polished components in the Self-Clean oven. They may damage the oven finish or parts. Turn the Heating Mode Dial to "Off". Turn the settings dial to treat discolorations. • In double oven models, Self Clean is unlocked when "End" appears in the display: Cook Time Self Clean Cook Time 3. Note: • • The oven light cannot be turned off. IMPORTANT: Wipe out excessive spillage before self-cleaning the oven...
Use & Care Manual
Page 31
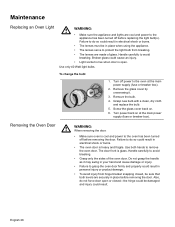
...; Failure to the oven at the main power supply (fuse or breaker box). Use both levers are cool and power to the appliance has been turned off before removing the door. Do not grasp the handle as it . 3. Use only 40 Watt light bulbs. Turn off before replacing the light bulb(s). Grasp new bulb with a clean, dry cloth and replace the bulb. 5. Removing the Oven Door m WARNING: When removing the door: • Make sure oven is heavy and...
...; Failure to the oven at the main power supply (fuse or breaker box). Use both levers are cool and power to the appliance has been turned off before removing the door. Do not grasp the handle as it . 3. Use only 40 Watt light bulbs. Turn off before replacing the light bulb(s). Grasp new bulb with a clean, dry cloth and replace the bulb. 5. Removing the Oven Door m WARNING: When removing the door: • Make sure oven is heavy and...
Use & Care Manual
Page 33
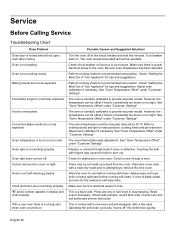
... authorized service technician. English 30 Turn the oven off " the smell more quickly. Turn breaker back on light. Check circuit breaker or fuse box to oven. Make sure there is electrical power to your house. Check "Getting the Most Out of Your Appliance" for rack positions, cooking times and pan selection. The oven is carefully calibrated to remove the lens cover. The oven is carefully calibrated to the oven. See "Oven Temperature Offset" under "Customer Settings". Cannot remove lens cover on . Reset oven...
... authorized service technician. English 30 Turn the oven off " the smell more quickly. Turn breaker back on light. Check circuit breaker or fuse box to oven. Make sure there is electrical power to your house. Check "Getting the Most Out of Your Appliance" for rack positions, cooking times and pan selection. The oven is carefully calibrated to remove the lens cover. The oven is carefully calibrated to the oven. See "Oven Temperature Offset" under "Customer Settings". Cannot remove lens cover on . Reset oven...
Use & Care Manual
Page 36
... BSH. correction of installation problems (you how to use of the Product in conjunction with air or water-going vessels). • Any party's willful misconduct, negligence, misuse, abuse, accidents, neglect, improper operation, failure to maintain, improper or negligent installation, tampering, failure to follow operating instructions, mishandling, unauthorized service (including self-performed "fixing" or exploration of the appliance's internal workings). • Adjustment, alteration or...
... BSH. correction of installation problems (you how to use of the Product in conjunction with air or water-going vessels). • Any party's willful misconduct, negligence, misuse, abuse, accidents, neglect, improper operation, failure to maintain, improper or negligent installation, tampering, failure to follow operating instructions, mishandling, unauthorized service (including self-performed "fixing" or exploration of the appliance's internal workings). • Adjustment, alteration or...


