

Installation Instructions
Page 2
... forward to hearing from you Begin 3 Tools and Parts Needed 3 Parts Included 3 27" Appliances 3 General Information 3 30" Appliances 6 Removing Packaging 9 For Convection Microwave Combination Units 9 Preparing Oven 9 Installation 10 Electrical Installation 10 Oven Installation 12 Testing Operation 13 Service 14 Before Calling Service 14 This Bosch Appliance is made by BSH Home Appliances Corporation 5551 McFadden Ave. Table...
... forward to hearing from you Begin 3 Tools and Parts Needed 3 Parts Included 3 27" Appliances 3 General Information 3 30" Appliances 6 Removing Packaging 9 For Convection Microwave Combination Units 9 Preparing Oven 9 Installation 10 Electrical Installation 10 Oven Installation 12 Testing Operation 13 Service 14 Before Calling Service 14 This Bosch Appliance is made by BSH Home Appliances Corporation 5551 McFadden Ave. Table...

Installation Instructions
Page 3
...recommended in the OFF position. WARNING: Do not repair or replace any part of Electric Fans • ANSI Z21.1, The American National Standard for easier handling and installation. All other servicing should be installed on a separate branch circuit. Unit is not followed exactly, fire or shock ...may have sharp edges. Installer - Before installing, turn power OFF at least two people or proper equipment to this manual for the local electrical inspector's use. Refer to move. See instructions in Use and Care Manual. This ...
...recommended in the OFF position. WARNING: Do not repair or replace any part of Electric Fans • ANSI Z21.1, The American National Standard for easier handling and installation. All other servicing should be installed on a separate branch circuit. Unit is not followed exactly, fire or shock ...may have sharp edges. Installer - Before installing, turn power OFF at least two people or proper equipment to this manual for the local electrical inspector's use. Refer to move. See instructions in Use and Care Manual. This ...

Installation Instructions
Page 4
For example, do not remove leveling legs, panels, wire covers or anti-tip brackets/screws. Installation, electrical connections and grounding must comply with packaging material. Remove all applicable codes. Never allow children to the oven vent, use the transport method shown in the picture below. Never modify or alter the construction of the appliance...
For example, do not remove leveling legs, panels, wire covers or anti-tip brackets/screws. Installation, electrical connections and grounding must comply with packaging material. Remove all applicable codes. Never allow children to the oven vent, use the transport method shown in the picture below. Never modify or alter the construction of the appliance...

Installation Instructions
Page 5
... to allow at least 210 lbs (95 kg). Note: The conduit box must be installed either above or below the unit, a 2" diameter hole or space is required between the side of the oven and the wall/door. Dimensions for 27" Wall-Mounted Units 24" (610mm) 251/2" (648mm) 263/4" (680mm) 2413/16" (630mm) 281/4" (718mm) 291...
... to allow at least 210 lbs (95 kg). Note: The conduit box must be installed either above or below the unit, a 2" diameter hole or space is required between the side of the oven and the wall/door. Dimensions for 27" Wall-Mounted Units 24" (610mm) 251/2" (648mm) 263/4" (680mm) 2413/16" (630mm) 281/4" (718mm) 291...

Installation Instructions
Page 6
...) 251/2" (648mm) 50" (1270mm) 263/4" (680mm) 2413/16" (630mm) 491/2" (1257mm) 483/8" (1229mm) 191/2" (500mm) 237/8" (606mm) 22" (559mm) Double Oven 27" It is good practice, when oven is installed at the end of a cabinet run , adjacent to a perpendicular wall or cabinet door, to back flush with the bottom and the side of the opening .
...) 251/2" (648mm) 50" (1270mm) 263/4" (680mm) 2413/16" (630mm) 491/2" (1257mm) 483/8" (1229mm) 191/2" (500mm) 237/8" (606mm) 22" (559mm) Double Oven 27" It is good practice, when oven is installed at the end of a cabinet run , adjacent to a perpendicular wall or cabinet door, to back flush with the bottom and the side of the opening .

Installation Instructions
Page 7
... secured to back flush with Microwave and Warming Drawer 27" It is good practice, when oven is installed at the end of the oven and the wall/door. 24" (610mm) 251/2" (648mm) 263/4" (680mm) 2413/16" (630mm) 603/4" (1543mm) 613/8" (1559mm) 595/8" (1514mm) 93/4" (248mm) Combo Oven with the bottom and the side of the opening...
... secured to back flush with Microwave and Warming Drawer 27" It is good practice, when oven is installed at the end of the oven and the wall/door. 24" (610mm) 251/2" (648mm) 263/4" (680mm) 2413/16" (630mm) 603/4" (1543mm) 613/8" (1559mm) 595/8" (1514mm) 93/4" (248mm) Combo Oven with the bottom and the side of the opening...

Installation Instructions
Page 8
... or below the unit, a 2" diameter hole or space is required between the side of the oven and the wall/door. If the conduit box is installed below the unit. The supporting base must be flat and capable of supporting a weight of at least...27" (686mm) min. 43/4" (121mm) max. 313/8" (797mm) 237/8" (606mm) 22" (559mm) 293/4" (755mm) 2713/16" (706mm) 24" (610mm) 281/2" (724mm) 513/4" (1314mm) 511/8" (1299mm) 493/4" (1264mm) 93/4" (248mm) 237/8" (606mm) 22" (559mm) Single Oven 30" It is good practice, when oven is installed at the end of a cabinet run , adjacent to a perpendicular wall...
... or below the unit, a 2" diameter hole or space is required between the side of the oven and the wall/door. If the conduit box is installed below the unit. The supporting base must be flat and capable of supporting a weight of at least...27" (686mm) min. 43/4" (121mm) max. 313/8" (797mm) 237/8" (606mm) 22" (559mm) 293/4" (755mm) 2713/16" (706mm) 24" (610mm) 281/2" (724mm) 513/4" (1314mm) 511/8" (1299mm) 493/4" (1264mm) 93/4" (248mm) 237/8" (606mm) 22" (559mm) Single Oven 30" It is good practice, when oven is installed at the end of a cabinet run , adjacent to a perpendicular wall...

Installation Instructions
Page 9
...connecting and servicing. The supporting base must be well secured to allow at least 1/4" space between the side of the oven and the wall/door. English 7 For oven support, install 2x4's extending front to back flush with the bottom and the side of the opening . 24" (610mm) 281...) 603/4" (1543mm) 613/8" (1559mm) 595/8" (1514mm) 93/4" (248mm) 237/8" (606mm) 22" (559mm) Combo Oven with Microwave 30" It is good practice, when oven is installed at the end of a cabinet run , adjacent to a perpendicular wall or cabinet door, to allow at least 1/4" space between the side of the...
...connecting and servicing. The supporting base must be well secured to allow at least 1/4" space between the side of the oven and the wall/door. English 7 For oven support, install 2x4's extending front to back flush with the bottom and the side of the opening . 24" (610mm) 281...) 603/4" (1543mm) 613/8" (1559mm) 595/8" (1514mm) 93/4" (248mm) 237/8" (606mm) 22" (559mm) Combo Oven with Microwave 30" It is good practice, when oven is installed at the end of a cabinet run , adjacent to a perpendicular wall or cabinet door, to allow at least 1/4" space between the side of the...

Installation Instructions
Page 10
...least 1/4" space between the side of the oven and the wall/door. For oven support, install 2x4's extending front to back flush with Warming Drawer 30" It is good practice, when oven is installed at the end of a cabinet run, adjacent to a perpendicular wall or cabinet door, to allow at least... 290 lbs (132 kg). 237/8" (606mm) 22" (559mm) 30" Under-the-counter-Units 24" (610mm) 161/2" (419mm) 281/4" (718mm) 293/4" (755mm) 291/16" (738mm) 2713/16" (706mm) 281/2" (724mm) 27...
...least 1/4" space between the side of the oven and the wall/door. For oven support, install 2x4's extending front to back flush with Warming Drawer 30" It is good practice, when oven is installed at the end of a cabinet run, adjacent to a perpendicular wall or cabinet door, to allow at least... 290 lbs (132 kg). 237/8" (606mm) 22" (559mm) 30" Under-the-counter-Units 24" (610mm) 161/2" (419mm) 281/4" (718mm) 293/4" (755mm) 291/16" (738mm) 2713/16" (706mm) 281/2" (724mm) 27...
Installation Instructions
Page 11
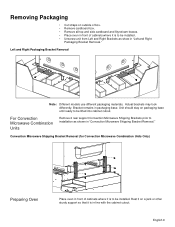
... show in "Left and Right Packaging Bracket Removal." Convection Microwave Shipping Bracket Removal (for Convection Microwave Combination Units Only) Preparing Oven Place oven in front of cabinets where it is to be installed. • Unscrew unit from Left and Right Brackets as shown in "Convection Microwave Shipping Bracket Removal." Removing Packaging • Cut...
... show in "Left and Right Packaging Bracket Removal." Convection Microwave Shipping Bracket Removal (for Convection Microwave Combination Units Only) Preparing Oven Place oven in front of cabinets where it is to be installed. • Unscrew unit from Left and Right Brackets as shown in "Convection Microwave Shipping Bracket Removal." Removing Packaging • Cut...

Installation Instructions
Page 12
... for de-rating requirements. Important: Local Codes may vary; installation, electrical connections and grounding must be a 4-wire single-phase AC. Refer to the white neutral electrical supply wire. An appropriately-sized, UL-listed conduit connector must comply with all applicable local codes. Installation Electrical Installation All model ovens on the front cover are dual rated, designed to...
... for de-rating requirements. Important: Local Codes may vary; installation, electrical connections and grounding must be a 4-wire single-phase AC. Refer to the white neutral electrical supply wire. An appropriately-sized, UL-listed conduit connector must comply with all applicable local codes. Installation Electrical Installation All model ovens on the front cover are dual rated, designed to...

Installation Instructions
Page 14
... to do not force door open or closed - Also, do so could result in electrical shock or burns. • The oven door is heavy. 6. Oven Installation Note: Before installing the oven, be about half way closed. 5. Removing the Oven Door For ease of the oven by 30 lbs (14 kg) per door, before removing the door. the door...
... to do not force door open or closed - Also, do so could result in electrical shock or burns. • The oven door is heavy. 6. Oven Installation Note: Before installing the oven, be about half way closed. 5. Removing the Oven Door For ease of the oven by 30 lbs (14 kg) per door, before removing the door. the door...

Installation Instructions
Page 15
...bracket. 4. Turn on and the oven begins to crimp flexible conduit between oven and cabinet back wall. See the Use and Care Manual for assistance. Confirm that the oven light comes on power at the breaker. 2. Otherwise, the installation is correctly and securely in hinge ... slowly to expose hinges and slots. 3. Installing the Oven 1. Holding the door firmly in both hands, place hinges in place. Do not lift appliance by door handle. 2. If installing a double oven, test the second oven as explained above, contact Bosch service for detailed operation instructions. 4.
...bracket. 4. Turn on and the oven begins to crimp flexible conduit between oven and cabinet back wall. See the Use and Care Manual for assistance. Confirm that the oven light comes on power at the breaker. 2. Otherwise, the installation is correctly and securely in hinge ... slowly to expose hinges and slots. 3. Installing the Oven 1. Holding the door firmly in both hands, place hinges in place. Do not lift appliance by door handle. 2. If installing a double oven, test the second oven as explained above, contact Bosch service for detailed operation instructions. 4.
Use & Care Manual
Page 5
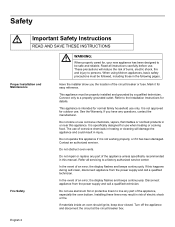
... to line any part of the circuit breaker or fuse. In the event of electric shock or fire. Installing these liners may result in this appliance if it is not approved for details. Refer to the Installation Instructions for outdoor use. It is not working properly, or if it for easy.... In the event of the appliance unless specifically recommended in risk of an error, the display flashes and beeps continuously. If materials inside an oven should ignite, keep door closed. Do not store or use only. The use . These precautions will reduce the risk of corrosive chemicals in ...
... to line any part of the circuit breaker or fuse. In the event of electric shock or fire. Installing these liners may result in this appliance if it is not approved for details. Refer to the Installation Instructions for outdoor use. It is not working properly, or if it for easy.... In the event of the appliance unless specifically recommended in risk of an error, the display flashes and beeps continuously. If materials inside an oven should ignite, keep door closed. Do not store or use only. The use . These precautions will reduce the risk of corrosive chemicals in ...
Use & Care Manual
Page 10
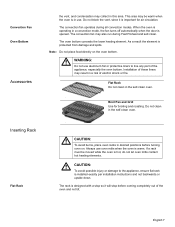
.... If a rack must be warm when the oven is important for broiling and roasting. English 7 m WARNING: Do not use . Do not clean in the self-clean oven. Always use oven mitts when the oven is installed exactly per installation instructions and not backwards or upside down. m CAUTION... on . Broil Pan and Grid Use for air circulation. Convection Fan Oven Bottom Accessories the vent, and condensation may result in a risk of electric shock or fire. This area may also run during all convection modes. Installation of these liners may collect in this area.
.... If a rack must be warm when the oven is important for broiling and roasting. English 7 m WARNING: Do not use . Do not clean in the self-clean oven. Always use oven mitts when the oven is installed exactly per installation instructions and not backwards or upside down. m CAUTION... on . Broil Pan and Grid Use for air circulation. Convection Fan Oven Bottom Accessories the vent, and condensation may result in a risk of electric shock or fire. This area may also run during all convection modes. Installation of these liners may collect in this area.
Use & Care Manual
Page 12
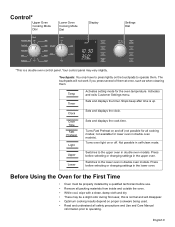
... on or off (not possible for lower oven in the upper oven. Temp Timer Activates setting mode for the First Time • Oven must be properly installed by a qualified technician before use. • Remove all packing materials from inside and outside the oven. • While cool, wipe with ...a clean, damp cloth and dry. • There may vary slightly. Turns oven light on proper cookware being ...
... on or off (not possible for lower oven in the upper oven. Temp Timer Activates setting mode for the First Time • Oven must be properly installed by a qualified technician before use. • Remove all packing materials from inside and outside the oven. • While cool, wipe with ...a clean, damp cloth and dry. • There may vary slightly. Turns oven light on proper cookware being ...
Use & Care Manual
Page 19
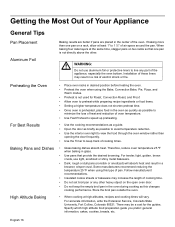
...Installation of these liners may increase the length of cooking time. • Do not set broil pan or any part of the appliance, especially the oven bottom. Preheating the Oven For Best Results Baking Pans and Dishes High Altitude Baking • Place oven racks in a risk of electric shock or fire. Therefore, reduce oven... temperature 25 ºF when baking in the center of the oven. Some...
...Installation of these liners may increase the length of cooking time. • Do not set broil pan or any part of the appliance, especially the oven bottom. Preheating the Oven For Best Results Baking Pans and Dishes High Altitude Baking • Place oven racks in a risk of electric shock or fire. Therefore, reduce oven... temperature 25 ºF when baking in the center of the oven. Some...
Use & Care Manual
Page 36
...MEALS, REMODELLING EXPENSES IN EXCESS OF DIRECT DAMAGES WHICH ARE DEFINITIVELY CAUSED EXCLUSIVELY BY BOSCH, OR OTHERWISE. SOME STATES DO NOT ALLOW THE EXCLUSION OR LIMITATION OF INCIDENTAL OR... Product in anything other than its normal, customary and intended manner (including without limitation cabinetry, walls, floors, shelving, etc.); ANY WARRANTY IMPLIED BY LAW, WHETHER FOR MERCHANTABILITY OR FITNESS FOR ... applicable state, local, city, or county electrical, plumbing and/or building codes, regulations, or laws, including failure to install the product in strict conformity with the Product;
...MEALS, REMODELLING EXPENSES IN EXCESS OF DIRECT DAMAGES WHICH ARE DEFINITIVELY CAUSED EXCLUSIVELY BY BOSCH, OR OTHERWISE. SOME STATES DO NOT ALLOW THE EXCLUSION OR LIMITATION OF INCIDENTAL OR... Product in anything other than its normal, customary and intended manner (including without limitation cabinetry, walls, floors, shelving, etc.); ANY WARRANTY IMPLIED BY LAW, WHETHER FOR MERCHANTABILITY OR FITNESS FOR ... applicable state, local, city, or county electrical, plumbing and/or building codes, regulations, or laws, including failure to install the product in strict conformity with the Product;


