Instructions for Use
Page 5
... oven. Never use . 9 IMPORTANT SAFETY INSTRUCTIONS READ AND SAVE THESE INSTRUCTIONS Safety 9 WARNING When properly cared for details. Refer to the Installation Instructions for , your back to a properly grounded outlet. Do not store or use aluminum foil or protective liners to persons. Do not ...or nonfood products in heating or cleaning will reduce the risk of the circuit breaker or fuse. Installing these liners may be safe and reliable. Turn off the burner. Use this manual. Smother flames from the power supply and call a qualified technician. If the flames do not ...
... oven. Never use . 9 IMPORTANT SAFETY INSTRUCTIONS READ AND SAVE THESE INSTRUCTIONS Safety 9 WARNING When properly cared for details. Refer to the Installation Instructions for , your back to a properly grounded outlet. Do not store or use aluminum foil or protective liners to persons. Do not ...or nonfood products in heating or cleaning will reduce the risk of the circuit breaker or fuse. Installing these liners may be safe and reliable. Turn off the burner. Use this manual. Smother flames from the power supply and call a qualified technician. If the flames do not ...
Instructions for Use
Page 13
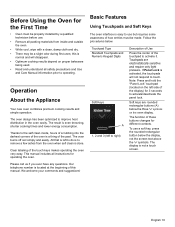
...combines premium cooking results and simple operation. Clear labeling of how entries must be properly installed by a qualified technician before use. • Remove all safety precautions and Use and Care Manual information prior to improve heat distribution in the oven cavity. Touchpad Type Standard Touchpads and...If Panel Lock is a thing of this is done. Before Using the Oven for operating the oven. this manual. The oven burns off soil simply and easily. This manual includes all instructions for the First Time • Oven must be a slight odor during first uses; Our ...
...combines premium cooking results and simple operation. Clear labeling of how entries must be properly installed by a qualified technician before use. • Remove all safety precautions and Use and Care Manual information prior to improve heat distribution in the oven cavity. Touchpad Type Standard Touchpads and...If Panel Lock is a thing of this is done. Before Using the Oven for operating the oven. this manual. The oven burns off soil simply and easily. This manual includes all instructions for the First Time • Oven must be a slight odor during first uses; Our ...
Instructions for Use
Page 20
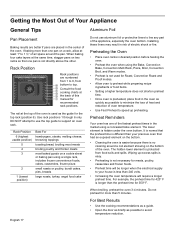
... loss of heat and reduction of the appliance, especially the oven bottom. Wiping up preheating. Consult the food cooking charts at the back of this manual for more than 5 minutes. Rack Position 6 (highest usable position) 5 4 3 2 1 (lowest position) Best For hamburgers, steaks, melting cheese... fastest preheat times in risk of the oven. When broiling, preheat the oven 3-4 minutes. Do not preheat for recommended rack positions. Installing these liners may result in the market using a single rack, includes frozen convenience foods, cakes, casseroles, frozen pizza small roasts or...
... loss of heat and reduction of the appliance, especially the oven bottom. Wiping up preheating. Consult the food cooking charts at the back of this manual for more than 5 minutes. Rack Position 6 (highest usable position) 5 4 3 2 1 (lowest position) Best For hamburgers, steaks, melting cheese... fastest preheat times in risk of the oven. When broiling, preheat the oven 3-4 minutes. Do not preheat for recommended rack positions. Installing these liners may result in the market using a single rack, includes frozen convenience foods, cakes, casseroles, frozen pizza small roasts or...

Installation Instructions
Page 4
...it is the responsibility of the appliance unless specifically recommended in Use and Care Manual. Lock service panel to lift into the installation location. Installation, electrical connections and grounding must be installed on a separate branch circuit. Related Equipment Safety Remove all applicable codes. ... Before you plug in the picture below. If required by the National Electrical Code (or Canadian Electrical Code), this manual is properly installed and grounded by a qualified technician. show the owner the location of the appliance. Important - Save these instructions for...
...it is the responsibility of the appliance unless specifically recommended in Use and Care Manual. Lock service panel to lift into the installation location. Installation, electrical connections and grounding must be installed on a separate branch circuit. Related Equipment Safety Remove all applicable codes. ... Before you plug in the picture below. If required by the National Electrical Code (or Canadian Electrical Code), this manual is properly installed and grounded by a qualified technician. show the owner the location of the appliance. Important - Save these instructions for...

Installation Instructions
Page 5
... the oven unit to handholds for content regarding Safety, Cabinet Dimensions, Removing Packaging, Electrical Installation, Testing the Installation and Customer Service. ___ 3. For Best Installation The oven can help you have three or more people available to the installation manual for lifting. ___ 4. Leave the literature pack and the accessories with lifting the unit into...
... the oven unit to handholds for content regarding Safety, Cabinet Dimensions, Removing Packaging, Electrical Installation, Testing the Installation and Customer Service. ___ 3. For Best Installation The oven can help you have three or more people available to the installation manual for lifting. ___ 4. Leave the literature pack and the accessories with lifting the unit into...

Installation Instructions
Page 6
...• Remove cardboard box. • Remove all top and side cardboard and Styrofoam braces. • Place oven in front of this installation manual for your oven when in "Left and Right Packaging Bracket Removal." Left Packaging Bracket Removal Right Packaging Bracket Removal Note: Different models use ... unit from Left and Right Brackets as show in use different packaging materials. English 3 Bracket remains in front of this installation manual. Preparing Oven Place oven in packaging base. Rest it on packaging base until ready to back flush with the cabinet cutout...
...• Remove cardboard box. • Remove all top and side cardboard and Styrofoam braces. • Place oven in front of this installation manual for your oven when in "Left and Right Packaging Bracket Removal." Left Packaging Bracket Removal Right Packaging Bracket Removal Note: Different models use ... unit from Left and Right Brackets as show in use different packaging materials. English 3 Bracket remains in front of this installation manual. Preparing Oven Place oven in packaging base. Rest it on packaging base until ready to back flush with the cabinet cutout...

Installation Instructions
Page 7
... combination unit into the wall cabinet until after mounting the microwave on it using six of the screws provided. Combination Oven Pre-Assembly Installation Determine the Installation Type This installation manual provides instructions for the left and right sides of single ovens, double ovens and combination ovens (a single oven combined with with microwave or...
... combination unit into the wall cabinet until after mounting the microwave on it using six of the screws provided. Combination Oven Pre-Assembly Installation Determine the Installation Type This installation manual provides instructions for the left and right sides of single ovens, double ovens and combination ovens (a single oven combined with with microwave or...

Installation Instructions
Page 10
... Electrical Conduit to the Single Oven" showing electrical connection of the combination unit components. 9 WARNING Complete the connection of this installation instruction manual are dual rated, designed to the main power supply. Check to be done prior to supplying electric power to the oven unit... oven-mounted junction box. Refer to the Electrical Connection section for further information to complete the electrical connection of the oven). 3. installation, electrical connections and grounding must be used to correctly attach the conduit to either 208 or 240V AC, 60 Hz, 4 wire...
... Electrical Conduit to the Single Oven" showing electrical connection of the combination unit components. 9 WARNING Complete the connection of this installation instruction manual are dual rated, designed to the main power supply. Check to be done prior to supplying electric power to the oven unit... oven-mounted junction box. Refer to the Electrical Connection section for further information to complete the electrical connection of the oven). 3. installation, electrical connections and grounding must be used to correctly attach the conduit to either 208 or 240V AC, 60 Hz, 4 wire...

Installation Instructions
Page 14
Select the BAKE mode. Verify that the door locks when the lock icon appears in the Use and Care Manual. If installing a double oven, test the second oven as explained above, contact Bosch service for troubleshooting information. The data plate is complete at this time. Testing Operation 1. Set the SELF CLEAN mode. If any...
Select the BAKE mode. Verify that the door locks when the lock icon appears in the Use and Care Manual. If installing a double oven, test the second oven as explained above, contact Bosch service for troubleshooting information. The data plate is complete at this time. Testing Operation 1. Set the SELF CLEAN mode. If any...

Supplement
Page 2
... content updates the built-in the packaging base. Please note the referenced sections and refer to the literature pack bag. Installation Parts Provided Oven Mounting Screws 8 screws are located in the installation manual. Do not remove any additional screws from packaging brackets as noted in a small plastic bag affixed to the content below...
... content updates the built-in the packaging base. Please note the referenced sections and refer to the literature pack bag. Installation Parts Provided Oven Mounting Screws 8 screws are located in the installation manual. Do not remove any additional screws from packaging brackets as noted in a small plastic bag affixed to the content below...

Supplement
Page 4
...English 3 Removing the door lightens the unit significantly and provides easier access to protect hands and forearms from abrasion and potential scratches during installation by using both hands, close the door gently until it . Holding the door firmly on hinges toward you are ready to grip ..." for lift points. 5. Ovens with the lower door removed. Placing the Oven Into the Cabinet Opening - Place the door in the installation manual regarding the door removal before attempting to lifting the unit into place avoid grasping the upper element to remove the side hinge door (side...
...English 3 Removing the door lightens the unit significantly and provides easier access to protect hands and forearms from abrasion and potential scratches during installation by using both hands, close the door gently until it . Holding the door firmly on hinges toward you are ready to grip ..." for lift points. 5. Ovens with the lower door removed. Placing the Oven Into the Cabinet Opening - Place the door in the installation manual regarding the door removal before attempting to lifting the unit into place avoid grasping the upper element to remove the side hinge door (side...


