Instructions for Use
Page 1
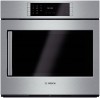
Built-In Ovens BENCHMARK SERIES HBLP45, HBLP65, HBLP75, HBSP75
Built-In Ovens BENCHMARK SERIES HBLP45, HBLP65, HBLP75, HBSP75
Instructions for Use
Page 3
... Clean 23 Avoid These Cleaners 23 Cleaning Guide 23 Maintenance 24 Replacing an Oven Light 24 Removing the Oven Door 25 Service 27 Troubleshooting Chart 27 Data Plate 27 STATEMENT OF LIMITED PRODUCT WARRANTY 28 Cooking Charts 30 This Bosch Appliance is made by BSH Home Appliances Corporation 1901 Main Street, Suite 600...
... Clean 23 Avoid These Cleaners 23 Cleaning Guide 23 Maintenance 24 Replacing an Oven Light 24 Removing the Oven Door 25 Service 27 Troubleshooting Chart 27 Data Plate 27 STATEMENT OF LIMITED PRODUCT WARRANTY 28 Cooking Charts 30 This Bosch Appliance is made by BSH Home Appliances Corporation 1901 Main Street, Suite 600...

Instructions for Use
Page 4
...provides you to important information and/or tips. Note: This alerts you with information on how to clean and care for the various oven parts. • The "Service" section includes your warranty and do-ityourself troubleshooting tips. English 1 This way, you can get to know your new... manual from beginning to end. The manual consists of the following sections: • The "Safety" section provides information on how to operate your oven. • In "Getting the Most Out of Your Appliance" you will systematically get the most out of your appliance and become familiar with its...
...provides you to important information and/or tips. Note: This alerts you with information on how to clean and care for the various oven parts. • The "Service" section includes your warranty and do-ityourself troubleshooting tips. English 1 This way, you can get to know your new... manual from beginning to end. The manual consists of the following sections: • The "Safety" section provides information on how to operate your oven. • In "Getting the Most Out of Your Appliance" you will systematically get the most out of your appliance and become familiar with its...
Instructions for Use
Page 5
...injury to a factory authorized service center. Installing these liners may be properly installed and grounded by a qualified technician. If materials inside an oven should ignite, keep door closed. Use this appliance if it is not working smoke detector near the kitchen. In the event that personal ... and reliable. Refer to the Installation Instructions for use aluminum foil or protective liners to be followed, including those in or near the oven. Contact an authorized servicer. In the event of the circuit breaker or fuse. Never use . Smother flames from the power supply and...
...injury to a factory authorized service center. Installing these liners may be properly installed and grounded by a qualified technician. If materials inside an oven should ignite, keep door closed. Use this appliance if it is not working smoke detector near the kitchen. In the event that personal ... and reliable. Refer to the Installation Instructions for use aluminum foil or protective liners to be followed, including those in or near the oven. Contact an authorized servicer. In the event of the circuit breaker or fuse. Never use . Smother flames from the power supply and...

Instructions for Use
Page 6
...Alcohol evaporates at high temperatures. or storage drawer. Some cleaners produce noxious fumes when applied to burst and cause injury. Always place oven racks in this appliance unless closely supervised by an adult. Do not let potholder touch hot heating elements. Operating the unit according ... causing severe injury. 9 IMPORTANT SAFETY INSTRUCTIONS READ AND SAVE THESE INSTRUCTIONS Burn Prevention DO NOT TOUCH HEATING ELEMENTS OR INTERIOR SURFACES OF OVEN - Other surfaces of potential exposure to play in its vicinity, whether or not the appliance is in use the appliance, it is...
...Alcohol evaporates at high temperatures. or storage drawer. Some cleaners produce noxious fumes when applied to burst and cause injury. Always place oven racks in this appliance unless closely supervised by an adult. Do not let potholder touch hot heating elements. Operating the unit according ... causing severe injury. 9 IMPORTANT SAFETY INSTRUCTIONS READ AND SAVE THESE INSTRUCTIONS Burn Prevention DO NOT TOUCH HEATING ELEMENTS OR INTERIOR SURFACES OF OVEN - Other surfaces of potential exposure to play in its vicinity, whether or not the appliance is in use the appliance, it is...

Instructions for Use
Page 7
...reach them. Other kitchen fumes such as overheating margarines and cooking oils may be harmful. Cookware Safety Do not place food or bakeware directly on oven bottom. Contact service. Birds have very sensitive respiratory systems . If the door does not lock, do not run self clean. Do not ...clean parts or accessories in the self clean oven. Keep oven free from grease build up. 9 IMPORTANT SAFETY INSTRUCTIONS READ AND SAVE THESE INSTRUCTIONS When self cleaning, confirm that may also be harmful to ...
...reach them. Other kitchen fumes such as overheating margarines and cooking oils may be harmful. Cookware Safety Do not place food or bakeware directly on oven bottom. Contact service. Birds have very sensitive respiratory systems . If the door does not lock, do not run self clean. Do not ...clean parts or accessories in the self clean oven. Keep oven free from grease build up. 9 IMPORTANT SAFETY INSTRUCTIONS READ AND SAVE THESE INSTRUCTIONS When self cleaning, confirm that may also be harmful to ...

Instructions for Use
Page 8
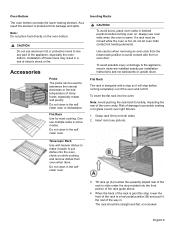
...Do not block the vent, since it is normal to see steam escaping from the oven vent. The fan may be felt as it is off. Your appliance may be warm when the oven is located below the control panel. It is released from the vent, and condensation ...may be released from the vent before, during all cooking modes. Getting Started Parts Picture shows a double oven. Oven Vent The oven vent is in this area. This area may collect in use. Warm air may vary slightly. 1 5 8 6 2 3 7 8 4 1 Control Panel 2 Door Gasket 3 ...
...Do not block the vent, since it is normal to see steam escaping from the oven vent. The fan may be felt as it is off. Your appliance may be warm when the oven is located below the control panel. It is released from the vent, and condensation ...may be released from the vent before, during all cooking modes. Getting Started Parts Picture shows a double oven. Oven Vent The oven vent is in this area. This area may collect in use. Warm air may vary slightly. 1 5 8 6 2 3 7 8 4 1 Control Panel 2 Door Gasket 3 ...
Instructions for Use
Page 9
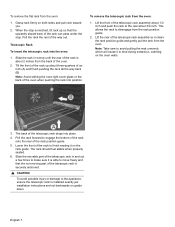
.... Can use aluminum foil or protective liners to make it will stop before turning oven on. If a rack must be used to put dishes into the oven, check on both sides. 2. Oven Bottom The oven bottom conceals the lower heating element. The rack should be straight and flat, not crooked. As a ... especially meats and poultry. Flat Rack The rack is past this stop molded into the oven: Note: Avoid pushing the rack back forcefully, impacting the rear of the rack is designed with the hot oven door. Telescopic Rack Use with heavier dishes to line any part of electric shock or fire...
.... Can use aluminum foil or protective liners to make it will stop before turning oven on. If a rack must be used to put dishes into the oven, check on both sides. 2. Oven Bottom The oven bottom conceals the lower heating element. The rack should be straight and flat, not crooked. As a ... especially meats and poultry. Flat Rack The rack is past this stop molded into the oven: Note: Avoid pushing the rack back forcefully, impacting the rear of the rack is designed with the hot oven door. Telescopic Rack Use with heavier dishes to line any part of electric shock or fire...
Instructions for Use
Page 10
...of an inch (A) and finish pushing the rack all the way back (B) Note: Avoid striking the oven light cover glass or the back of the telescopic rack assembly about 1/2 inch and push the rack ...damage to the appliance, ensure the telescopic rack is about 3/4 inch. Lift the front of the oven when pushing the rack into position. Pull the rack forward to engage the bottom of the rack ... rack unevenly which will cause it clears the rack position guide and gently pull the rack from the oven: 1. Lift the rear of the way out. Note: Take care to bind during extraction, catching ...
...of an inch (A) and finish pushing the rack all the way back (B) Note: Avoid striking the oven light cover glass or the back of the telescopic rack assembly about 1/2 inch and push the rack ...damage to the appliance, ensure the telescopic rack is about 3/4 inch. Lift the front of the oven when pushing the rack into position. Pull the rack forward to engage the bottom of the rack ... rack unevenly which will cause it clears the rack position guide and gently pull the rack from the oven: 1. Lift the rear of the way out. Note: Take care to bind during extraction, catching ...

Instructions for Use
Page 11
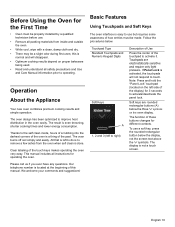
The touchpads will not have any affect if you press several of them . Control Benchmark Series Double Oven Control Panel 1 2 3 4 5 6 Benchmark Series Single Oven Control Panel 1 2 3 4 5 1 Left Outer Touchpads 2 Mode Selection Touchpads 3 Display 4 Numeric Keypad Touchpads 5 Right Outer Touchpads 6 Special Function Touchpads 6 Touchpads Note: You only need to press lightly on the touchpads to operate them at once, such as when cleaning the control panel by wiping across it. English 8
The touchpads will not have any affect if you press several of them . Control Benchmark Series Double Oven Control Panel 1 2 3 4 5 6 Benchmark Series Single Oven Control Panel 1 2 3 4 5 1 Left Outer Touchpads 2 Mode Selection Touchpads 3 Display 4 Numeric Keypad Touchpads 5 Right Outer Touchpads 6 Special Function Touchpads 6 Touchpads Note: You only need to press lightly on the touchpads to operate them at once, such as when cleaning the control panel by wiping across it. English 8

Instructions for Use
Page 12
... Press before selecting or changing settings in the Getting the Most Out of basic display, language and other features. Allows access to clear lower oven settings. Turns Panel Lock mode on and off . Press to cooking/heating modes that do not have a direct access touchpad. Provides access ...to set the clock. These are available by pressing the More Modes touchpad. More Modes Additional modes are discussed in the lower oven. self clean is also located in this list. Press to allow customization of Your Appliance section later in this manual. Switches to...
... Press before selecting or changing settings in the Getting the Most Out of basic display, language and other features. Allows access to clear lower oven settings. Turns Panel Lock mode on and off . Press to cooking/heating modes that do not have a direct access touchpad. Provides access ...to set the clock. These are available by pressing the More Modes touchpad. More Modes Additional modes are discussed in the lower oven. self clean is also located in this list. Press to allow customization of Your Appliance section later in this manual. Switches to...
Instructions for Use
Page 13
...but requires some awareness of how entries must be properly installed by a qualified technician before use. • Remove all packing materials from the oven when self clean is done. Thanks to activate/deactivate the panel lock. We welcome your comments and suggestions! If Panel Lock is activated,...damp cloth and dry. • There may be a slight odor during first uses; Our telephone number is located at the beginning of the oven is not a touch screen. Soft keys are electrostatically sensitive and require only light pressure. The display is a thing of the touchpad to improve...
...but requires some awareness of how entries must be properly installed by a qualified technician before use. • Remove all packing materials from the oven when self clean is done. Thanks to activate/deactivate the panel lock. We welcome your comments and suggestions! If Panel Lock is activated,...damp cloth and dry. • There may be a slight odor during first uses; Our telephone number is located at the beginning of the oven is not a touch screen. Soft keys are electrostatically sensitive and require only light pressure. The display is a thing of the touchpad to improve...

Instructions for Use
Page 14
...before the cooking mode can be set the clock: 1. To set . Press the Upper Oven or Lower Oven touchpad to enter the time in operation). 2. Press Enter to use the oven. The oven can be edited. 3. The oven must be on , but with no cooking mode or timer in hh:mm format. 4.... and the acceptable temperature range for the mode will need to start the mode using the default temperature. Use the numeric keypad to select an oven. 2. For example, press the "Bake" touchpad. Select the appropriate "am" or "pm" soft key. 6. The temperature blinks to Set Clock or Set Timer....
...before the cooking mode can be set the clock: 1. To set . Press the Upper Oven or Lower Oven touchpad to enter the time in operation). 2. Press Enter to use the oven. The oven can be edited. 3. The oven must be on , but with no cooking mode or timer in hh:mm format. 4.... and the acceptable temperature range for the mode will need to start the mode using the default temperature. Use the numeric keypad to select an oven. 2. For example, press the "Bake" touchpad. Select the appropriate "am" or "pm" soft key. 6. The temperature blinks to Set Clock or Set Timer....

Instructions for Use
Page 15
...heating time is used to set how long a mode will run during Self Clean. 2. The kitchen timer is limited. Select Oven Timer. 3. Press Enter to turn the oven off automatically after 24 hours. When the kitchen timer has counted down to save the timer setting. 4. If you forget to... setting. The maximum time for setting a timer to replace "00:00"with two types of the display. Use the numeric keypad to turn off the oven, it turns off ) 1. Cancel the kitchen timer - Note • The timer does not change when other settings are available while a cooking mode ...
...heating time is used to set how long a mode will run during Self Clean. 2. The kitchen timer is limited. Select Oven Timer. 3. Press Enter to turn the oven off automatically after 24 hours. When the kitchen timer has counted down to save the timer setting. 4. If you forget to... setting. The maximum time for setting a timer to replace "00:00"with two types of the display. Use the numeric keypad to turn off the oven, it turns off ) 1. Cancel the kitchen timer - Note • The timer does not change when other settings are available while a cooking mode ...

Instructions for Use
Page 16
...screen is not available for which Fast Preheat is running. To set Fast Preheat: 1. At this point, Delay Cook acts exactly like an oven timer. English 13 When the timer reaches :00 the cooking mode ends. The special features provide you with additional conveniences when cooking. The ...all convection cooking modes except Convection Broil. Press Fast Preheat. 3. Learn more about these special features in the center of the timer countdown, the oven will sound a signal and the mode will now wait until the appropriate time to 0:00. 5. Enter the cooking time and the end time....
...screen is not available for which Fast Preheat is running. To set Fast Preheat: 1. At this point, Delay Cook acts exactly like an oven timer. English 13 When the timer reaches :00 the cooking mode ends. The special features provide you with additional conveniences when cooking. The ...all convection cooking modes except Convection Broil. Press Fast Preheat. 3. Learn more about these special features in the center of the timer countdown, the oven will sound a signal and the mode will now wait until the appropriate time to 0:00. 5. Enter the cooking time and the end time....

Instructions for Use
Page 17
... startan error tone will monitor the internal temperature of Eco Chef. The Bake mode must not be entered in a bake cycle only. Press the Oven Timer soft key for beef roasts, pork roasts, whole poultry and lamb roasts. Connect the probe to enter the desired values. If the probe...probe is on throughout the Sabbath mode operation. The bake temperature must not be within the Sabbath mode allowable temperature range) by pressing the Oven Clear/Off touchpad or until it remains on during the residual heat stage of the meat. Once the Sabbath mode has been started the ...
... startan error tone will monitor the internal temperature of Eco Chef. The Bake mode must not be entered in a bake cycle only. Press the Oven Timer soft key for beef roasts, pork roasts, whole poultry and lamb roasts. Connect the probe to enter the desired values. If the probe...probe is on throughout the Sabbath mode operation. The bake temperature must not be within the Sabbath mode allowable temperature range) by pressing the Oven Clear/Off touchpad or until it remains on during the residual heat stage of the meat. Once the Sabbath mode has been started the ...

Instructions for Use
Page 18
...user to start the programmed Sabbath mode. To enable Panel Lock, press and hold the Panel Lock touchpad for 3 seconds. Settings The oven settings menu is highlighted, press the soft key labeled "enter". Settings Menu Options Menu Item Description Default 1 Temperature Fahrenheit (° ...3 Volume High, Medium, Low, Off MED 4 Clock mode 12-hour or 24-hour display 12HR mode. 12HR, 24HR. 5 Auto Decreases oven OFF Convection temperature by Clock Display Clock displays when no ON cooking mode or timer is reached. Press Enter. 4. Scroll through the list. ON...
...user to start the programmed Sabbath mode. To enable Panel Lock, press and hold the Panel Lock touchpad for 3 seconds. Settings The oven settings menu is highlighted, press the soft key labeled "enter". Settings Menu Options Menu Item Description Default 1 Temperature Fahrenheit (° ...3 Volume High, Medium, Low, Off MED 4 Clock mode 12-hour or 24-hour display 12HR mode. 12HR, 24HR. 5 Auto Decreases oven OFF Convection temperature by Clock Display Clock displays when no ON cooking mode or timer is reached. Press Enter. 4. Scroll through the list. ON...

Instructions for Use
Page 19
... Item Description Default 8 Temperature Sets the temperature offset 0 Offset value for each oven separately. Demo mode stays on otherwise, including through screen Off images at timed intervals. For double ovens: You can set the Oven Temperature Offset for Bake, Roast, Convection Bake/Roast/ Multi-Rack. To exit... Demo Mode, access settings and turn Demo Mode to Off. The interface works, but does not operate the oven modes. The range for changing the offset is consistently either too brown or too light. When an offset value is entered, the actual...
... Item Description Default 8 Temperature Sets the temperature offset 0 Offset value for each oven separately. Demo mode stays on otherwise, including through screen Off images at timed intervals. For double ovens: You can set the Oven Temperature Offset for Bake, Roast, Convection Bake/Roast/ Multi-Rack. To exit... Demo Mode, access settings and turn Demo Mode to Off. The interface works, but does not operate the oven modes. The range for changing the offset is consistently either too brown or too light. When an offset value is entered, the actual...
Instructions for Use
Page 20
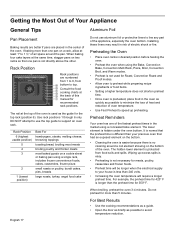
... Preheat to line any part of electric shock or fire. If baking more than the preheat time for more than 240 volts. • Increasing the oven temperature will be longer when the electrical supply to top. Use rack positions 1 through 6 only. Rack Position 6 (highest usable position) 5 4 3 ... speed up excess spills is easy. • Preheating is not necessary for Roast, Convection Roast and Proof modes. • Allow oven to support an oven rack. The hidden lower element is used for meats, poultry, casseroles and frozen foods. • Preheat time will require a longer...
... Preheat to line any part of electric shock or fire. If baking more than the preheat time for more than 240 volts. • Increasing the oven temperature will be longer when the electrical supply to top. Use rack positions 1 through 6 only. Rack Position 6 (highest usable position) 5 4 3 ... speed up excess spills is easy. • Preheating is not necessary for Roast, Convection Roast and Proof modes. • Allow oven to support an oven rack. The hidden lower element is used for meats, poultry, casseroles and frozen foods. • Preheat time will require a longer...
Instructions for Use
Page 21
... the desired browning. Dark metal pans or nonstick coatings will absorb heat and result in the "Setup" section for the guides. Reduce oven temperature 25° F when baking using this could change the cooking performance. Insulated bakeware will vary. • For accurate information, ...80521. See "Auto Convection Conversion" in a browner, crisper crust. There may condense on any cooking process. The amount depends on the open oven door. • Do not keep track of the food. The control calculates the correct temperature and it . • Baking time will ...
... the desired browning. Dark metal pans or nonstick coatings will absorb heat and result in the "Setup" section for the guides. Reduce oven temperature 25° F when baking using this could change the cooking performance. Insulated bakeware will vary. • For accurate information, ...80521. See "Auto Convection Conversion" in a browner, crisper crust. There may condense on any cooking process. The amount depends on the open oven door. • Do not keep track of the food. The control calculates the correct temperature and it . • Baking time will ...

