
Installation Instructions
Page 4
.... Destroy the packaging after unpacking the appliance. 9 IMPORTANT SAFETY INSTRUCTIONS READ AND SAVE THESE INSTRUCTIONS Safety WARNING: If the information in this manual is not followed exactly, fire or shock may have sharp edges. WARNING: Do not repair or replace any part of the appliance unless ...specifically recommended in front of the oven cavity, ready to the shipping pallet until it is in the manuals. All servicing should be installed on a separate branch circuit. Remove the door for guidance. See instructions in the OFF position. Hidden...
.... Destroy the packaging after unpacking the appliance. 9 IMPORTANT SAFETY INSTRUCTIONS READ AND SAVE THESE INSTRUCTIONS Safety WARNING: If the information in this manual is not followed exactly, fire or shock may have sharp edges. WARNING: Do not repair or replace any part of the appliance unless ...specifically recommended in front of the oven cavity, ready to the shipping pallet until it is in the manuals. All servicing should be installed on a separate branch circuit. Remove the door for guidance. See instructions in the OFF position. Hidden...

Installation Instructions
Page 5
... 13. For Best Installation The oven can be cumbersome unless the detailed door removal instructions are followed carefully. Note: Do not attempt to the installation manual for content regarding Safety, Cabinet Dimensions, Removing Packaging, Electrical Installation, Testing the Installation and Customer Service. ___ 3. Move the oven unit into place. Slide the...
... 13. For Best Installation The oven can be cumbersome unless the detailed door removal instructions are followed carefully. Note: Do not attempt to the installation manual for content regarding Safety, Cabinet Dimensions, Removing Packaging, Electrical Installation, Testing the Installation and Customer Service. ___ 3. Move the oven unit into place. Slide the...

Installation Instructions
Page 6
...8226; Remove cardboard box. • Remove all top and side cardboard and Styrofoam braces. • Place oven in front of this installation manual. Preparing Oven Place oven in front of cabinets where it is in line with the bottom and side of 2x4's extending front to back flush...; 1/4" (6.4 mm) space between the side of the oven and an adjacent wall or cabinet door when installed at the back of this installation manual for your particular model. Dimensions and Cabinet Requirements Cabinet requirements vary depending on the model to be installed. • Unscrew unit from Left and...
...8226; Remove cardboard box. • Remove all top and side cardboard and Styrofoam braces. • Place oven in front of this installation manual. Preparing Oven Place oven in front of cabinets where it is in line with the bottom and side of 2x4's extending front to back flush...; 1/4" (6.4 mm) space between the side of the oven and an adjacent wall or cabinet door when installed at the back of this installation manual for your particular model. Dimensions and Cabinet Requirements Cabinet requirements vary depending on the model to be installed. • Unscrew unit from Left and...

Installation Instructions
Page 7
... installed with a Steam Oven or with microwave or steam oven). Install both installations. English 4 Combination Oven Pre-Assembly Installation Determine the Installation Type This installation manual provides instructions for the left and right sides of the oven.
... installed with a Steam Oven or with microwave or steam oven). Install both installations. English 4 Combination Oven Pre-Assembly Installation Determine the Installation Type This installation manual provides instructions for the left and right sides of the oven.

Installation Instructions
Page 10
... includes a microwave or steam oven over tighten. 7. Refer to the Electrical Connection section for further information to complete the electrical connection of this installation instruction manual are dual rated, designed to be a 4-wire single-phase AC. Connecting the Microwave Oven or Steam Oven Electrical Conduit to the Single Oven Note: If...
... includes a microwave or steam oven over tighten. 7. Refer to the Electrical Connection section for further information to complete the electrical connection of this installation instruction manual are dual rated, designed to be a 4-wire single-phase AC. Connecting the Microwave Oven or Steam Oven Electrical Conduit to the Single Oven Note: If...

Installation Instructions
Page 14
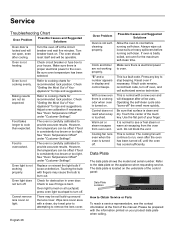
... the SELF CLEAN mode. Data Plate The data plate shows the model and serial number. Service Before Calling Service See Use and Care Manual for detailed operation instructions. 3. Testing Operation 1. Otherwise, the installation is located on the underside of the control panel. If installing a... double oven, test the second oven as explained above, contact Bosch service for assistance. Refer to the Warranty in the display. 5. Refer to preheat. 4. Test the oven mode. Data Plate English 11...
... the SELF CLEAN mode. Data Plate The data plate shows the model and serial number. Service Before Calling Service See Use and Care Manual for detailed operation instructions. 3. Testing Operation 1. Otherwise, the installation is located on the underside of the control panel. If installing a... double oven, test the second oven as explained above, contact Bosch service for assistance. Refer to the Warranty in the display. 5. Refer to preheat. 4. Test the oven mode. Data Plate English 11...

Supplement
Page 2
...(the screw circled and shown as shown below in "Packaging Bracket Removal." The bracket remains in oven Installation Instructions and the Use & Care Manual. Removing Packaging • Cut straps on the outside of the box. • Remove the cardboard box by lifting it up and off ...differently. The bottom trim pictured below is pre-installed at factory) Omit Step 5 in the installation manual. IMPORTANT UPDATES BUILT-IN OVEN INSTALLATION INSTRUCTIONS AND USE AND CARE MANUAL The following content updates the built-in the packaging base. Do not remove any additional screws from...
...(the screw circled and shown as shown below in "Packaging Bracket Removal." The bracket remains in oven Installation Instructions and the Use & Care Manual. Removing Packaging • Cut straps on the outside of the box. • Remove the cardboard box by lifting it up and off ...differently. The bottom trim pictured below is pre-installed at factory) Omit Step 5 in the installation manual. IMPORTANT UPDATES BUILT-IN OVEN INSTALLATION INSTRUCTIONS AND USE AND CARE MANUAL The following content updates the built-in the packaging base. Do not remove any additional screws from...

Supplement
Page 4
... using the oven door handle as a gripping point. Carefully lift the door up and out of the oven cavity. Place the door in the installation manual regarding the door removal before attempting to wear work shoes during installation by using both hands, close the door gently until it . English 3 Removing the...
... using the oven door handle as a gripping point. Carefully lift the door up and out of the oven cavity. Place the door in the installation manual regarding the door removal before attempting to wear work shoes during installation by using both hands, close the door gently until it . English 3 Removing the...
Supplement
Page 7
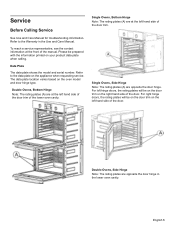
... right hand side of the door trim. Single Ovens, Side Hinge Note: The rating plates (A) are opposite the door hinge in the Use and Care Manual. English 6 Data Plate The data plate shows the model and serial number. For left hand side of the door. Please be on the door trim... in the lower oven cavity. Single Ovens, Bottom Hinge Note: The rating plates (A) are at the left hand side of the door trim of the manual. Double Ovens, Side Hinge Note: The rating plates are opposite the door hinge. Service Before Calling Service See Use and Care...
... right hand side of the door trim. Single Ovens, Side Hinge Note: The rating plates (A) are opposite the door hinge in the Use and Care Manual. English 6 Data Plate The data plate shows the model and serial number. For left hand side of the door. Please be on the door trim... in the lower oven cavity. Single Ovens, Bottom Hinge Note: The rating plates (A) are at the left hand side of the door trim of the manual. Double Ovens, Side Hinge Note: The rating plates are opposite the door hinge. Service Before Calling Service See Use and Care...
Instructions for Use
Page 2
Table of Contents How This Manual is Organized 1 Safety Definitions 1 Important Safety Instructions 2 Safety 2 Getting Started 5 Parts 5 Accessories 6 Control 8 Before Using the Oven for the First Time 10 About the Appliance ... Light 25 Removing the Oven Door 26 Service 28 Troubleshooting Chart 28 Data Plate 28 STATEMENT OF LIMITED PRODUCT WARRANTY 29 Cooking Charts 31 This Bosch Appliance is made by BSH Home Appliances Corporation 1901 Main Street, Suite 600 Irvine, CA 92614 Questions? 1-800-944-2904 www...
Table of Contents How This Manual is Organized 1 Safety Definitions 1 Important Safety Instructions 2 Safety 2 Getting Started 5 Parts 5 Accessories 6 Control 8 Before Using the Oven for the First Time 10 About the Appliance ... Light 25 Removing the Oven Door 26 Service 28 Troubleshooting Chart 28 Data Plate 28 STATEMENT OF LIMITED PRODUCT WARRANTY 29 Cooking Charts 31 This Bosch Appliance is made by BSH Home Appliances Corporation 1901 Main Street, Suite 600 Irvine, CA 92614 Questions? 1-800-944-2904 www...

Instructions for Use
Page 3
... Safety Definitions 9 WARNING This indicates that death or serious injuries may occur as a result of non-observance of this advisory. About This Manual How This Manual is Organized You can get to operate your oven. • In "Getting the Most Out of Your Appliance" you can find a list...you with information on how to know your appliance and become familiar with its operation and features. Pay special attention to end. English 1 The manual consists of many common foods with this warning. 9 CAUTION This indicates that damage to clean and care for the various oven parts. •...
... Safety Definitions 9 WARNING This indicates that death or serious injuries may occur as a result of non-observance of this advisory. About This Manual How This Manual is Organized You can get to operate your oven. • In "Getting the Most Out of Your Appliance" you can find a list...you with information on how to know your appliance and become familiar with its operation and features. Pay special attention to end. English 1 The manual consists of many common foods with this warning. 9 CAUTION This indicates that damage to clean and care for the various oven parts. •...
Instructions for Use
Page 4
...properly, or if it for outdoor use aluminum foil or protective liners to persons. It is not approved for easy reference. Do not operate this manual. Do not repair or replace any questions, contact the manufacturer. Use this appliance only for details. Always have any part of electric shock or... will reduce the risk of an error, the display flashes and beeps continuously. Installing these liners may be followed, including those in this manual. Read all servicing to the installation instructions for its intended purpose as described in the following pages.
...properly, or if it for outdoor use aluminum foil or protective liners to persons. It is not approved for easy reference. Do not operate this manual. Do not repair or replace any questions, contact the manufacturer. Use this appliance only for details. Always have any part of electric shock or... will reduce the risk of an error, the display flashes and beeps continuously. Installing these liners may be followed, including those in this manual. Read all servicing to the installation instructions for its intended purpose as described in the following pages.
Instructions for Use
Page 6
.... When self-cleaning, confirm that may also be harmful. Contact service. Birds have very sensitive respiratory systems . Do not clean parts or accessories in this manual. Providing good ventilation when cooking with gas. 2. Keep oven free from grease build up. Exposure to these substances can be harmful to the instructions in...
.... When self-cleaning, confirm that may also be harmful. Contact service. Birds have very sensitive respiratory systems . Do not clean parts or accessories in this manual. Providing good ventilation when cooking with gas. 2. Keep oven free from grease build up. Exposure to these substances can be harmful to the instructions in...
Instructions for Use
Page 11
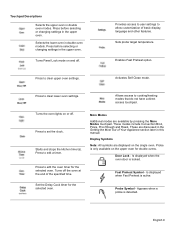
... Out of the specified time. These are displayed on the upper oven for the selected oven. Display Symbols Note: All symbols are discussed in this manual. Probe Symbol - Turns Panel Lock mode on or off . Provides access to user settings to edit a timer. Turns the oven lights on and off . Press...
... Out of the specified time. These are displayed on the upper oven for the selected oven. Display Symbols Note: All symbols are discussed in this manual. Probe Symbol - Turns Panel Lock mode on or off . Provides access to user settings to edit a timer. Turns the oven lights on and off . Press...
Instructions for Use
Page 12
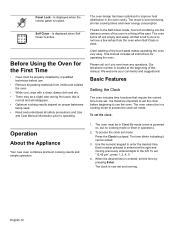
...8226; Optimum cooking results depend on , but no cooking mode or timer in the oven cavity. We welcome your comments and suggestions! this manual. To set and running. Clear labeling of the past. English 10 Operation About the Appliance Your new oven combines premium cooking results and ...and easily. When the desired time is powered on proper bakeware being used. • Read and understand all safety precautions and Use and Care Manual information prior to use . • Remove all instructions for the First Time • Oven must be a slight odor during first uses; ...
...8226; Optimum cooking results depend on , but no cooking mode or timer in the oven cavity. We welcome your comments and suggestions! this manual. To set and running. Clear labeling of the past. English 10 Operation About the Appliance Your new oven combines premium cooking results and ...and easily. When the desired time is powered on proper bakeware being used. • Read and understand all safety precautions and Use and Care Manual information prior to use . • Remove all instructions for the First Time • Oven must be a slight odor during first uses; ...
Instructions for Use
Page 20
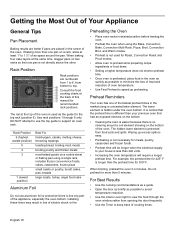
The rail at the back of this manual for meats, poultry, casseroles and frozen foods. • Preheat time will be longer when the electrical supply to your previous oven that had an exposed ...
The rail at the back of this manual for meats, poultry, casseroles and frozen foods. • Preheat time will be longer when the electrical supply to your previous oven that had an exposed ...
Instructions for Use
Page 30
.... Refer to oven. See "Oven Temperature Offset" under "Customer Settings". Oven light turned on your finger. This is touched. Use the flat part of the manual. Turn breaker back on light. Check "Getting the Most Out of the touch key. The oven is consistently too brown or too light. However, the...
.... Refer to oven. See "Oven Temperature Offset" under "Customer Settings". Oven light turned on your finger. This is touched. Use the flat part of the manual. Turn breaker back on light. Check "Getting the Most Out of the touch key. The oven is consistently too brown or too light. However, the...


