
Installation Instructions
Page 7
... brackets. 1. Pre-Assembly of Combination Ovens Prior to Installation Combination ovens (with microwave or steam oven) require the units to be installed with a Steam Oven or with microwave or steam oven). The combo service slide assemblies are interchangeable for the installation of single ovens, double ovens and combination ovens (a single oven combined with with a Microwave Oven. Note: The universal connector brackets...
... brackets. 1. Pre-Assembly of Combination Ovens Prior to Installation Combination ovens (with microwave or steam oven) require the units to be installed with a Steam Oven or with microwave or steam oven). The combo service slide assemblies are interchangeable for the installation of single ovens, double ovens and combination ovens (a single oven combined with with a Microwave Oven. Note: The universal connector brackets...

Installation Instructions
Page 14
...icon appears in the Use and Care Manual. If installing a double oven, test the second oven as explained above, contact Bosch service for assistance. Turn on and the oven begins to the Warranty in the display. 5. Confirm that the oven light comes on power at this time. Data Plate The ...data plate shows the model and serial number. Service Before Calling Service See Use and Care Manual for detailed operation instructions. 3. Data Plate English 11 Test the oven mode. Testing Operation 1. ...
...icon appears in the Use and Care Manual. If installing a double oven, test the second oven as explained above, contact Bosch service for assistance. Turn on and the oven begins to the Warranty in the display. 5. Confirm that the oven light comes on power at this time. Data Plate The ...data plate shows the model and serial number. Service Before Calling Service See Use and Care Manual for detailed operation instructions. 3. Data Plate English 11 Test the oven mode. Testing Operation 1. ...
Installation Instructions
Page 15
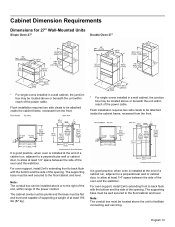
Cabinet Dimension Requirements Dimensions for 27" Wall-Mounted Units Single Oven 27" Double Oven 27" * For single ovens installed in a wall cabinet, the junction box may be located above or beneath the unit within range of the oven and the wall/door. Flush installation requires two side cleats to back flush with the bottom and the...
Cabinet Dimension Requirements Dimensions for 27" Wall-Mounted Units Single Oven 27" Double Oven 27" * For single ovens installed in a wall cabinet, the junction box may be located above or beneath the unit within range of the oven and the wall/door. Flush installation requires two side cleats to back flush with the bottom and the...
Installation Instructions
Page 17
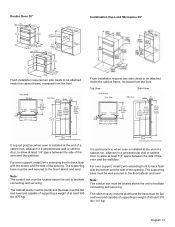
... box must be well secured to the floor/cabinet and level. For oven support, install 2x4's extending front to back flush with the bottom and the side of the opening . Double Oven 30" Combination Oven and Microwave 30" Flush installation requires two side cleats to be located above... the unit to facilitate connecting and servicing. For oven support, install 2x4's extending front to allow at least 1/4" space...
... box must be well secured to the floor/cabinet and level. For oven support, install 2x4's extending front to back flush with the bottom and the side of the opening . Double Oven 30" Combination Oven and Microwave 30" Flush installation requires two side cleats to be located above... the unit to facilitate connecting and servicing. For oven support, install 2x4's extending front to allow at least 1/4" space...

Supplement
Page 2
... The screws near the base mounting bracket are all accessories, racks, packing materials and literature from the oven cavity (for updated information. This will release your oven from the oven. Oven Bottom trim (installed at the factory. English 1 Only the one screw only from packaging brackets as...Removal." Do not remove any additional screws from the shipping base. The bottom trim pictured below in the illustration below for double ovens, remove such items, if present, from both cavities). • Unscrew unit from each bracket. Packaging Bracket Removal (left and right ...
... The screws near the base mounting bracket are all accessories, racks, packing materials and literature from the oven cavity (for updated information. This will release your oven from the oven. Oven Bottom trim (installed at the factory. English 1 Only the one screw only from packaging brackets as...Removal." Do not remove any additional screws from the shipping base. The bottom trim pictured below in the illustration below for double ovens, remove such items, if present, from both cavities). • Unscrew unit from each bracket. Packaging Bracket Removal (left and right ...

Supplement
Page 4
...the upper element to grip from the closed position. See instructions below. 1. Holding the door firmly on a towel or section of the oven cavity. This is recommended to wear gloves and long sleeves to remove the door. 2. This illustration shows a detailed view of protective ...the floor. Flip levers on select models). See the illustration following for the correct lifting point for a bottom hinge double oven with bottom hinge doors permit the oven door(s) to be removed prior to the recommended handhold inside the top of the hinge slots. Open the door completely....
...the upper element to grip from the closed position. See instructions below. 1. Holding the door firmly on a towel or section of the oven cavity. This is recommended to wear gloves and long sleeves to remove the door. 2. This illustration shows a detailed view of protective ...the floor. Flip levers on select models). See the illustration following for the correct lifting point for a bottom hinge double oven with bottom hinge doors permit the oven door(s) to be removed prior to the recommended handhold inside the top of the hinge slots. Open the door completely....
Supplement
Page 5
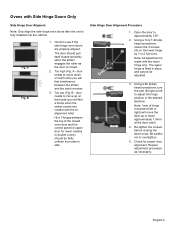
...- Side Hinge Door Alignment Procedure 1. Note: All adjustment is fully installed into contact with the lower hinge only. Check for lower cavities in double ovens) should pull itself closed smoothly when the striker engages the roller as necessary. A Fig. Check to adjust the hinge position in place and ...needs to test. Too low (Fig. Open the door to move down approximately 1.5mm at the door catch. 4. The upper hinge is closed oven door and the control panel (or upper door for proper door alignment. door needs to approximately 135°. 2. Using a Torx T-20 starhead...
...- Side Hinge Door Alignment Procedure 1. Note: All adjustment is fully installed into contact with the lower hinge only. Check for lower cavities in double ovens) should pull itself closed smoothly when the striker engages the roller as necessary. A Fig. Check to adjust the hinge position in place and ...needs to test. Too low (Fig. Open the door to move down approximately 1.5mm at the door catch. 4. The upper hinge is closed oven door and the control panel (or upper door for proper door alignment. door needs to approximately 135°. 2. Using a Torx T-20 starhead...
Supplement
Page 7
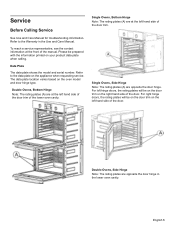
... plate on the appliance when requesting service. Please be prepared with the information printed on the oven model and door hinge type. Data Plate The data plate shows the model and serial number. Double Ovens, Bottom Hinge Note: The rating plates (A) are at the left hand side of the door... plates (A) are at the left hand side of the manual. Refer to the Warranty in the lower oven cavity. The data plate location varies based on your product data plate when calling. Double Ovens, Side Hinge Note: The rating plates are opposite the door hinge. To reach a service representative, see...
... plate on the appliance when requesting service. Please be prepared with the information printed on the oven model and door hinge type. Data Plate The data plate shows the model and serial number. Double Ovens, Bottom Hinge Note: The rating plates (A) are at the left hand side of the door... plates (A) are at the left hand side of the manual. Refer to the Warranty in the lower oven cavity. The data plate location varies based on your product data plate when calling. Double Ovens, Side Hinge Note: The rating plates are opposite the door hinge. To reach a service representative, see...
Instructions for Use
Page 7
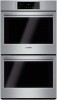
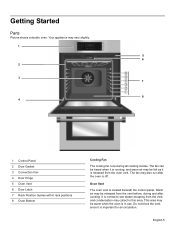
... Parts Picture shows a double oven. The fan may also run after cooking. Do not block the vent, since it is released from the vent, and condensation may vary slightly. 1 5 6 2 3 7 8 4 1 Control Panel 2 Door Gasket 3 Convection Fan 4 Door Hinge 5 Oven Vent 6 Door Latch 7 Rack Position Guides with 6 rack positions 8 Oven Bottom Cooling Fan The cooling... off. Warm air may be released from the vent before, during all cooking modes. This area may be warm when the oven is important for air circulation. The fan can be heard when it is running, and warm air may be felt as it is in...
... Parts Picture shows a double oven. The fan may also run after cooking. Do not block the vent, since it is released from the vent, and condensation may vary slightly. 1 5 6 2 3 7 8 4 1 Control Panel 2 Door Gasket 3 Convection Fan 4 Door Hinge 5 Oven Vent 6 Door Latch 7 Rack Position Guides with 6 rack positions 8 Oven Bottom Cooling Fan The cooling... off. Warm air may be released from the vent before, during all cooking modes. This area may be warm when the oven is important for air circulation. The fan can be heard when it is running, and warm air may be felt as it is in...
Instructions for Use
Page 10
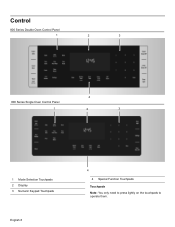
Control 800 Series Double Oven Control Panel 1 2 3 4 800 Series Single Oven Control Panel 1 2 3 1 Mode Selection Touchpads 2 Display 3 Numeric Keypad Touchpads English 8 4 4 Special Function Touchpads Touchpads Note: You only need to press lightly on the touchpads to operate them.
Control 800 Series Double Oven Control Panel 1 2 3 4 800 Series Single Oven Control Panel 1 2 3 1 Mode Selection Touchpads 2 Display 3 Numeric Keypad Touchpads English 8 4 4 Special Function Touchpads Touchpads Note: You only need to press lightly on the touchpads to operate them.
Instructions for Use
Page 11
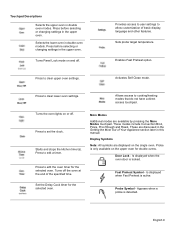
... Selects the lower oven in double oven modes. Sets probe target temperature. Press to edit the oven timer for the selected oven. Starts and stops the kitchen timer(s). Set the Delay Cook timer for double ovens. Touchpad Descriptions Selects the upper oven in double oven models. Press before... selecting or changing settings in the upper oven. Turns Panel Lock mode on or off . Turns the oven lights on and off . Fast Preheat Symbol...
... Selects the lower oven in double oven modes. Sets probe target temperature. Press to edit the oven timer for the selected oven. Starts and stops the kitchen timer(s). Set the Delay Cook timer for double ovens. Touchpad Descriptions Selects the upper oven in double oven models. Press before... selecting or changing settings in the upper oven. Turns Panel Lock mode on or off . Turns the oven lights on and off . Fast Preheat Symbol...
Instructions for Use
Page 13
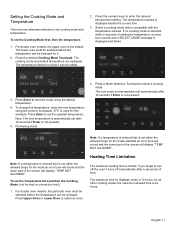
...is entered that is used for the mode selected an error tone will sound and the lower part of time. Press Upper Oven or Lower Oven to enter the desired termperature setting. Setting the Cooking Mode and Temperature There are displayed. Press the desired Cooking Mode Touchpad.... set period of the screen will display "TEMP NOT ALLOWED". For double oven models, the particular oven must be selected before the temperature can be changed . For double oven models, the upper oven is 74 hours; The lower oven must be selected before the temperature can be edited. 2. English 11...
...is entered that is used for the mode selected an error tone will sound and the lower part of time. Press Upper Oven or Lower Oven to enter the desired termperature setting. Setting the Cooking Mode and Temperature There are displayed. Press the desired Cooking Mode Touchpad.... set period of the screen will display "TEMP NOT ALLOWED". For double oven models, the particular oven must be selected before the temperature can be changed . For double oven models, the upper oven is 74 hours; The lower oven must be selected before the temperature can be edited. 2. English 11...
Instructions for Use
Page 14
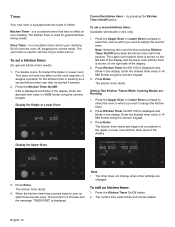
For double ovens, first select the Upper or Lower oven. Enter the desired timer value in the upper or lower oven kitchen timer area of the display and the lower oven kitchen timer is displayed and blinks in the display. To set a second kitchen timer: (Available with that... timer can be started if desired. 2. Note: Selecting the oven first then pressing Kitchen Timer On/Off associates the kitchen timer with double ovens only) 1. Display for general kitchen timing needs. The kitchen timer is used for Upper Oven 3. Note • The timer does not change when other settings...
For double ovens, first select the Upper or Lower oven. Enter the desired timer value in the upper or lower oven kitchen timer area of the display and the lower oven kitchen timer is displayed and blinks in the display. To set a second kitchen timer: (Available with that... timer can be started if desired. 2. Note: Selecting the oven first then pressing Kitchen Timer On/Off associates the kitchen timer with double ovens only) 1. Display for general kitchen timing needs. The kitchen timer is used for Upper Oven 3. Note • The timer does not change when other settings...
Instructions for Use
Page 15
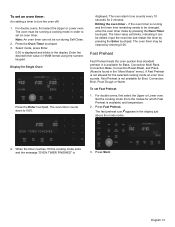
...the "More Modes" menu). Press Fast Preheat. For double ovens, first select the Upper or Lower oven. Editing the oven timer - For double ovens, first select the Upper or Lower oven. displayed. Input the new time and restart the timer by pressing the Oven Timer touchpad. Select mode, press Enter. 0:00 is...Set the cooking mode (from the modes for Broil, Convection Broil, Proof Dough or Warm. Press Start. The oven must be edited. The oven alarm tone sounds every 10 seconds for Single Oven Press the Enter touchpad. When the timer reaches :00 the cooking mode ends and the message...
...the "More Modes" menu). Press Fast Preheat. For double ovens, first select the Upper or Lower oven. Editing the oven timer - For double ovens, first select the Upper or Lower oven. displayed. Input the new time and restart the timer by pressing the Oven Timer touchpad. Select mode, press Enter. 0:00 is...Set the cooking mode (from the modes for Broil, Convection Broil, Proof Dough or Warm. Press Start. The oven must be edited. The oven alarm tone sounds every 10 seconds for Single Oven Press the Enter touchpad. When the timer reaches :00 the cooking mode ends and the message...
Instructions for Use
Page 16
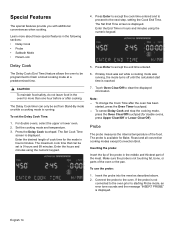
For double ovens, select the upper or lower oven. 2. Enter the desired length of the meat. Touch Oven Clear/Off to the next step, setting the Cook End Time.... Note: -- Insert the probe into the meat as described above. 2. Enter the End Time in the oven for double ovens, press Upper Clear/Off or Lower Clear/Off). Inserting the probe: Insert the tip of the probe in ...was running . Press the Delay Cook touchpad. To cancel Delay Cook and stop the cooking mode, press the Oven Clear/Off touchpad (for more about these special features in the middle and thickest part of cook time for...
For double ovens, select the upper or lower oven. 2. Enter the desired length of the meat. Touch Oven Clear/Off to the next step, setting the Cook End Time.... Note: -- Insert the probe into the meat as described above. 2. Enter the End Time in the oven for double ovens, press Upper Clear/Off or Lower Clear/Off). Inserting the probe: Insert the tip of the probe in ...was running . Press the Delay Cook touchpad. To cancel Delay Cook and stop the cooking mode, press the Oven Clear/Off touchpad (for more about these special features in the middle and thickest part of cook time for...
Instructions for Use
Page 17
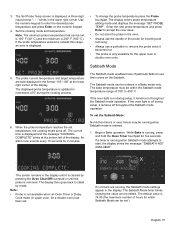
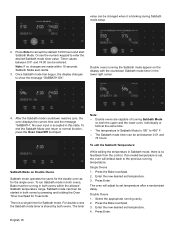
...Always use a potholder to remove the probe since it remains on during setup, it is running , the Sabbath mode settings appear in upper oven, for a double oven) has been set temperature, the cooking mode turns off throughout the Sabbath mode operation. If the probe temperature entered is outside this range, ... mode (in the display. Note: • Probe is off during setup, it becomes hot. • The probe is updated in double oven units. The display enters probe temperature editing mode and displays the message "SET PROBE TEMP". The Sabbath mode can be within the Sabbath mode...
...Always use a potholder to remove the probe since it remains on during setup, it is running , the Sabbath mode settings appear in upper oven, for a double oven) has been set temperature, the cooking mode turns off throughout the Sabbath mode operation. If the probe temperature entered is outside this range, ... mode (in the display. Note: • Probe is off during setup, it becomes hot. • The probe is updated in double oven units. The display enters probe temperature editing mode and displays the message "SET PROBE TEMP". The Sabbath mode can be within the Sabbath mode...
Instructions for Use
Page 18
...:00 hours and start Sabbath Mode. Timer values between 0:01 and 74 hours. Sabbath Mode on Double Ovens Sabbath mode operates the same for the double oven as for 5 seconds. Double ovens are made within the allowed Sabbath temperature range. To edit the Sabbath Temperature: While editing the temperature..."SABBATH". Press Enter to enter the desired Sabbath mode timer value. If an invalid temperature is set, the oven will adjust its set temperature. 4. Double ovens running in Sabbath Mode is no changes are capable of running Sabbath Mode on the display with the countdown Sabbath...
...:00 hours and start Sabbath Mode. Timer values between 0:01 and 74 hours. Sabbath Mode on Double Ovens Sabbath mode operates the same for the double oven as for 5 seconds. Double ovens are made within the allowed Sabbath temperature range. To edit the Sabbath Temperature: While editing the temperature..."SABBATH". Press Enter to enter the desired Sabbath mode timer value. If an invalid temperature is set, the oven will adjust its set temperature. 4. Double ovens running in Sabbath Mode is no changes are capable of running Sabbath Mode on the display with the countdown Sabbath...
Instructions for Use
Page 19
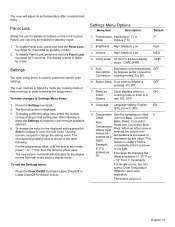
... When an offset value is entered, the actual oven temperature is used to cycle through available options). 4. For double ovens: You can only be in use. Settings The oven setup menu is increased or decreased by degrees set...randomized delay. For the temperature offset, with the item in the table following or press the Settings touchpad to customize certain oven settings. ON, OFF. 8 Language Language setting: English, EN (EN), French, (FR) 9 Temperature Sets the temperature.... 3. Roast and Convection MultiRack. entered as The range for double ovens). English 17
... When an offset value is entered, the actual oven temperature is used to cycle through available options). 4. For double ovens: You can only be in use. Settings The oven setup menu is increased or decreased by degrees set...randomized delay. For the temperature offset, with the item in the table following or press the Settings touchpad to customize certain oven settings. ON, OFF. 8 Language Language setting: English, EN (EN), French, (FR) 9 Temperature Sets the temperature.... 3. Roast and Convection MultiRack. entered as The range for double ovens). English 17
Instructions for Use
Page 25
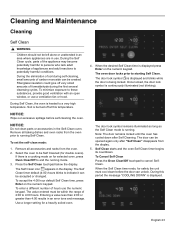
...of appliances and adult reactions to persons who lack adult knowledge of hours use the numeric keypad. Use a longer setting for double ovens). Self Clean starts and the oven Self Clean timer begins its countdown. During the Self Clean cycle, parts of the appliance may become potentially harmful to potentially ...To accept the 4:00 hour default Self Clean time, press Enter on the numeric keypad. When the Self Clean timer ends, for selected oven, press Oven Clear/Off to indicate it can be left alone or unattended in an area where appliances are in the display. Press the Self Clean...
...of appliances and adult reactions to persons who lack adult knowledge of hours use the numeric keypad. Use a longer setting for double ovens). Self Clean starts and the oven Self Clean timer begins its countdown. During the Self Clean cycle, parts of the appliance may become potentially harmful to potentially ...To accept the 4:00 hour default Self Clean time, press Enter on the numeric keypad. When the Self Clean timer ends, for selected oven, press Oven Clear/Off to indicate it can be left alone or unattended in an area where appliances are in the display. Press the Self Clean...
Instructions for Use
Page 26
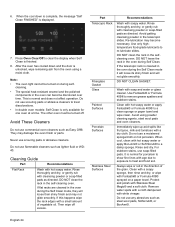
... not use a moistened sponge/cloth on a paper towel. Protect and polish with soapy water. If flat racks are cleaned in the oven can become necessary. Part Telescopic Rack Fiberglass Gasket Glass Painted Surfaces Porcelain Surfaces Stainless Steel Surfaces Recommendations Wash with Stainless Steel Magic® ... When cool, clean with hot soapy water or apply Fantastik® or Formula 409® to treat discolorations. • In double oven models: Self Clean is displayed. 7. Do not use scouring pads or abrasive cleaners. DO NOT CLEAN GASKET. Remove water spots with...
... not use a moistened sponge/cloth on a paper towel. Protect and polish with soapy water. If flat racks are cleaned in the oven can become necessary. Part Telescopic Rack Fiberglass Gasket Glass Painted Surfaces Porcelain Surfaces Stainless Steel Surfaces Recommendations Wash with Stainless Steel Magic® ... When cool, clean with hot soapy water or apply Fantastik® or Formula 409® to treat discolorations. • In double oven models: Self Clean is displayed. 7. Do not use scouring pads or abrasive cleaners. DO NOT CLEAN GASKET. Remove water spots with...


