Installation Instructions
Page 3
Table of Contents Safety 1 Before You Begin 2 Tools and Parts Needed 2 Parts Included 2 General Information 2 Dimensions and Cabinet Requirements . . 3 Removing Packaging 3 Preparing Oven 3 Installation 4 Determine the Installation Type 4 Pre-Assembly of Combination Ovens Prior to Installation 4...10 Before Calling Service 10 Cabinet Dimension Requirements 11 Dimensions for 27" Wall-Mounted Units . . . 11 Dimensions for 30" Wall-Mounted Units . 12 This Bosch Appliance is made by BSH Home Appliances Corporation 1901 Main Street, Suite 600 Irvine, CA 92614 Questions? 1-800-944-2904 www...
Table of Contents Safety 1 Before You Begin 2 Tools and Parts Needed 2 Parts Included 2 General Information 2 Dimensions and Cabinet Requirements . . 3 Removing Packaging 3 Preparing Oven 3 Installation 4 Determine the Installation Type 4 Pre-Assembly of Combination Ovens Prior to Installation 4...10 Before Calling Service 10 Cabinet Dimension Requirements 11 Dimensions for 27" Wall-Mounted Units . . . 11 Dimensions for 30" Wall-Mounted Units . 12 This Bosch Appliance is made by BSH Home Appliances Corporation 1901 Main Street, Suite 600 Irvine, CA 92614 Questions? 1-800-944-2904 www...

Installation Instructions
Page 4
... legs, panels, wire covers or anti-tip brackets/screws. Transport To avoid damage to the oven vent, use . WARNING: Do not repair or replace any part of the owner and the installer to determine if additional requirements and/or standards apply to side when moving it into place. Use caution when...
... legs, panels, wire covers or anti-tip brackets/screws. Transport To avoid damage to the oven vent, use . WARNING: Do not repair or replace any part of the owner and the installer to determine if additional requirements and/or standards apply to side when moving it into place. Use caution when...

Installation Instructions
Page 5
...). ___ 6. Removal of the carton (using Philips screwdriver). ___ 10. Preparation Before You Begin Tools and Parts Needed • Phillips head screwdriver • Star head screwdriver (T20) • Measuring tape • Drill with bit (1/8") Parts Included • Phillips head screws (6) General Information Power Requirements The outlet must be properly grounded in accordance...
...). ___ 6. Removal of the carton (using Philips screwdriver). ___ 10. Preparation Before You Begin Tools and Parts Needed • Phillips head screwdriver • Star head screwdriver (T20) • Measuring tape • Drill with bit (1/8") Parts Included • Phillips head screws (6) General Information Power Requirements The outlet must be properly grounded in accordance...

Installation Instructions
Page 7
... unit into the wall cabinet until after mounting the microwave on top of oven) Decorative trim (1) Packed in the square tube parts box are installing a combination oven, skip over the combination oven pre-assembly instructions and go directly to "Electrical Installation" which ...applies to both universal connector brackets using the universal connector brackets. 1. The parts contained in bubble wrap, near the oven control panel. Note: The universal connector brackets are attached to the oven spaced to be...
... unit into the wall cabinet until after mounting the microwave on top of oven) Decorative trim (1) Packed in the square tube parts box are installing a combination oven, skip over the combination oven pre-assembly instructions and go directly to "Electrical Installation" which ...applies to both universal connector brackets using the universal connector brackets. 1. The parts contained in bubble wrap, near the oven control panel. Note: The universal connector brackets are attached to the oven spaced to be...

Supplement
Page 2
...). • Unscrew unit from the mounting base (the screw circled and shown as "A" in a small plastic bag affixed to the cabinet. The part is pre-installed at factory) Omit Step 5 in the "Placing the Oven Into the Cabinet Opening" section referencing installation of the unit needs to lift...right sides) Note: Different models use different packaging materials. Only the one screw only from the oven cavity (for updated information. Installation Parts Provided Oven Mounting Screws 8 screws are all accessories, racks, packing materials and literature from each bracket.
...). • Unscrew unit from the mounting base (the screw circled and shown as "A" in a small plastic bag affixed to the cabinet. The part is pre-installed at factory) Omit Step 5 in the "Placing the Oven Into the Cabinet Opening" section referencing installation of the unit needs to lift...right sides) Note: Different models use different packaging materials. Only the one screw only from the oven cavity (for updated information. Installation Parts Provided Oven Mounting Screws 8 screws are all accessories, racks, packing materials and literature from each bracket.
Instructions for Use
Page 2
Table of Contents How This Manual is Organized 1 Safety Definitions 1 Important Safety Instructions 2 Safety 2 Getting Started 5 Parts 5 Accessories 6 Control 8 Before Using the Oven for the First Time 10 About the Appliance 10 Operation 10 Basic Features 10 Setting the Clock 10 Setting ... Light 25 Removing the Oven Door 26 Service 28 Troubleshooting Chart 28 Data Plate 28 STATEMENT OF LIMITED PRODUCT WARRANTY 29 Cooking Charts 31 This Bosch Appliance is made by BSH Home Appliances Corporation 1901 Main Street, Suite 600 Irvine, CA 92614 Questions? 1-800-944-2904 www...
Table of Contents How This Manual is Organized 1 Safety Definitions 1 Important Safety Instructions 2 Safety 2 Getting Started 5 Parts 5 Accessories 6 Control 8 Before Using the Oven for the First Time 10 About the Appliance 10 Operation 10 Basic Features 10 Setting the Clock 10 Setting ... Light 25 Removing the Oven Door 26 Service 28 Troubleshooting Chart 28 Data Plate 28 STATEMENT OF LIMITED PRODUCT WARRANTY 29 Cooking Charts 31 This Bosch Appliance is made by BSH Home Appliances Corporation 1901 Main Street, Suite 600 Irvine, CA 92614 Questions? 1-800-944-2904 www...

Instructions for Use
Page 3
..." provides you will systematically get the most out of your new oven by -step instructions on how to clean and care for the various oven parts. • The "Service" section includes your warranty and do-ityourself troubleshooting tips. The manual consists of this warning. Safety Definitions 9 WARNING This indicates that death...
..." provides you will systematically get the most out of your new oven by -step instructions on how to clean and care for the various oven parts. • The "Service" section includes your warranty and do-ityourself troubleshooting tips. The manual consists of this warning. Safety Definitions 9 WARNING This indicates that death...
Instructions for Use
Page 4
... the oven bottom. English 2 It is specifically designed for easy reference. Contact an authorized servicer. Do not repair or replace any part of electric shock or fire. Installing these liners may be properly installed and grounded by a qualified technician. Never use aluminum foil or... protective liners to line any part of the appliance unless specifically recommended in this happens during self-clean, disconnect appliance from food fires other than grease fires with ...
... the oven bottom. English 2 It is specifically designed for easy reference. Contact an authorized servicer. Do not repair or replace any part of electric shock or fire. Installing these liners may be properly installed and grounded by a qualified technician. Never use aluminum foil or... protective liners to line any part of the appliance unless specifically recommended in this happens during self-clean, disconnect appliance from food fires other than grease fires with ...
Instructions for Use
Page 5
... requires the Governor of California to publish a list of substances known to the state to ensure that it is hot, do not touch any part of potential exposure to avoid unintentional contact with high alcohol content (e.g. The fiberglass insulation in or out of English 3 For side hinge doors,...rum, brandy, bourbon) in desired location while oven is the responsibility of the parents or legal guardians to cause cancer, birth defects or other parts of soil during the first several cleaning cycles. If a rack must be left alone or unattended in the area where the appliance is a ...
... requires the Governor of California to publish a list of substances known to the state to ensure that it is hot, do not touch any part of potential exposure to avoid unintentional contact with high alcohol content (e.g. The fiberglass insulation in or out of English 3 For side hinge doors,...rum, brandy, bourbon) in desired location while oven is the responsibility of the parents or legal guardians to cause cancer, birth defects or other parts of soil during the first several cleaning cycles. If a rack must be left alone or unattended in the area where the appliance is a ...
Instructions for Use
Page 6
... harmful. Contact service. Keep oven free from grease build up. Cookware Safety Do not place food or bakeware directly on oven bottom. Do not clean parts or accessories in this manual. 9 IMPORTANT SAFETY INSTRUCTIONS READ AND SAVE THESE INSTRUCTIONS cancer. Providing good ventilation during and immediately after self-cleaning the oven...
... harmful. Contact service. Keep oven free from grease build up. Cookware Safety Do not place food or bakeware directly on oven bottom. Do not clean parts or accessories in this manual. 9 IMPORTANT SAFETY INSTRUCTIONS READ AND SAVE THESE INSTRUCTIONS cancer. Providing good ventilation during and immediately after self-cleaning the oven...
Instructions for Use
Page 7
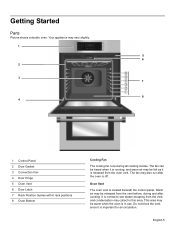
..., since it is off. Oven Vent The oven vent is important for air circulation. This area may be released from the oven vent. Getting Started Parts Picture shows a double oven. The fan can be heard when it is running, and warm air may be warm when the oven is normal to...
..., since it is off. Oven Vent The oven vent is important for air circulation. This area may be released from the oven vent. Getting Started Parts Picture shows a double oven. The fan can be heard when it is running, and warm air may be warm when the oven is normal to...
Instructions for Use
Page 8
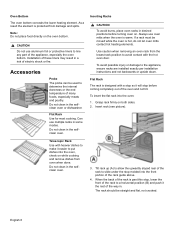
... oven mitts when the oven is hot, do not let oven mitts contact hot heating elements. To avoid possible injury or damage to line any part of the way in the selfclean oven. 3. Grasp rack firmly on . Oven Bottom The oven bottom conceals the lower heating element. Note: Do not place...
... oven mitts when the oven is hot, do not let oven mitts contact hot heating elements. To avoid possible injury or damage to line any part of the way in the selfclean oven. 3. Grasp rack firmly on . Oven Bottom The oven bottom conceals the lower heating element. Note: Do not place...

Instructions for Use
Page 9
... way back (B). Pull the rack the rest of the rack position guide. 5. Lift the rear of the telescopic rack drops into position. 4. Slide the movable part of the telescopic rack in evenly until the rear of the oven. 2. Grasp rack firmly on the oven walls. 3. When the stop . Tilt the front... of the rack up so that the non-moving part of the telescopic rack is securely anchored. 9 CAUTION To avoid possible injury or damage to bind during extraction, catching on both sides and pull rack...
... way back (B). Pull the rack the rest of the rack position guide. 5. Lift the rear of the telescopic rack drops into position. 4. Slide the movable part of the telescopic rack in evenly until the rear of the oven. 2. Grasp rack firmly on the oven walls. 3. When the stop . Tilt the front... of the rack up so that the non-moving part of the telescopic rack is securely anchored. 9 CAUTION To avoid possible injury or damage to bind during extraction, catching on both sides and pull rack...
Instructions for Use
Page 13
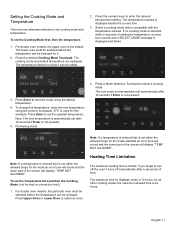
... The temperature flashes to select an oven. If no cooking mode is selected within 5 seconds of the screen will sound and the lower part of setting the temperature, an error tone sounds and a SELECT MODE message is 24 hours. Note: If a temperature is entered that ... the new temperature using the default temperature. 4. Note: The new temperature is automatically set period of the screen will sound and the lower part of time. The maximum time for broil or convection broil) 1. English 11 Press the desired Cooking Mode Touchpad. Press a Mode Selection Touchpad...
... The temperature flashes to select an oven. If no cooking mode is selected within 5 seconds of the screen will sound and the lower part of setting the temperature, an error tone sounds and a SELECT MODE message is 24 hours. Note: If a temperature is entered that ... the new temperature using the default temperature. 4. Note: The new temperature is automatically set period of the screen will sound and the lower part of time. The maximum time for broil or convection broil) 1. English 11 Press the desired Cooking Mode Touchpad. Press a Mode Selection Touchpad...
Instructions for Use
Page 16
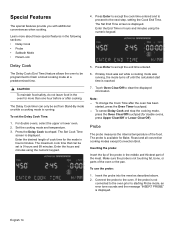
... to proceed to the oven. The Delay Cook timer can be set is not touching fat, bone, or parts of cook time for more about these special features in the middle and thickest part of the food. If Delay Cook was set the Delay Cook Time: 1. Touch Oven Clear/Off to starting...
... to proceed to the oven. The Delay Cook timer can be set is not touching fat, bone, or parts of cook time for more about these special features in the middle and thickest part of the food. If Delay Cook was set the Delay Cook Time: 1. Touch Oven Clear/Off to starting...
Instructions for Use
Page 20
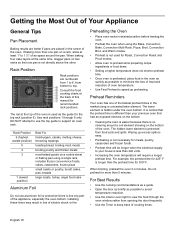
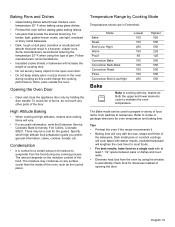
... small roasts or poultry, bundt cakes, pies, breads large roasts, turkey, angel food cake Aluminum Foil Do not use the top guide to line any part of the appliance, especially the oven bottom. Rack Position 6 (highest usable position) 5 4 3 2 1 (lowest position) Best For hamburgers, steaks, melting cheese, browning toppings toasting bread, broiling...
... small roasts or poultry, bundt cakes, pies, breads large roasts, turkey, angel food cake Aluminum Foil Do not use the top guide to line any part of the appliance, especially the oven bottom. Rack Position 6 (highest usable position) 5 4 3 2 1 (lowest position) Best For hamburgers, steaks, melting cheese, browning toppings toasting bread, broiling...
Instructions for Use
Page 21
... condense on any heavy object on the open oven door. • Do not keep empty pans or pizza stones in the oven during any other parts of the oven, such as this type of food items, from the oven by holding the door handle. Condensation • It is cooking with at...
... condense on any heavy object on the open oven door. • Do not keep empty pans or pizza stones in the oven during any other parts of the oven, such as this type of food items, from the oven by holding the door handle. Condensation • It is cooking with at...
Instructions for Use
Page 25
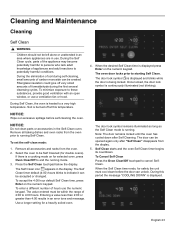
To minimize exposure to starting Self Clean. NOTICE: Do not clean parts or accessories in the display. Press the Self Clean touchpad below the display. The value entered must cool down after "Self Clean" disappears from the ... while the door is continuously illuminated (not blinking). Once locked, the door lock symbol is being locked. Soil is displayed. During the Self Clean cycle, parts of the appliance may become potentially harmful to persons who lack adult knowledge of soil during the first several cleansing cycles. Remove all accessories and...
To minimize exposure to starting Self Clean. NOTICE: Do not clean parts or accessories in the display. Press the Self Clean touchpad below the display. The value entered must cool down after "Self Clean" disappears from the ... while the door is continuously illuminated (not blinking). Once locked, the door lock symbol is being locked. Soil is displayed. During the Self Clean cycle, parts of the appliance may become potentially harmful to persons who lack adult knowledge of soil during the first several cleansing cycles. Remove all accessories and...
Instructions for Use
Page 26
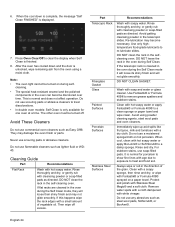
... time. Use only hightemperature food-grade lubricants to remove grease spatters and stubborn stains. Re-lubrication may damage the oven finish or parts. If the telescopic rack is displayed. 7. Use Fantastik® or Formula 409® to re-lubricate slides. Do not use... steel wool pads, Softscrub®, or BonAmi©. When cool, clean with a dry cloth. Protect and polish with soapy water. Part Telescopic Rack Fiberglass Gasket Glass Painted Surfaces Porcelain Surfaces Stainless Steel Surfaces Recommendations Wash with Stainless Steel Magic® and a soft cloth. ...
... time. Use only hightemperature food-grade lubricants to remove grease spatters and stubborn stains. Re-lubrication may damage the oven finish or parts. If the telescopic rack is displayed. 7. Use Fantastik® or Formula 409® to re-lubricate slides. Do not use... steel wool pads, Softscrub®, or BonAmi©. When cool, clean with a dry cloth. Protect and polish with soapy water. Part Telescopic Rack Fiberglass Gasket Glass Painted Surfaces Porcelain Surfaces Stainless Steel Surfaces Recommendations Wash with Stainless Steel Magic® and a soft cloth. ...
Instructions for Use
Page 27
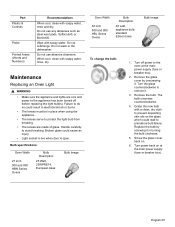
... the main power supply (fuse or breaker box). Maintenance Replacing an Oven Light 9 WARNING • Make sure the appliance and lights are made of glass. Part Plastic & Controls Probe Printed Areas (Words and Numbers) Recommendations When cool, clean with soapy water. Do not use abrasive cleansers. Wipe with soapy water, rinse...
... the main power supply (fuse or breaker box). Maintenance Replacing an Oven Light 9 WARNING • Make sure the appliance and lights are made of glass. Part Plastic & Controls Probe Printed Areas (Words and Numbers) Recommendations When cool, clean with soapy water. Do not use abrasive cleansers. Wipe with soapy water, rinse...