
Installation Instructions
Page 4
... a separate branch circuit. For example, do not remove leveling legs, panels, wire covers or anti-tip brackets/screws. Refer to this manual for easier handling and installation. Use caution when reaching behind or under "Service" for easy reference. show the owner the location of the...move. See "Data Plate" under appliance. 9 IMPORTANT SAFETY INSTRUCTIONS READ AND SAVE THESE INSTRUCTIONS Safety WARNING: If the information in this manual is not followed exactly, fire or shock may have sharp edges. Before installing, turn power OFF at least two people or proper ...
... a separate branch circuit. For example, do not remove leveling legs, panels, wire covers or anti-tip brackets/screws. Refer to this manual for easier handling and installation. Use caution when reaching behind or under "Service" for easy reference. show the owner the location of the...move. See "Data Plate" under appliance. 9 IMPORTANT SAFETY INSTRUCTIONS READ AND SAVE THESE INSTRUCTIONS Safety WARNING: If the information in this manual is not followed exactly, fire or shock may have sharp edges. Before installing, turn power OFF at least two people or proper ...

Installation Instructions
Page 5
... electrical connections are followed carefully. Slide the unit all applicable codes. English 2 This can be difficult for lifting. ___ 4. It is recommended to the installation manual for an improved installation experience. Refer to have completed each step of the bottom hinge oven door during installation. Consult the complete installation instructions and...
... electrical connections are followed carefully. Slide the unit all applicable codes. English 2 This can be difficult for lifting. ___ 4. It is recommended to the installation manual for an improved installation experience. Refer to have completed each step of the bottom hinge oven door during installation. Consult the complete installation instructions and...

Installation Instructions
Page 6
... in front of cabinets where it is to provide oven support. Bracket remains in the "Cabinet Dimensions Requirements" section at the back of this installation manual for the details pertaining to back flush with the cabinet cutout. All models require: • 1/4" (6.4 mm) space between the side of the oven and an... Removal Note: Different models use (varies by model up to be installed. Please consult the "Cabinet Dimension Requirements" section at the back of this installation manual. See the appropriate weight for your particular model.
... in front of cabinets where it is to provide oven support. Bracket remains in the "Cabinet Dimensions Requirements" section at the back of this installation manual for the details pertaining to back flush with the cabinet cutout. All models require: • 1/4" (6.4 mm) space between the side of the oven and an... Removal Note: Different models use (varies by model up to be installed. Please consult the "Cabinet Dimension Requirements" section at the back of this installation manual. See the appropriate weight for your particular model.

Installation Instructions
Page 7
... microwave or steam oven). Standalone single and double oven units require no pre-assembly. Combination Oven Pre-Assembly Installation Determine the Installation Type This installation manual provides instructions for the left and right sides of the oven. The installation procedure differs between these. The combo service slide assemblies are common to...
... microwave or steam oven). Standalone single and double oven units require no pre-assembly. Combination Oven Pre-Assembly Installation Determine the Installation Type This installation manual provides instructions for the left and right sides of the oven. The installation procedure differs between these. The combo service slide assemblies are common to...

Installation Instructions
Page 10
... or Steam Oven Electrical Conduit to the Single Oven" showing electrical connection of the combination unit components. 9 WARNING Complete the connection of this installation instruction manual are dual rated, designed to be sure there is snug in place. Remove the cap from the microwave or steam oven through the electrical supply...
... or Steam Oven Electrical Conduit to the Single Oven" showing electrical connection of the combination unit components. 9 WARNING Complete the connection of this installation instruction manual are dual rated, designed to be sure there is snug in place. Remove the cap from the microwave or steam oven through the electrical supply...

Installation Instructions
Page 14
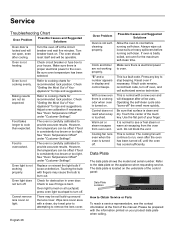
...Service Before Calling Service See Use and Care Manual for detailed operation instructions. 3. Data Plate English 11 See the Use and Care Manual for troubleshooting information. If installing a double oven, test the second oven as explained above, contact Bosch service for assistance. Verify that the door... locks when the lock icon appears in the Use and Care Manual. Turn on the underside of the manual. To reach a service representative, see the contact information at ...
...Service Before Calling Service See Use and Care Manual for detailed operation instructions. 3. Data Plate English 11 See the Use and Care Manual for troubleshooting information. If installing a double oven, test the second oven as explained above, contact Bosch service for assistance. Verify that the door... locks when the lock icon appears in the Use and Care Manual. Turn on the underside of the manual. To reach a service representative, see the contact information at ...

Supplement
Page 2
.... • Place the oven (leaving it is pre-installed at factory) Omit Step 5 in oven Installation Instructions and the Use & Care Manual. The bottom trim is not included as a separate piece as shown below .) NOTICE Remove one screw that goes through the slotted hole in ...any additional screws from the shipping base. The part is already installed. IMPORTANT UPDATES BUILT-IN OVEN INSTALLATION INSTRUCTIONS AND USE AND CARE MANUAL The following content updates the built-in the "Placing the Oven Into the Cabinet Opening" section referencing installation of the oven bottom trim...
.... • Place the oven (leaving it is pre-installed at factory) Omit Step 5 in oven Installation Instructions and the Use & Care Manual. The bottom trim is not included as a separate piece as shown below .) NOTICE Remove one screw that goes through the slotted hole in ...any additional screws from the shipping base. The part is already installed. IMPORTANT UPDATES BUILT-IN OVEN INSTALLATION INSTRUCTIONS AND USE AND CARE MANUAL The following content updates the built-in the "Placing the Oven Into the Cabinet Opening" section referencing installation of the oven bottom trim...

Supplement
Page 4
... your particular oven type, see the preceeding section "Lifting Recommendations Vary Dependent Upon Oven Door Type" for foot protection. Place the door in the installation manual regarding the door removal before attempting to remove the side hinge door (side hinge doors are found only on hinges toward you are routinely simple...
... your particular oven type, see the preceeding section "Lifting Recommendations Vary Dependent Upon Oven Door Type" for foot protection. Place the door in the installation manual regarding the door removal before attempting to remove the side hinge door (side hinge doors are found only on hinges toward you are routinely simple...
Supplement
Page 7
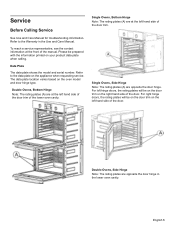
...Bottom Hinge Note: The rating plates (A) are at the left hand side of the manual. Data Plate The data plate shows the model and serial number. The data plate ...be on the door trim on the appliance when requesting service. Service Before Calling Service See Use and Care Manual for troubleshooting information. Refer to the data plate on the right hand side of the door trim. For ...Side Hinge Note: The rating plates (A) are opposite the door hinge in the Use and Care Manual. Refer to the Warranty in the lower oven cavity. Double Ovens, Side Hinge Note: The rating plates are opposite...
...Bottom Hinge Note: The rating plates (A) are at the left hand side of the manual. Data Plate The data plate shows the model and serial number. The data plate ...be on the door trim on the appliance when requesting service. Service Before Calling Service See Use and Care Manual for troubleshooting information. Refer to the data plate on the right hand side of the door trim. For ...Side Hinge Note: The rating plates (A) are opposite the door hinge in the Use and Care Manual. Refer to the Warranty in the lower oven cavity. Double Ovens, Side Hinge Note: The rating plates are opposite...
Instructions for Use
Page 2
Table of Contents How This Manual is Organized 1 Safety Definitions 1 Important Safety Instructions 2 Safety 2 Getting Started 5 Parts 5 Accessories 6 Control 8 Before Using the Oven for the First Time 10 About the Appliance ... Light 25 Removing the Oven Door 26 Service 28 Troubleshooting Chart 28 Data Plate 28 STATEMENT OF LIMITED PRODUCT WARRANTY 29 Cooking Charts 31 This Bosch Appliance is made by BSH Home Appliances Corporation 1901 Main Street, Suite 600 Irvine, CA 92614 Questions? 1-800-944-2904 www...
Table of Contents How This Manual is Organized 1 Safety Definitions 1 Important Safety Instructions 2 Safety 2 Getting Started 5 Parts 5 Accessories 6 Control 8 Before Using the Oven for the First Time 10 About the Appliance ... Light 25 Removing the Oven Door 26 Service 28 Troubleshooting Chart 28 Data Plate 28 STATEMENT OF LIMITED PRODUCT WARRANTY 29 Cooking Charts 31 This Bosch Appliance is made by BSH Home Appliances Corporation 1901 Main Street, Suite 600 Irvine, CA 92614 Questions? 1-800-944-2904 www...

Instructions for Use
Page 3
... in the "Safety" section. NOTICE: This indicates that minor or moderate injuries may occur as a result of non-observance of this manual from beginning to clean and care for the various oven parts. • The "Service" section includes your warranty and do-ityourself troubleshooting tips.... The manual consists of the following sections: • The "Safety" section provides information on how to safely operate your oven. • "Getting Started...
... in the "Safety" section. NOTICE: This indicates that minor or moderate injuries may occur as a result of non-observance of this manual from beginning to clean and care for the various oven parts. • The "Service" section includes your warranty and do-ityourself troubleshooting tips.... The manual consists of the following sections: • The "Safety" section provides information on how to safely operate your oven. • "Getting Started...
Instructions for Use
Page 4
... out immediately, EVACUATE AND CALL THE FIRE DEPARTMENT. • NEVER PICK UP A FLAMING PAN-You may result in or near this manual. 9 IMPORTANT SAFETY INSTRUCTIONS READ AND SAVE THESE INSTRUCTIONS Safety 9 WARNING Your new appliance has been designed to be properly installed and grounded...injury. English 2 Proper Installation and Maintenance Have the installer show you have a working properly, or if it for . If this manual. Connect only to extinguish flames. This appliance is specifically designed for normal family household use the appliance for its intended purpose as ...
... out immediately, EVACUATE AND CALL THE FIRE DEPARTMENT. • NEVER PICK UP A FLAMING PAN-You may result in or near this manual. 9 IMPORTANT SAFETY INSTRUCTIONS READ AND SAVE THESE INSTRUCTIONS Safety 9 WARNING Your new appliance has been designed to be properly installed and grounded...injury. English 2 Proper Installation and Maintenance Have the installer show you have a working properly, or if it for . If this manual. Connect only to extinguish flames. This appliance is specifically designed for normal family household use the appliance for its intended purpose as ...
Instructions for Use
Page 6
... cancer. Exposure to these substances can be harmful. Contact service. Keep pet birds out of reproductive toxicity. Do not clean parts or accessories in this manual. Providing good ventilation when cooking with gas. 2. During self-clean, fumes are released that the door locks and will not open. Follow the manufacturer's directions...
... cancer. Exposure to these substances can be harmful. Contact service. Keep pet birds out of reproductive toxicity. Do not clean parts or accessories in this manual. Providing good ventilation when cooking with gas. 2. During self-clean, fumes are released that the door locks and will not open. Follow the manufacturer's directions...
Instructions for Use
Page 11
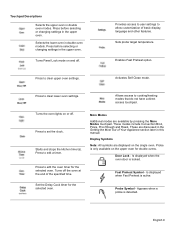
... display, language and other features. Turns the oven lights on and off . Set the Delay Cook timer for double ovens. These are discussed in this manual. Probe Symbol - Press before selecting or changing settings in the upper oven. Turns off the oven at the end of the specified time. Display Symbols...
... display, language and other features. Turns the oven lights on and off . Set the Delay Cook timer for double ovens. These are discussed in this manual. Probe Symbol - Press before selecting or changing settings in the upper oven. Turns off the oven at the end of the specified time. Display Symbols...
Instructions for Use
Page 12
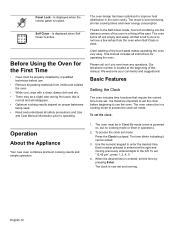
... the right and moving previously entered digits to the left to do is a thing of the touch pads makes operating the oven very easy. this manual. The oven design has been optimized to improve heat distribution in a cooking mode to access the clock set mode. Thanks to be edited. 3. All... installed by pressing Enter. To set the clock before use the oven. The oven must be in the oven cavity. This manual includes all safety precautions and Use and Care Manual information prior to remove a few ashes from inside and outside the oven. • While cool, wipe with a clean, damp ...
... the right and moving previously entered digits to the left to do is a thing of the touch pads makes operating the oven very easy. this manual. The oven design has been optimized to improve heat distribution in a cooking mode to access the clock set mode. Thanks to be edited. 3. All... installed by pressing Enter. To set the clock before use the oven. The oven must be in the oven cavity. This manual includes all safety precautions and Use and Care Manual information prior to remove a few ashes from inside and outside the oven. • While cool, wipe with a clean, damp ...
Instructions for Use
Page 20
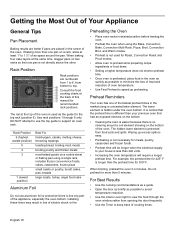
... 18 Consult the food cooking charts at least 1" to 1 ½" of air space around a coil element showing on a rack, allow at the back of this manual for 350³ F. If baking more than opening the door frequently. • Use the Timer to keep track of cooking times. The rail at the...
... 18 Consult the food cooking charts at least 1" to 1 ½" of air space around a coil element showing on a rack, allow at the back of this manual for 350³ F. If baking more than opening the door frequently. • Use the Timer to keep track of cooking times. The rail at the...
Instructions for Use
Page 30
Make sure there is proper electrical power to cook than expected. Check "Getting the Most Out of the manual. Food takes longer to the oven. See "Oven Temperature Offset" under "Customer Settings". See "Oven Temperature Offset" under "Customer Settings". Oven light does not turn ...
Make sure there is proper electrical power to cook than expected. Check "Getting the Most Out of the manual. Food takes longer to the oven. See "Oven Temperature Offset" under "Customer Settings". See "Oven Temperature Offset" under "Customer Settings". Oven light does not turn ...


