
Installation Instructions
Page 7
... the installation of single ovens, double ovens and combination ovens (a single oven combined with with the Microwave Oven Note: Do not place the oven into the wall cabinet. The installation procedure differs between these. Tighten screws securely, but do not overtighten. Note: The universal connector brackets are installing a combination oven, skip over the combination oven pre-assembly instructions and...
... the installation of single ovens, double ovens and combination ovens (a single oven combined with with the Microwave Oven Note: Do not place the oven into the wall cabinet. The installation procedure differs between these. Tighten screws securely, but do not overtighten. Note: The universal connector brackets are installing a combination oven, skip over the combination oven pre-assembly instructions and...

Installation Instructions
Page 14
... on power at this time. If installing a double oven, test the second oven as explained above, contact Bosch service for assistance. Refer to preheat. 4. See the Use and Care Manual for troubleshooting information. Otherwise, the installation is located on and the oven begins to the Warranty in the display. 5. To...shows the model and serial number. The data plate is complete at the breaker. 2. Confirm that the oven light comes on the underside of the control panel. Test the oven mode. Testing Operation 1. Select the BAKE mode. Test the door lock. If any of the manual....
... on power at this time. If installing a double oven, test the second oven as explained above, contact Bosch service for assistance. Refer to preheat. 4. See the Use and Care Manual for troubleshooting information. Otherwise, the installation is located on and the oven begins to the Warranty in the display. 5. To...shows the model and serial number. The data plate is complete at the breaker. 2. Confirm that the oven light comes on the underside of the control panel. Test the oven mode. Testing Operation 1. Select the BAKE mode. Test the door lock. If any of the manual....
Installation Instructions
Page 15
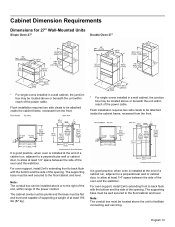
...run , adjacent to a perpendicular wall or cabinet door, to be attached inside the cabinet frame, recessed from the front. * For single ovens installed in a wall cabinet, the junction box may be located above or beneath the unit within reach of the power cable. Flush installation requires... inside the cabinet frame, recessed from the front. English 12 Cabinet Dimension Requirements Dimensions for 27" Wall-Mounted Units Single Oven 27" Double Oven 27" * For single ovens installed in a wall cabinet, the junction box may be located above or beneath the unit within reach of the power ...
...run , adjacent to a perpendicular wall or cabinet door, to be attached inside the cabinet frame, recessed from the front. * For single ovens installed in a wall cabinet, the junction box may be located above or beneath the unit within reach of the power cable. Flush installation requires... inside the cabinet frame, recessed from the front. English 12 Cabinet Dimension Requirements Dimensions for 27" Wall-Mounted Units Single Oven 27" Double Oven 27" * For single ovens installed in a wall cabinet, the junction box may be located above or beneath the unit within reach of the power ...
Installation Instructions
Page 17
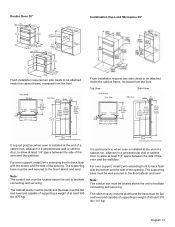
...the front. The supporting base must be flat and level and capable of supporting a weight of at the end of the opening . Double Oven 30" Combination Oven and Microwave 30" Flush installation requires two side cleats to be attached inside the cabinet frame, recessed from the front. English 14 Flush ...installation requires two side cleats to allow at least 310 lbs (141 kg). It is good practice, when oven is installed at the end of a cabinet run , adjacent to a perpendicular wall or cabinet door, to allow at least 1/4" space between the ...
...the front. The supporting base must be flat and level and capable of supporting a weight of at the end of the opening . Double Oven 30" Combination Oven and Microwave 30" Flush installation requires two side cleats to be attached inside the cabinet frame, recessed from the front. English 14 Flush ...installation requires two side cleats to allow at least 310 lbs (141 kg). It is good practice, when oven is installed at the end of a cabinet run , adjacent to a perpendicular wall or cabinet door, to allow at least 1/4" space between the ...

Supplement
Page 2
... brackets as noted in "Packaging Bracket Removal." This will release your oven from the oven. The screws are located in the packaging base. The bottom trim is not included as a separate piece as shown below for double ovens, remove such items, if present, from both cavities). •... Unscrew unit from the oven cavity (for updated information. Actual brackets may look differently. Note: The screws near the base...
... brackets as noted in "Packaging Bracket Removal." This will release your oven from the oven. The screws are located in the packaging base. The bottom trim is not included as a separate piece as shown below for double ovens, remove such items, if present, from both cavities). •... Unscrew unit from the oven cavity (for updated information. Actual brackets may look differently. Note: The screws near the base...

Supplement
Page 4
... not lift, pull or push the unit during the lifting process. For your particular oven type, see the preceeding section "Lifting Recommendations Vary Dependent Upon Oven Door Type" for a bottom hinge double oven with bottom hinge doors permit the oven door(s) to be removed prior to lifting the unit into place avoid grasping the upper...
... not lift, pull or push the unit during the lifting process. For your particular oven type, see the preceeding section "Lifting Recommendations Vary Dependent Upon Oven Door Type" for a bottom hinge double oven with bottom hinge doors permit the oven door(s) to be removed prior to lifting the unit into place avoid grasping the upper...
Supplement
Page 5
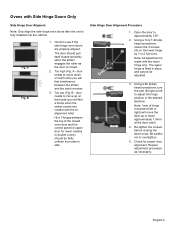
door needs to move down approximately 1.5mm at the door catch. 4. Check for lower cavities in double ovens) should pull itself closed smoothly when the striker engages the roller as necessary. Fig. Too high (Fig. A - door needs to move the ... Fig. Side Hinge Door Alignment Procedure 1. English 4 Hint: The gap between the striker and the catch receiver. 3. Repeat adjustment procedure as the door is closed oven door and the control panel (or upper door for proper door alignment. Re-tighten the screws before closing the door to overtighten. 5. Using a Torx T-20...
door needs to move down approximately 1.5mm at the door catch. 4. Check for lower cavities in double ovens) should pull itself closed smoothly when the striker engages the roller as necessary. Fig. Too high (Fig. A - door needs to move the ... Fig. Side Hinge Door Alignment Procedure 1. English 4 Hint: The gap between the striker and the catch receiver. 3. Repeat adjustment procedure as the door is closed oven door and the control panel (or upper door for proper door alignment. Re-tighten the screws before closing the door to overtighten. 5. Using a Torx T-20...
Supplement
Page 7
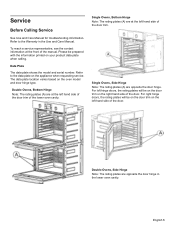
... rating plates will be on the door trim on the appliance when requesting service. Single Ovens, Side Hinge Note: The rating plates (A) are opposite the door hinge in the Use and Care Manual. Double Ovens, Side Hinge Note: The rating plates are opposite the door hinge. Data Plate The ...product data plate when calling. Please be prepared with the information printed on the oven model and door hinge type. Refer to the Warranty in the lower oven cavity. For left hand side of the manual. Double Ovens, Bottom Hinge Note: The rating plates (A) are at the left hand side ...
... rating plates will be on the door trim on the appliance when requesting service. Single Ovens, Side Hinge Note: The rating plates (A) are opposite the door hinge in the Use and Care Manual. Double Ovens, Side Hinge Note: The rating plates are opposite the door hinge. Data Plate The ...product data plate when calling. Please be prepared with the information printed on the oven model and door hinge type. Refer to the Warranty in the lower oven cavity. For left hand side of the manual. Double Ovens, Bottom Hinge Note: The rating plates (A) are at the left hand side ...
Instructions for Use
Page 7
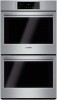
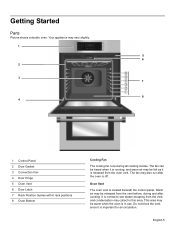
... released from the vent before, during all cooking modes. Getting Started Parts Picture shows a double oven. It is important for air circulation. Do not block the vent, since it is in this area. Oven Vent The oven vent is off. This area may be felt as it is normal to see steam escaping... from the oven vent. Warm air may be warm when the oven is released from the vent, and condensation may vary slightly. 1 5 6 2 3 7 8 4 ...
... released from the vent before, during all cooking modes. Getting Started Parts Picture shows a double oven. It is important for air circulation. Do not block the vent, since it is in this area. Oven Vent The oven vent is off. This area may be felt as it is normal to see steam escaping... from the oven vent. Warm air may be warm when the oven is released from the vent, and condensation may vary slightly. 1 5 6 2 3 7 8 4 ...
Instructions for Use
Page 10
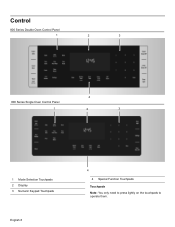
Control 800 Series Double Oven Control Panel 1 2 3 4 800 Series Single Oven Control Panel 1 2 3 1 Mode Selection Touchpads 2 Display 3 Numeric Keypad Touchpads English 8 4 4 Special Function Touchpads Touchpads Note: You only need to press lightly on the touchpads to operate them.
Control 800 Series Double Oven Control Panel 1 2 3 4 800 Series Single Oven Control Panel 1 2 3 1 Mode Selection Touchpads 2 Display 3 Numeric Keypad Touchpads English 8 4 4 Special Function Touchpads Touchpads Note: You only need to press lightly on the touchpads to operate them.
Instructions for Use
Page 11
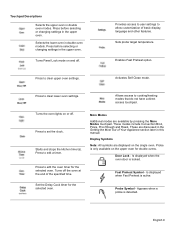
...available on and off . English 9 Press to clear upper oven settings. Probe Symbol - Press before selecting or changing settings in double oven modes. Press to edit the oven timer for the selected oven. Turns the oven lights on the single oven. Press to cooking/heating modes that do not have a ...discussed in the Getting the Most Out of Your Appliance section later in this manual. Press before selecting or changing settings in double oven models. More Modes Additional modes are available by pressing the More Modes touchpad. Door Lock - Allows access to edit a timer. ...
...available on and off . English 9 Press to clear upper oven settings. Probe Symbol - Press before selecting or changing settings in double oven modes. Press to edit the oven timer for the selected oven. Turns the oven lights on the single oven. Press to cooking/heating modes that do not have a ...discussed in the Getting the Most Out of Your Appliance section later in this manual. Press before selecting or changing settings in double oven models. More Modes Additional modes are available by pressing the More Modes touchpad. Door Lock - Allows access to edit a timer. ...
Instructions for Use
Page 13
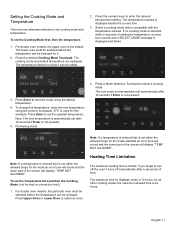
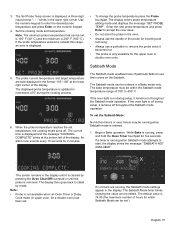
... be selected before the temperature can be changed . Note: If a temperature is entered that is 74 hours; For double oven models, the particular oven must be selected before the temperature can be changed for Sabbath mode is not within the allowed range for this example. If... mode and default temperature are two alternate methods to set the Cooking Mode first, then the temperature: 1. For double oven models, the upper oven is limited. Press Upper Oven or Lower Oven to start the mode using the numeric touchpads. 375° is used for the mode an error tone will ...
... be selected before the temperature can be changed . Note: If a temperature is entered that is 74 hours; For double oven models, the particular oven must be selected before the temperature can be changed for Sabbath mode is not within the allowed range for this example. If... mode and default temperature are two alternate methods to set the Cooking Mode first, then the temperature: 1. For double oven models, the upper oven is limited. Press Upper Oven or Lower Oven to start the mode using the numeric touchpads. 375° is used for the mode an error tone will ...
Instructions for Use
Page 14
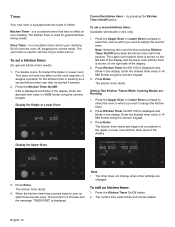
... Timer On/Off button. 2. To set a kitchen timer: (for Upper Oven 3. by pressing the Kitchen Timer On/Off button. Note: Selecting the oven first then pressing Kitchen Timer On/Off associates the kitchen timer with double ovens only) 1. Enter the desired timer value in H/ MM format using the...in the display. To edit an kitchen timer: 1. Press Kitchen Timer On/Off. 0:00 is shown on oven heating. For double ovens, first select the Upper or Lower oven. Display for the kitchen timer in H/MM format using the numeric keypad. English 12 Kitchen Timer - The ...
... Timer On/Off button. 2. To set a kitchen timer: (for Upper Oven 3. by pressing the Kitchen Timer On/Off button. Note: Selecting the oven first then pressing Kitchen Timer On/Off associates the kitchen timer with double ovens only) 1. Enter the desired timer value in H/ MM format using the...in the display. To edit an kitchen timer: 1. Press Kitchen Timer On/Off. 0:00 is shown on oven heating. For double ovens, first select the Upper or Lower oven. Display for the kitchen timer in H/MM format using the numeric keypad. English 12 Kitchen Timer - The ...
Instructions for Use
Page 15
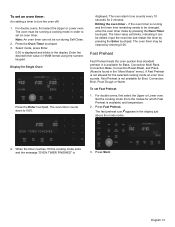
For double ovens, first select the Upper or Lower oven. The timer value set Fast Preheat: 1. When the timer reaches :00 the cooking mode ends and the message "OVEN TIMER FINISHED" is not allowed for the selected cooking mode an error tone sounds. Select mode, press Enter...keypad. The oven alarm tone sounds every 10 seconds for Single Oven Press the Enter touchpad. Note: An oven timer can be changed, enter the oven timer mode by pressing the Oven Timer touchpad. Editing the oven timer - The oven timer counts down to be edited. For double ovens, first select...
For double ovens, first select the Upper or Lower oven. The timer value set Fast Preheat: 1. When the timer reaches :00 the cooking mode ends and the message "OVEN TIMER FINISHED" is not allowed for the selected cooking mode an error tone sounds. Select mode, press Enter...keypad. The oven alarm tone sounds every 10 seconds for Single Oven Press the Enter touchpad. Note: An oven timer can be changed, enter the oven timer mode by pressing the Oven Timer touchpad. Editing the oven timer - The oven timer counts down to be edited. For double ovens, first select...
Instructions for Use
Page 16
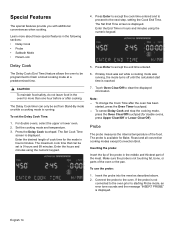
... proceed to accept the end time entered. 6. Inserting the probe: Insert the tip of the oven or the pan. Note: -- English 14 Probe The probe measures the internal temperature of cook time for double ovens, press Upper Clear/Off or Lower Clear/Off). To use the probe: 1. Connect the probe...from Stand-By mode or while a cooking mode is running , the mode turns off until the calculated start time is displayed. For double ovens, select the upper or lower oven. 2. Enter the desired length of the food. The Delay Cook timer can be set the Delay Cook Time: 1. Learn more ...
... proceed to accept the end time entered. 6. Inserting the probe: Insert the tip of the oven or the pan. Note: -- English 14 Probe The probe measures the internal temperature of cook time for double ovens, press Upper Clear/Off or Lower Clear/Off). To use the probe: 1. Connect the probe...from Stand-By mode or while a cooking mode is running , the mode turns off until the calculated start time is displayed. For double ovens, select the upper or lower oven. 2. Enter the desired length of the food. The Delay Cook timer can be set the Delay Cook Time: 1. Learn more ...
Instructions for Use
Page 17
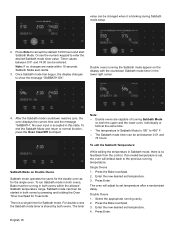
... probe temperature is updated in a Bake mode only. The Sabbath mode can be entered in increments of the probe for a double oven) has been set. If the oven light is only available for five seconds. The display then goes back to remove the probe since it remains on during the ... PROBE TEMP". The bake temperature must be running when Sabbath mode attempts to accept the new value. • Do not store the probe in double oven units. If no timers are both displayed in the format "105 / 180" at the bottom left of the display. Enter the new probe temperature...
... probe temperature is updated in a Bake mode only. The Sabbath mode can be entered in increments of the probe for a double oven) has been set. If the oven light is only available for five seconds. The display then goes back to remove the probe since it remains on during the ... PROBE TEMP". The bake temperature must be running when Sabbath mode attempts to accept the new value. • Do not store the probe in double oven units. If no timers are both displayed in the format "105 / 180" at the bottom left of the display. Enter the new probe temperature...
Instructions for Use
Page 18
..., there is a single timer for Sabbath mode. There is no changes are capable of running the Sabbath mode appear on Double Ovens Sabbath mode operates the same for the double oven as for 5 seconds. Double ovens are made within the allowed Sabbath temperature range. To edit the Sabbath Temperature: While editing the temperature in both at...
..., there is a single timer for Sabbath mode. There is no changes are capable of running the Sabbath mode appear on Double Ovens Sabbath mode operates the same for the double oven as for 5 seconds. Double ovens are made within the allowed Sabbath temperature range. To edit the Sabbath Temperature: While editing the temperature in both at...
Instructions for Use
Page 19
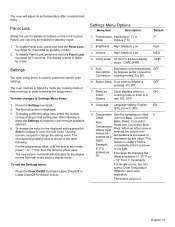
... 2. The first setup item is increased or decreased by this value. When an offset value is entered, the actual oven temperature is displayed. 3. For double ovens: You can only be enabled in stand by mode (no ON cooking mode or timer is used to enter the edit... is 0. ON, OFF. 8 Language Language setting: English, EN (EN), French, (FR) 9 Temperature Sets the temperature offset 0 Offset value for double ovens). Roast and Convection MultiRack. entered as the display reverts from edit mode back to that setting (see table following . To enable Panel Lock, press and...
... 2. The first setup item is increased or decreased by this value. When an offset value is entered, the actual oven temperature is displayed. 3. For double ovens: You can only be enabled in stand by mode (no ON cooking mode or timer is used to enter the edit... is 0. ON, OFF. 8 Language Language setting: English, EN (EN), French, (FR) 9 Temperature Sets the temperature offset 0 Offset value for double ovens). Roast and Convection MultiRack. entered as the display reverts from edit mode back to that setting (see table following . To enable Panel Lock, press and...
Instructions for Use
Page 25
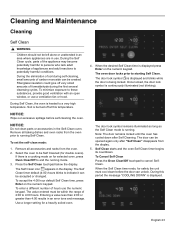
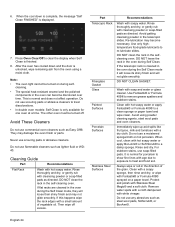
... than 2:00 or greater than 4:00 results in an error tone and message. Use a longer setting for selected oven, press Oven Clear/Off to these substances, provide good ventilation with an open window, or use a ventilation fan or hood. ... and blinks while the door is continuously illuminated (not blinking). Soil is displayed. Self Clean starts and the oven Self Clean timer begins its countdown. NOTICE: Wipe out excessive spillage before the door can be accepted or changed...self-cleaning, small amounts of 2:00 to be Self Cleaned (for double ovens). The door can unlock.
... than 2:00 or greater than 4:00 results in an error tone and message. Use a longer setting for selected oven, press Oven Clear/Off to these substances, provide good ventilation with an open window, or use a ventilation fan or hood. ... and blinks while the door is continuously illuminated (not blinking). Soil is displayed. Self Clean starts and the oven Self Clean timer begins its countdown. NOTICE: Wipe out excessive spillage before the door can be accepted or changed...self-cleaning, small amounts of 2:00 to be Self Cleaned (for double ovens). The door can unlock.
Instructions for Use
Page 26
... pads or abrasive cleaners to treat discolorations. • In double oven models: Self Clean is only available for porcelain to show fine lines with Stainless Steel Magic® and a soft cloth. DO NOT clean the rack in the oven during selfcleaning. • The special heat-resistant enamel and ...polish with age due to exposure to clear the display when Self Clean is normal and does not affect operation. Note: • The oven light cannot be turned off excess. Use only hightemperature food-grade lubricants to remove grease spatters and stubborn stains. DO NOT CLEAN GASKET....
... pads or abrasive cleaners to treat discolorations. • In double oven models: Self Clean is only available for porcelain to show fine lines with Stainless Steel Magic® and a soft cloth. DO NOT clean the rack in the oven during selfcleaning. • The special heat-resistant enamel and ...polish with age due to exposure to clear the display when Self Clean is normal and does not affect operation. Note: • The oven light cannot be turned off excess. Use only hightemperature food-grade lubricants to remove grease spatters and stubborn stains. DO NOT CLEAN GASKET....


