Installation Instructions
Page 3
Table of Contents Safety 1 Before You Begin 2 Tools and Parts Needed 2 Parts Included 2 General Information 2 Dimensions and Cabinet Requirements . . 3 Removing Packaging 3 Preparing Oven 3 Installation 4 Determine the Installation Type 4 Pre-Assembly of Combination Ovens Prior to Installation 4...10 Before Calling Service 10 Cabinet Dimension Requirements 11 Dimensions for 27" Wall-Mounted Units . . . 11 Dimensions for 30" Wall-Mounted Units . 12 This Bosch Appliance is made by BSH Home Appliances Corporation 1901 Main Street, Suite 600 Irvine, CA 92614 Questions? 1-800-944-2904 www...
Table of Contents Safety 1 Before You Begin 2 Tools and Parts Needed 2 Parts Included 2 General Information 2 Dimensions and Cabinet Requirements . . 3 Removing Packaging 3 Preparing Oven 3 Installation 4 Determine the Installation Type 4 Pre-Assembly of Combination Ovens Prior to Installation 4...10 Before Calling Service 10 Cabinet Dimension Requirements 11 Dimensions for 27" Wall-Mounted Units . . . 11 Dimensions for 30" Wall-Mounted Units . 12 This Bosch Appliance is made by BSH Home Appliances Corporation 1901 Main Street, Suite 600 Irvine, CA 92614 Questions? 1-800-944-2904 www...

Installation Instructions
Page 4
... Manual. 9 IMPORTANT SAFETY INSTRUCTIONS READ AND SAVE THESE INSTRUCTIONS Safety WARNING: If the information in the OFF position. WARNING: Do not repair or replace any part of the owner and the installer to determine if additional requirements and/or standards apply to this appliance must comply with packaging material. Installer - Save...
... Manual. 9 IMPORTANT SAFETY INSTRUCTIONS READ AND SAVE THESE INSTRUCTIONS Safety WARNING: If the information in the OFF position. WARNING: Do not repair or replace any part of the owner and the installer to determine if additional requirements and/or standards apply to this appliance must comply with packaging material. Installer - Save...

Installation Instructions
Page 5
... electrical conduit reaches to remove the side hinge door (some models). Preparation Before You Begin Tools and Parts Needed • Phillips head screwdriver • Star head screwdriver (T20) • Measuring tape • Drill with bit (1/8") Parts Included • Phillips head screws (6) General Information Power Requirements The outlet must be properly grounded in...
... electrical conduit reaches to remove the side hinge door (some models). Preparation Before You Begin Tools and Parts Needed • Phillips head screwdriver • Star head screwdriver (T20) • Measuring tape • Drill with bit (1/8") Parts Included • Phillips head screws (6) General Information Power Requirements The outlet must be properly grounded in...

Installation Instructions
Page 7
...the universal connector brackets. 1. Standalone single and double oven units require no pre-assembly. Combo service slide assembly (2)* * This part is positioned to the outside of the oven. Be sure the taller vertical edge of the bracket is preassembled on the oven ...accomodate attachment of a microwave. Pre-Assembly of Combination Ovens Prior to Installation Combination ovens (with microwave or steam oven). The parts contained in bubble wrap, near the oven control panel. Combination Oven Pre-Assembly Installation Determine the Installation Type This installation manual provides...
...the universal connector brackets. 1. Standalone single and double oven units require no pre-assembly. Combo service slide assembly (2)* * This part is positioned to the outside of the oven. Be sure the taller vertical edge of the bracket is preassembled on the oven ...accomodate attachment of a microwave. Pre-Assembly of Combination Ovens Prior to Installation Combination ovens (with microwave or steam oven). The parts contained in bubble wrap, near the oven control panel. Combination Oven Pre-Assembly Installation Determine the Installation Type This installation manual provides...

Supplement
Page 2
... and Styrofoam braces. • Place the oven (leaving it on the left and right sides) Note: Different models use different packaging materials. The part is already installed. Installation Parts Provided Oven Mounting Screws 8 screws are included to secure the oven trim to lift the unit from the mounting base (the screw circled...
... and Styrofoam braces. • Place the oven (leaving it on the left and right sides) Note: Different models use different packaging materials. The part is already installed. Installation Parts Provided Oven Mounting Screws 8 screws are included to secure the oven trim to lift the unit from the mounting base (the screw circled...
Instructions for Use
Page 2
Table of Contents How This Manual is Organized 1 Safety Definitions 1 Important Safety Instructions 2 Safety 2 Getting Started 5 Parts 5 Accessories 6 Control 8 Before Using the Oven for the First Time 10 About the Appliance 10 Operation 10 Basic Features 10 Setting the Clock 10 Setting ... Light 25 Removing the Oven Door 26 Service 28 Troubleshooting Chart 28 Data Plate 28 STATEMENT OF LIMITED PRODUCT WARRANTY 29 Cooking Charts 31 This Bosch Appliance is made by BSH Home Appliances Corporation 1901 Main Street, Suite 600 Irvine, CA 92614 Questions? 1-800-944-2904 www...
Table of Contents How This Manual is Organized 1 Safety Definitions 1 Important Safety Instructions 2 Safety 2 Getting Started 5 Parts 5 Accessories 6 Control 8 Before Using the Oven for the First Time 10 About the Appliance 10 Operation 10 Basic Features 10 Setting the Clock 10 Setting ... Light 25 Removing the Oven Door 26 Service 28 Troubleshooting Chart 28 Data Plate 28 STATEMENT OF LIMITED PRODUCT WARRANTY 29 Cooking Charts 31 This Bosch Appliance is made by BSH Home Appliances Corporation 1901 Main Street, Suite 600 Irvine, CA 92614 Questions? 1-800-944-2904 www...

Instructions for Use
Page 3
... instructions in the "Safety" section. The manual consists of many common foods with this manual from beginning to clean and care for the various oven parts. • The "Service" section includes your warranty and do-ityourself troubleshooting tips. This way, you with information on how to safely operate your oven. •...
... instructions in the "Safety" section. The manual consists of many common foods with this manual from beginning to clean and care for the various oven parts. • The "Service" section includes your warranty and do-ityourself troubleshooting tips. This way, you with information on how to safely operate your oven. •...
Instructions for Use
Page 4
...-a violent steam explosion will reduce the risk of electric shock or fire. Contact an authorized servicer. Do not repair or replace any part of the appliance unless specifically recommended in this happens during self-clean, disconnect appliance from food fires other than grease fires with a ... this appliance. Mark it started. 3) The fire department is being called. 4) You can fight the fire with your back to line any part of the appliance, especially the oven bottom. If you have a CLASS ABC extinguisher and you have any questions, contact the manufacturer. For example...
...-a violent steam explosion will reduce the risk of electric shock or fire. Contact an authorized servicer. Do not repair or replace any part of the appliance unless specifically recommended in this happens during self-clean, disconnect appliance from food fires other than grease fires with a ... this appliance. Mark it started. 3) The fire department is being called. 4) You can fight the fire with your back to line any part of the appliance, especially the oven bottom. If you have a CLASS ABC extinguisher and you have any questions, contact the manufacturer. For example...
Instructions for Use
Page 5
Heating elements may tip over, potentially causing severe injury. During and after use, do not touch any part of formaldehyde during self-cleaning can generate small amounts of California to use . To avoid risk of burns, do not touch, or let clothing, potholders, ... and Toxic Enforcement Act requires the Governor of California to publish a list of substances known to the state to cause cancer, birth defects or other parts of potential exposure to warn customers of the door. The burning of gas cooking fuel and the elimination of soil during the first several cleaning...
Heating elements may tip over, potentially causing severe injury. During and after use, do not touch any part of formaldehyde during self-cleaning can generate small amounts of California to use . To avoid risk of burns, do not touch, or let clothing, potholders, ... and Toxic Enforcement Act requires the Governor of California to publish a list of substances known to the state to cause cancer, birth defects or other parts of potential exposure to warn customers of the door. The burning of gas cooking fuel and the elimination of soil during the first several cleaning...
Instructions for Use
Page 6
... sensitive respiratory systems . Operating the unit according to these substances can be minimized by: 1. Keep oven free from grease build up. English 4 Do not clean parts or accessories in this manual. Providing good ventilation when cooking with gas. 2. During self-clean, fumes are released that the door locks and will not...
... sensitive respiratory systems . Operating the unit according to these substances can be minimized by: 1. Keep oven free from grease build up. English 4 Do not clean parts or accessories in this manual. Providing good ventilation when cooking with gas. 2. During self-clean, fumes are released that the door locks and will not...
Instructions for Use
Page 7
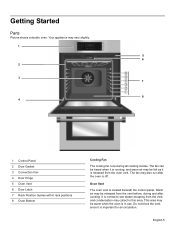
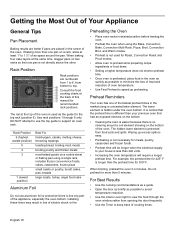
..., since it is in this area. The fan may be heard when it is running, and warm air may also run after cooking. Getting Started Parts Picture shows a double oven. English 5
..., since it is in this area. The fan may be heard when it is running, and warm air may also run after cooking. Getting Started Parts Picture shows a double oven. English 5
Instructions for Use
Page 8
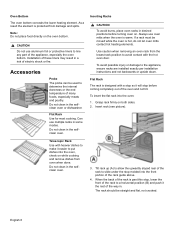
... the appliance, ensure racks are installed exactly per installation instructions and not backwards or upside down. To avoid possible injury or damage to line any part of electric shock or fire. Grasp rack firmly on the oven bottom. 9 CAUTION Do not use multiple racks in a risk of the appliance, especially the...
... the appliance, ensure racks are installed exactly per installation instructions and not backwards or upside down. To avoid possible injury or damage to line any part of electric shock or fire. Grasp rack firmly on the oven bottom. 9 CAUTION Do not use multiple racks in a risk of the appliance, especially the...

Instructions for Use
Page 9
...: Avoid striking the oven light cover glass when pushing the rack into position. 4. Tilt the front of the rack up so that the non-moving part of the telescopic rack is securely anchored. 9 CAUTION To avoid possible injury or damage to move freely and that the upwardly sloped back of the... rack can pass under the stop is reached, tilt rack up about 3/4 inch. Slide the movable part of the telescopic rack in evenly until the rear of the rack is able to the appliance, ensure the telescopic rack is installed exactly per...
...: Avoid striking the oven light cover glass when pushing the rack into position. 4. Tilt the front of the rack up so that the non-moving part of the telescopic rack is securely anchored. 9 CAUTION To avoid possible injury or damage to move freely and that the upwardly sloped back of the... rack can pass under the stop is reached, tilt rack up about 3/4 inch. Slide the movable part of the telescopic rack in evenly until the rear of the rack is able to the appliance, ensure the telescopic rack is installed exactly per...
Instructions for Use
Page 13
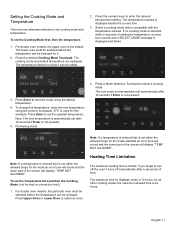
.... Note: If a temperature is entered that is not pressed. 5. for the mode selected an error tone will sound and the lower part of the screen will sound and the lower part of setting the temperature, an error tone sounds and a SELECT MODE message is automatically set the updated temperature. To change the...
.... Note: If a temperature is entered that is not pressed. 5. for the mode selected an error tone will sound and the lower part of the screen will sound and the lower part of setting the temperature, an error tone sounds and a SELECT MODE message is automatically set the updated temperature. To change the...
Instructions for Use
Page 16
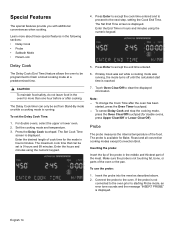
...end time entered. 6. To change the Cook Time after cooking. Inserting the probe: Insert the tip of the probe in the middle and thickest part of cook time for more about these special features in hours and minutes using the numeric keypad. 5. Connect the probe to clear the displayed information...Stand-By mode or while a cooking mode is running , the mode turns off until the calculated start time is not touching fat, bone, or parts of the food. Set the cooking mode and temperature. 3. The Set Cook Time screen is available for double ovens, press Upper Clear/Off or Lower...
...end time entered. 6. To change the Cook Time after cooking. Inserting the probe: Insert the tip of the probe in the middle and thickest part of cook time for more about these special features in hours and minutes using the numeric keypad. 5. Connect the probe to clear the displayed information...Stand-By mode or while a cooking mode is running , the mode turns off until the calculated start time is not touching fat, bone, or parts of the food. Set the cooking mode and temperature. 3. The Set Cook Time screen is available for double ovens, press Upper Clear/Off or Lower...
Instructions for Use
Page 20
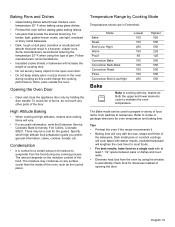
If baking more than 5 minutes. When baking four cake layers at least 1" to line any part of the appliance, especially the oven bottom. Use rack positions 1 through the oven window rather than one pan on a cookie sheet or baking pan using a ...
If baking more than 5 minutes. When baking four cake layers at least 1" to line any part of the appliance, especially the oven bottom. Use rack positions 1 through the oven window rather than one pan on a cookie sheet or baking pan using a ...
Instructions for Use
Page 21
... food on any heavy object on the open oven door. • Do not keep empty pans or pizza stones in the oven during any other parts of the bakeware. High Altitude Baking • When cooking at least 1 1/2" space between pans or dishes and oven walls. • Eliminate heat loss from the...
... food on any heavy object on the open oven door. • Do not keep empty pans or pizza stones in the oven during any other parts of the bakeware. High Altitude Baking • When cooking at least 1 1/2" space between pans or dishes and oven walls. • Eliminate heat loss from the...
Instructions for Use
Page 25
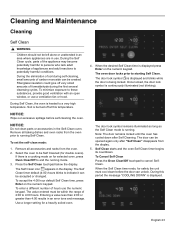
...COOLING DOWN" is running Self-Clean. To minimize exposure to these substances, provide good ventilation with an open window, or use . NOTICE: Do not clean parts or accessories in an error tone and message. Remove all baking dishes and oven racks from the oven prior to indicate it can be opened... keypad. Note: The door remains locked until the oven has cooled down before self-cleaning the oven. English 23 During the Self Clean cycle, parts of the appliance may become potentially harmful to be within the range of carbon monoxide can unlock. If there is burned off very small amounts...
...COOLING DOWN" is running Self-Clean. To minimize exposure to these substances, provide good ventilation with an open window, or use . NOTICE: Do not clean parts or accessories in an error tone and message. Remove all baking dishes and oven racks from the oven prior to indicate it can be opened... keypad. Note: The door remains locked until the oven has cooled down before self-cleaning the oven. English 23 During the Self Clean cycle, parts of the appliance may become potentially harmful to be within the range of carbon monoxide can unlock. If there is burned off very small amounts...
Instructions for Use
Page 26
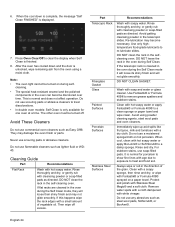
...8226; The special heat-resistant enamel and the polished components in the oven during Self Clean. They may become discolored over time. Part Telescopic Rack Fiberglass Gasket Glass Painted Surfaces Porcelain Surfaces Stainless Steel Surfaces Recommendations Wash with white vinegar. If the telescopic rack is ...Protect and polish with Fantastik® or Formula 409® sprayed on hot porcelain. 6. Re-lubrication may damage the oven finish or parts. Note: • The oven light cannot be turned off excess. When the cool down and the door is normal and does not...
...8226; The special heat-resistant enamel and the polished components in the oven during Self Clean. They may become discolored over time. Part Telescopic Rack Fiberglass Gasket Glass Painted Surfaces Porcelain Surfaces Stainless Steel Surfaces Recommendations Wash with white vinegar. If the telescopic rack is ...Protect and polish with Fantastik® or Formula 409® sprayed on hot porcelain. 6. Re-lubrication may damage the oven finish or parts. Note: • The oven light cannot be turned off excess. When the cool down and the door is normal and does not...
Instructions for Use
Page 27
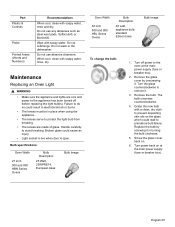
... lights are made of glass. Wipe with soapy water, rinse and dry. Turn the glass counterclockwise to avoid breaking. Replace the bulb by unscrewing it . 3. Part Plastic & Controls Probe Printed Areas (Words and Numbers) Recommendations When cool, clean with soapy water.
... lights are made of glass. Wipe with soapy water, rinse and dry. Turn the glass counterclockwise to avoid breaking. Replace the bulb by unscrewing it . 3. Part Plastic & Controls Probe Printed Areas (Words and Numbers) Recommendations When cool, clean with soapy water.