
Installation Instructions
Page 4
...codes. Never allow children to move. 9 IMPORTANT SAFETY INSTRUCTIONS READ AND SAVE THESE INSTRUCTIONS Safety WARNING: If the information in the manuals. All servicing should be done by door handle. Use caution when reaching behind or under "Service" for the Safety of the oven...lift appliance by a qualified technician. Unit is properly installed and grounded by the National Electrical Code (or Canadian Electrical Code), this manual for the local electrical inspector's use the transport method shown in the OFF position. Safety Codes and Standards This appliance complies with...
...codes. Never allow children to move. 9 IMPORTANT SAFETY INSTRUCTIONS READ AND SAVE THESE INSTRUCTIONS Safety WARNING: If the information in the manuals. All servicing should be done by door handle. Use caution when reaching behind or under "Service" for the Safety of the oven...lift appliance by a qualified technician. Unit is properly installed and grounded by the National Electrical Code (or Canadian Electrical Code), this manual for the local electrical inspector's use the transport method shown in the OFF position. Safety Codes and Standards This appliance complies with...

Installation Instructions
Page 5
... handholds for content regarding Safety, Cabinet Dimensions, Removing Packaging, Electrical Installation, Testing the Installation and Customer Service. ___ 3. Note: Do not attempt to the installation manual for lifting. ___ 4. This can help you have three or more people available to assist with lifting the unit into place, making sure to the...
... handholds for content regarding Safety, Cabinet Dimensions, Removing Packaging, Electrical Installation, Testing the Installation and Customer Service. ___ 3. Note: Do not attempt to the installation manual for lifting. ___ 4. This can help you have three or more people available to assist with lifting the unit into place, making sure to the...

Installation Instructions
Page 6
...; Unscrew unit from Left and Right Brackets as show in the "Cabinet Dimensions Requirements" section at the back of this installation manual. Bracket remains in front of this installation manual for your oven when in line with the bottom and side of your model in "Left and Right Packaging Bracket Removal." Please...
...; Unscrew unit from Left and Right Brackets as show in the "Cabinet Dimensions Requirements" section at the back of this installation manual. Bracket remains in front of this installation manual for your oven when in line with the bottom and side of your model in "Left and Right Packaging Bracket Removal." Please...

Installation Instructions
Page 7
... go directly to "Electrical Installation" which applies to accomodate attachment of the screws provided. Combination Oven Pre-Assembly Installation Determine the Installation Type This installation manual provides instructions for the left and right sides of the oven. Parts Provided Oven Bottom trim (1) Packed in a plastic sleeve, with the Microwave Oven Note...
... go directly to "Electrical Installation" which applies to accomodate attachment of the screws provided. Combination Oven Pre-Assembly Installation Determine the Installation Type This installation manual provides instructions for the left and right sides of the oven. Parts Provided Oven Bottom trim (1) Packed in a plastic sleeve, with the Microwave Oven Note...

Installation Instructions
Page 10
... the Electrical Connection section for further information to the junction box. Install a suitable conduit box (not furnished). Push the bare end of this installation instruction manual are dual rated, designed to be used to correctly attach the conduit to complete the electrical connection of the oven). 3. Tighten the screws securely, but...
... the Electrical Connection section for further information to the junction box. Install a suitable conduit box (not furnished). Push the bare end of this installation instruction manual are dual rated, designed to be used to correctly attach the conduit to complete the electrical connection of the oven). 3. Tighten the screws securely, but...

Installation Instructions
Page 14
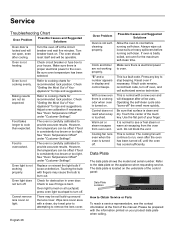
See the Use and Care Manual for troubleshooting information. Test the door lock. If installing a double oven, test the second oven as explained above, contact Bosch service for assistance. Data Plate The data plate shows the model and serial number. Confirm that the oven light comes on and ...your product data plate when calling. Select the BAKE mode. Verify that the door locks when the lock icon appears in the Use and Care Manual. To reach a service representative, see the contact information at the front of the control panel. The data plate is complete at the breaker....
See the Use and Care Manual for troubleshooting information. Test the door lock. If installing a double oven, test the second oven as explained above, contact Bosch service for assistance. Data Plate The data plate shows the model and serial number. Confirm that the oven light comes on and ...your product data plate when calling. Select the BAKE mode. Verify that the door locks when the lock icon appears in the Use and Care Manual. To reach a service representative, see the contact information at the front of the control panel. The data plate is complete at the breaker....

Supplement
Page 2
... screw that goes through the slotted hole in the mounting bracket on the shipping base) in oven Installation Instructions and the Use & Care Manual. This will release your oven from the oven. The part is to lift the unit from each bracket. Oven Bottom trim (installed at...base (the screw circled and shown as noted in the packaging base. The bracket remains in the installation manual. IMPORTANT UPDATES BUILT-IN OVEN INSTALLATION INSTRUCTIONS AND USE AND CARE MANUAL The following content updates the built-in front of the oven bottom trim. Removing Packaging • Cut ...
... screw that goes through the slotted hole in the mounting bracket on the shipping base) in oven Installation Instructions and the Use & Care Manual. This will release your oven from the oven. The part is to lift the unit from each bracket. Oven Bottom trim (installed at...base (the screw circled and shown as noted in the packaging base. The bracket remains in the installation manual. IMPORTANT UPDATES BUILT-IN OVEN INSTALLATION INSTRUCTIONS AND USE AND CARE MANUAL The following content updates the built-in front of the oven bottom trim. Removing Packaging • Cut ...

Supplement
Page 4
... for the correct lifting point for lift points. 5. Carefully lift the door up and out of the oven cavity. Place the door in the installation manual regarding the door removal before attempting to remove the side hinge door (side hinge doors are routinely simple procedures. English 3
... for the correct lifting point for lift points. 5. Carefully lift the door up and out of the oven cavity. Place the door in the installation manual regarding the door removal before attempting to remove the side hinge door (side hinge doors are routinely simple procedures. English 3
Supplement
Page 7
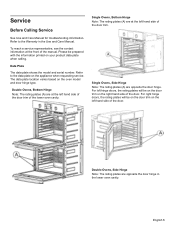
Service Before Calling Service See Use and Care Manual for troubleshooting information. Single Ovens, Side Hinge Note: The rating plates (A) are at the left hinge doors, the rating plates will be on the door ... oven cavity. Double Ovens, Bottom Hinge Note: The rating plates (A) are opposite the door hinge in the Use and Care Manual. For left hand side of the door trim of the manual. Data Plate The data plate shows the model and serial number. Refer to the data plate on the left hand...
Service Before Calling Service See Use and Care Manual for troubleshooting information. Single Ovens, Side Hinge Note: The rating plates (A) are at the left hinge doors, the rating plates will be on the door ... oven cavity. Double Ovens, Bottom Hinge Note: The rating plates (A) are opposite the door hinge in the Use and Care Manual. For left hand side of the door trim of the manual. Data Plate The data plate shows the model and serial number. Refer to the data plate on the left hand...
Instructions for Use
Page 2
Table of Contents How This Manual is Organized 1 Safety Definitions 1 Important Safety Instructions 2 Safety 2 Getting Started 5 Parts 5 Accessories 6 Control 8 Before Using the Oven for the First Time 10 About the Appliance ... Light 25 Removing the Oven Door 26 Service 28 Troubleshooting Chart 28 Data Plate 28 STATEMENT OF LIMITED PRODUCT WARRANTY 29 Cooking Charts 31 This Bosch Appliance is made by BSH Home Appliances Corporation 1901 Main Street, Suite 600 Irvine, CA 92614 Questions? 1-800-944-2904 www...
Table of Contents How This Manual is Organized 1 Safety Definitions 1 Important Safety Instructions 2 Safety 2 Getting Started 5 Parts 5 Accessories 6 Control 8 Before Using the Oven for the First Time 10 About the Appliance ... Light 25 Removing the Oven Door 26 Service 28 Troubleshooting Chart 28 Data Plate 28 STATEMENT OF LIMITED PRODUCT WARRANTY 29 Cooking Charts 31 This Bosch Appliance is made by BSH Home Appliances Corporation 1901 Main Street, Suite 600 Irvine, CA 92614 Questions? 1-800-944-2904 www...

Instructions for Use
Page 3
... Started" introduces you to the oven components and features. • The "Operation" section offers you step-by reading this advisory. The manual consists of this warning. Pay special attention to know your warranty and do-ityourself troubleshooting tips. Safety Definitions 9 WARNING This indicates that death...safety instructions in the "Safety" section. This way, you will systematically get the most out of Your Appliance" you with this manual from beginning to clean and care for the various oven parts. • The "Service" section includes your appliance and become familiar...
... Started" introduces you to the oven components and features. • The "Operation" section offers you step-by reading this advisory. The manual consists of this warning. Pay special attention to know your warranty and do-ityourself troubleshooting tips. Safety Definitions 9 WARNING This indicates that death...safety instructions in the "Safety" section. This way, you will systematically get the most out of Your Appliance" you with this manual from beginning to clean and care for the various oven parts. • The "Service" section includes your appliance and become familiar...
Instructions for Use
Page 4
...cookie sheet, or metal tray, then turn off the appliance and disconnect the circuit at the circuit breaker box. Do not operate this manual. Do not repair or replace any part of the appliance unless specifically recommended in injury. Fire Safety Do not use the appliance for warming... that personal clothing or hair catches fire, drop and roll immediately to the installation instructions for its intended purpose as described in or near this manual. English 2 If you the location of corrosive chemicals in heating or cleaning will result. • Use an extinguisher ONLY if: 1) You ...
...cookie sheet, or metal tray, then turn off the appliance and disconnect the circuit at the circuit breaker box. Do not operate this manual. Do not repair or replace any part of the appliance unless specifically recommended in injury. Fire Safety Do not use the appliance for warming... that personal clothing or hair catches fire, drop and roll immediately to the installation instructions for its intended purpose as described in or near this manual. English 2 If you the location of corrosive chemicals in heating or cleaning will result. • Use an extinguisher ONLY if: 1) You ...
Instructions for Use
Page 6
... harmful to the instructions in the self-clean oven. English 4 Providing good ventilation when cooking with gas. 2. Do not clean parts or accessories in this manual. Operating the unit according to birds. Exposure to these substances can be harmful. Birds have very sensitive respiratory systems .
... harmful to the instructions in the self-clean oven. English 4 Providing good ventilation when cooking with gas. 2. Do not clean parts or accessories in this manual. Operating the unit according to birds. Exposure to these substances can be harmful. Birds have very sensitive respiratory systems .
Instructions for Use
Page 11
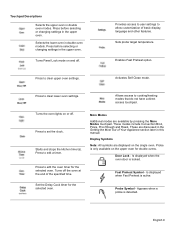
... clear lower oven settings. Turns the oven lights on and off the oven at the end of the specified time. These are discussed in this manual. Display Symbols Note: All symbols are available by pressing the More Modes touchpad. Door Lock - Probe Symbol - Provides access to user settings to allow customization...
... clear lower oven settings. Turns the oven lights on and off the oven at the end of the specified time. These are discussed in this manual. Display Symbols Note: All symbols are available by pressing the More Modes touchpad. Door Lock - Probe Symbol - Provides access to user settings to allow customization...
Instructions for Use
Page 12
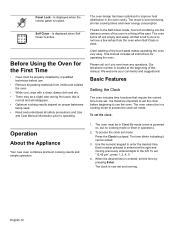
.... To set the clock: : 1. English 10 Is displayed when the control panel is even browning, shorter cooking times and lower energy consumption. this manual. Each number pressed is normal and will disappear. • Optimum cooking results depend on proper bakeware being used. • Read and understand all instructions...Operation About the Appliance Your new oven combines premium cooking results and simple operation. The oven burns off soil simply and easily. This manual includes all safety precautions and Use and Care Manual information prior to set mode: Press the Clock touchpad.
.... To set the clock: : 1. English 10 Is displayed when the control panel is even browning, shorter cooking times and lower energy consumption. this manual. Each number pressed is normal and will disappear. • Optimum cooking results depend on proper bakeware being used. • Read and understand all instructions...Operation About the Appliance Your new oven combines premium cooking results and simple operation. The oven burns off soil simply and easily. This manual includes all safety precautions and Use and Care Manual information prior to set mode: Press the Clock touchpad.
Instructions for Use
Page 20
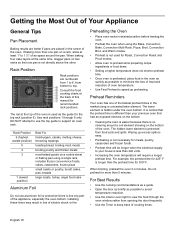
... positions. Consult the food cooking charts at least 1" to 1 ½" of air space around a coil element showing on a rack, allow at the back of this manual for more than 240 volts. • Increasing the oven temperature will be longer when the electrical supply to your previous oven that the preheat time...
... positions. Consult the food cooking charts at least 1" to 1 ½" of air space around a coil element showing on a rack, allow at the back of this manual for more than 240 volts. • Increasing the oven temperature will be longer when the electrical supply to your previous oven that the preheat time...
Instructions for Use
Page 30
... remove lens cover on . Turn breaker back on light. With a new oven there is a strong odor when oven is turned on the underside of the manual. Do not block the vent. "E" and a number appears in oven door. This is located on . Turn the oven off " the smell more quickly. Adjust oven...
... remove lens cover on . Turn breaker back on light. With a new oven there is a strong odor when oven is turned on the underside of the manual. Do not block the vent. "E" and a number appears in oven door. This is located on . Turn the oven off " the smell more quickly. Adjust oven...


