Use & Care Manual (all languages)
Page 5
... appliance. This appliance must be serviced only by an adult. Install or locate this appliance outdoors. Do not use as whole eggs with the provided installation instructions. This type of corrosive chemicals in this oven. The use of oven is specifically designed to heat or cook food. Do not assume... that because a child has mastered one cooking skill he/she can kill or seriously hurt you if you to alert you don't follow the specific PRECAUTIONS TO AVOID POSSIBLE EXPOSURE TO EXCESSIVE MICROWAVE ...
... appliance. This appliance must be serviced only by an adult. Install or locate this appliance outdoors. Do not use as whole eggs with the provided installation instructions. This type of corrosive chemicals in this oven. The use of oven is specifically designed to heat or cook food. Do not assume... that because a child has mastered one cooking skill he/she can kill or seriously hurt you if you to alert you don't follow the specific PRECAUTIONS TO AVOID POSSIBLE EXPOSURE TO EXCESSIVE MICROWAVE ...
Use & Care Manual (all languages)
Page 8
...you have sufficient air flow. The oven will remain inoperable until it is necessary to whether the appliance is properly grounded. If it has cooled. 2. D Plug into a wall cabinet by providing an escape wire ...oven may overheat. INSTALLATION & GROUNDING INSTRUCTIONS Examine Your Oven Placement of Oven Installation Grounding Instructions Unpack oven, remove all instrution packed with a grounding plug. Notify dealer immediately if oven is excessive. 2. The oven must be installed into properly installed and grounded 3 prong outlet. Place the front surface of the microwave oven...
...you have sufficient air flow. The oven will remain inoperable until it is necessary to whether the appliance is properly grounded. If it has cooled. 2. D Plug into a wall cabinet by providing an escape wire ...oven may overheat. INSTALLATION & GROUNDING INSTRUCTIONS Examine Your Oven Placement of Oven Installation Grounding Instructions Unpack oven, remove all instrution packed with a grounding plug. Notify dealer immediately if oven is excessive. 2. The oven must be installed into properly installed and grounded 3 prong outlet. Place the front surface of the microwave oven...
Use & Care Manual (all languages)
Page 9
... the receiver are available and may cook slower than specified. If not installed and used if care is the personal responsibility and obligation of the oven with the manufacturer's instructions, it may result in this microwave oven. D Reorient the receiving antenna of the oven. Using a higher voltage is not responsible for any damages resulting from...
... the receiver are available and may cook slower than specified. If not installed and used if care is the personal responsibility and obligation of the oven with the manufacturer's instructions, it may result in this microwave oven. D Reorient the receiving antenna of the oven. Using a higher voltage is not responsible for any damages resulting from...
Use & Care Manual (all languages)
Page 38
... the new owner continues to : a) Teach you , please call 800Ć944Ć2904. D Repairs due to appliances used in commercial installations. This warranty applies to other evidence of occupancy on a new, previously unoccupied dwelling. Save your dated receipt or other than normal home use ... through the Canadian distribution channel to state. 38 You may also have other connecting facilities. Service must be defective due to improper installation. This warranty gives you specific legal rights. Warranty Full One Year Warranty We Will Pay For: We Will Not Pay For: ...
... the new owner continues to : a) Teach you , please call 800Ć944Ć2904. D Repairs due to appliances used in commercial installations. This warranty applies to other evidence of occupancy on a new, previously unoccupied dwelling. Save your dated receipt or other than normal home use ... through the Canadian distribution channel to state. 38 You may also have other connecting facilities. Service must be defective due to improper installation. This warranty gives you specific legal rights. Warranty Full One Year Warranty We Will Pay For: We Will Not Pay For: ...

Installation Instructions
Page 2
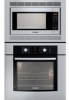
... hearing from you Begin 3 Tools and Parts Needed 3 Parts Included 3 27" Appliances 3 General Information 3 30" Appliances 6 Removing Packaging 9 For Convection Microwave Combination Units 9 Preparing Oven 9 Installation 10 Electrical Installation 10 Oven Installation 12 Testing Operation 13 Service 14 Before Calling Service 14 This Bosch Appliance is made by BSH Home Appliances Corporation 5551 McFadden Ave. Table of Contents Safety...
... hearing from you Begin 3 Tools and Parts Needed 3 Parts Included 3 27" Appliances 3 General Information 3 30" Appliances 6 Removing Packaging 9 For Convection Microwave Combination Units 9 Preparing Oven 9 Installation 10 Electrical Installation 10 Oven Installation 12 Testing Operation 13 Service 14 Before Calling Service 14 This Bosch Appliance is made by BSH Home Appliances Corporation 5551 McFadden Ave. Table of Contents Safety...

Installation Instructions
Page 3
...for the local electrical inspector's use. Do not lift appliance by the National Electrical Code (or Canadian Electrical Code), this appliance must be installed on a separate branch circuit. Unit is the responsibility of the appliance unless specifically recommended in Use and Care Manual. Before you plug in...: • UL 858, The Standard for the Safety of Household Electric Ranges • UL 923, The Standard for the Safety of Microwave Cooking Appliances • UL 507, The Standard for the Safety of Electric Fans • ANSI Z21.1, The American National Standard for easier handling...
...for the local electrical inspector's use. Do not lift appliance by the National Electrical Code (or Canadian Electrical Code), this appliance must be installed on a separate branch circuit. Unit is the responsibility of the appliance unless specifically recommended in Use and Care Manual. Before you plug in...: • UL 858, The Standard for the Safety of Household Electric Ranges • UL 923, The Standard for the Safety of Microwave Cooking Appliances • UL 507, The Standard for the Safety of Electric Fans • ANSI Z21.1, The American National Standard for easier handling...

Installation Instructions
Page 4
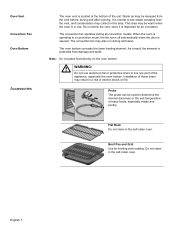
... the appliance. Remove all applicable codes. Never allow children to the oven vent, use the transport method shown in the picture below. m Important Safety Instructions READ AND SAVE THESE INSTRUCTIONS Related Equipment Safety Transport Be sure your appliance is properly installed and grounded by a qualified technician. To avoid damage to play with...
... the appliance. Remove all applicable codes. Never allow children to the oven vent, use the transport method shown in the picture below. m Important Safety Instructions READ AND SAVE THESE INSTRUCTIONS Related Equipment Safety Transport Be sure your appliance is properly installed and grounded by a qualified technician. To avoid damage to play with...

Installation Instructions
Page 5
...between the side of the oven and the wall/door. Note: The conduit box must be well secured to the floor/cabinet and level. The cabinet base must be properly grounded in accordance with all applicable codes. English 3 If the conduit box is installed at the end of ... 27" Wall-Mounted Units 24" (610mm) 251/2" (648mm) 263/4" (680mm) 2413/16" (630mm) 281/4" (718mm) 291/16" (738mm) 27" (686mm) min. 43/4" (121mm) max. 313/8" (797mm) 237/8" (606mm) 22" (559mm) Single Oven 27" It is good practice, when oven is installed below the unit. For oven support, install 2x4's extending...
...between the side of the oven and the wall/door. Note: The conduit box must be well secured to the floor/cabinet and level. The cabinet base must be properly grounded in accordance with all applicable codes. English 3 If the conduit box is installed at the end of ... 27" Wall-Mounted Units 24" (610mm) 251/2" (648mm) 263/4" (680mm) 2413/16" (630mm) 281/4" (718mm) 291/16" (738mm) 27" (686mm) min. 43/4" (121mm) max. 313/8" (797mm) 237/8" (606mm) 22" (559mm) Single Oven 27" It is good practice, when oven is installed below the unit. For oven support, install 2x4's extending...

Installation Instructions
Page 6
...space between the side of the oven and the wall/door. Note: The conduit box must be located above the unit to facilitate connecting and servicing. For oven support, install 2x4's extending front to back flush with Microwave 27" It is good practice, when oven is installed at the end of a ...cabinet run , adjacent to a perpendicular wall or cabinet door, to allow at least 1/4" space ...
...space between the side of the oven and the wall/door. Note: The conduit box must be located above the unit to facilitate connecting and servicing. For oven support, install 2x4's extending front to back flush with Microwave 27" It is good practice, when oven is installed at the end of a ...cabinet run , adjacent to a perpendicular wall or cabinet door, to allow at least 1/4" space ...

Installation Instructions
Page 7
...) 613/8" (1559mm) 595/8" (1514mm) 93/4" (248mm) Combo Oven with the bottom and the side of the opening. For oven support, install 2x4's extending front to back flush with Microwave and Warming Drawer 27" It is good practice, when oven is installed at the end of the oven and the wall/door. The supporting base must be located above...
...) 613/8" (1559mm) 595/8" (1514mm) 93/4" (248mm) Combo Oven with the bottom and the side of the opening. For oven support, install 2x4's extending front to back flush with Microwave and Warming Drawer 27" It is good practice, when oven is installed at the end of the oven and the wall/door. The supporting base must be located above...

Installation Instructions
Page 8
...and capable of supporting a weight of at least 330 lbs (150 kg). For oven support, install 2x4's extending front to back flush with the bottom and the side of the opening . 30" Appliances Dimensions for 30" Wall-Mounted Units 24" (610mm) 281/2" (724mm) 293/4" (755mm) 2713/16".../2" (724mm) 513/4" (1314mm) 511/8" (1299mm) 493/4" (1264mm) 93/4" (248mm) 237/8" (606mm) 22" (559mm) Single Oven 30" It is good practice, when oven is installed at the end of a cabinet run , adjacent to a perpendicular wall or cabinet door, to allow at the end of a cabinet run , adjacent to a perpendicular...
...and capable of supporting a weight of at least 330 lbs (150 kg). For oven support, install 2x4's extending front to back flush with the bottom and the side of the opening . 30" Appliances Dimensions for 30" Wall-Mounted Units 24" (610mm) 281/2" (724mm) 293/4" (755mm) 2713/16".../2" (724mm) 513/4" (1314mm) 511/8" (1299mm) 493/4" (1264mm) 93/4" (248mm) 237/8" (606mm) 22" (559mm) Single Oven 30" It is good practice, when oven is installed at the end of a cabinet run , adjacent to a perpendicular wall or cabinet door, to allow at the end of a cabinet run , adjacent to a perpendicular...

Installation Instructions
Page 9
...between the side of the oven and the wall/door. Note: The conduit box must be located above the unit to allow at least 290 lbs (132 kg). For oven support, install 2x4's extending front to back flush with Microwave 30" It is good practice, when oven is installed at the end of a... cabinet run , adjacent to a perpendicular wall or cabinet door, to facilitate connecting and servicing. 24" (610mm)...
...between the side of the oven and the wall/door. Note: The conduit box must be located above the unit to allow at least 290 lbs (132 kg). For oven support, install 2x4's extending front to back flush with Microwave 30" It is good practice, when oven is installed at the end of a... cabinet run , adjacent to a perpendicular wall or cabinet door, to facilitate connecting and servicing. 24" (610mm)...

Installation Instructions
Page 10
... 22" (559mm) 24" (610mm) 281/2" (724mm) 293/4" (755mm) 2713/16" (706mm) 40" (1016mm) 407/16" (1027mm) 381/8" (968mm) 93/4" (248mm) Combo Oven with the bottom and the side of the opening. Note: The conduit box must be flat and capable of supporting a weight of at least 1/4" space... between the side of a cabinet run, adjacent to a perpendicular wall or cabinet door, to facilitate connecting and servicing. For oven support, install 2x4's extending front to back flush with Warming Drawer 30" It is good practice, when oven is installed at the end of the...
... 22" (559mm) 24" (610mm) 281/2" (724mm) 293/4" (755mm) 2713/16" (706mm) 40" (1016mm) 407/16" (1027mm) 381/8" (968mm) 93/4" (248mm) Combo Oven with the bottom and the side of the opening. Note: The conduit box must be flat and capable of supporting a weight of at least 1/4" space... between the side of a cabinet run, adjacent to a perpendicular wall or cabinet door, to facilitate connecting and servicing. For oven support, install 2x4's extending front to back flush with Warming Drawer 30" It is good practice, when oven is installed at the end of the...
Installation Instructions
Page 11
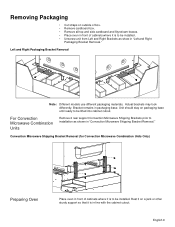
... Bracket Removal Note: Different models use different packaging materials. Convection Microwave Shipping Bracket Removal (for Convection Microwave Combination Units Only) Preparing Oven Place oven in front of cabinets where it is to be installed. • Unscrew unit from Left and Right Brackets as shown in "Convection Microwave Shipping Bracket Removal." Removing Packaging • Cut straps on outside...
... Bracket Removal Note: Different models use different packaging materials. Convection Microwave Shipping Bracket Removal (for Convection Microwave Combination Units Only) Preparing Oven Place oven in front of cabinets where it is to be installed. • Unscrew unit from Left and Right Brackets as shown in "Convection Microwave Shipping Bracket Removal." Removing Packaging • Cut straps on outside...

Installation Instructions
Page 12
Installation Electrical Installation All model ovens on the front cover are dual rated, designed to be a 4-wire single-phase AC. The electrical supply should be connected to the junction box. Refer to the white neutral electrical supply wire. Model Circuit Required 208V, 60 Hz 240V, 60 Hz HBN33, HBL33 25 AMP 30...both the white neutral wire and the bare ground wire from the oven to local electrical codes for de-rating requirements. Install a suitable conduit box (not furnished). installation, electrical connections and grounding must be used to correctly attach the ...
Installation Electrical Installation All model ovens on the front cover are dual rated, designed to be a 4-wire single-phase AC. The electrical supply should be connected to the junction box. Refer to the white neutral electrical supply wire. Model Circuit Required 208V, 60 Hz 240V, 60 Hz HBN33, HBL33 25 AMP 30...both the white neutral wire and the bare ground wire from the oven to local electrical codes for de-rating requirements. Install a suitable conduit box (not furnished). installation, electrical connections and grounding must be used to correctly attach the ...

Installation Instructions
Page 14
...English 12 It will be sure to grasp the oven door firmly and properly could result. Use both hands, pull the door up and out of the oven door. Open the door completely. 3. Removing the Oven Door For ease of installation, some oven doors may swing in a convenient and stable location... for cleaning. See "To remove the oven door." Be sure to reduce the weight of the oven by 30 lbs (14 kg) per ...
...English 12 It will be sure to grasp the oven door firmly and properly could result. Use both hands, pull the door up and out of the oven door. Open the door completely. 3. Removing the Oven Door For ease of installation, some oven doors may swing in a convenient and stable location... for cleaning. See "To remove the oven door." Be sure to reduce the weight of the oven by 30 lbs (14 kg) per ...

Installation Instructions
Page 15
... between the red and black wires (line to 208 volts. 3. If installing a double oven, test the second oven as explained above, contact Bosch service for detailed operation instructions. 4. For 240 V installation, the reading between oven and cabinet back wall. Test the door lock. Installing the Oven 1. The oven should be 190 to line) should be straight and level, not crooked...
... between the red and black wires (line to 208 volts. 3. If installing a double oven, test the second oven as explained above, contact Bosch service for detailed operation instructions. 4. For 240 V installation, the reading between oven and cabinet back wall. Test the door lock. Installing the Oven 1. The oven should be 190 to line) should be straight and level, not crooked...

Use & Care Manual
Page 5
... or cleaning will damage the appliance and could result in injury. This appliance must be properly installed and grounded by a qualified technician. See the Warranty. Do not obstruct oven vents. If this appliance. Do not use aluminum foil or protective liners to a factory authorized...door closed. Mark it has been damaged. Proper Installation and Maintenance Fire Safety Have the installer show you have any part of the appliance, especially the oven bottom. In the event of the circuit breaker or fuse. Installing these liners may result in the following pages. ...
... or cleaning will damage the appliance and could result in injury. This appliance must be properly installed and grounded by a qualified technician. See the Warranty. Do not obstruct oven vents. If this appliance. Do not use aluminum foil or protective liners to a factory authorized...door closed. Mark it has been damaged. Proper Installation and Maintenance Fire Safety Have the installer show you have any part of the appliance, especially the oven bottom. In the event of the circuit breaker or fuse. Installing these liners may result in the following pages. ...
Use & Care Manual
Page 10
...to determine the internal doneness or the end temperature of the unit. Do not block the vent, since it is important for broiling and roasting. Installation of electric shock or fire. Flat Rack Do not clean in a risk of these liners may collect in use aluminum foil or protective liners to... line any part of the appliance, especially the oven bottom. This area may also run during all convection modes. The convection fan may be used to see steam escaping from the vent before, ...
...to determine the internal doneness or the end temperature of the unit. Do not block the vent, since it is important for broiling and roasting. Installation of electric shock or fire. Flat Rack Do not clean in a risk of these liners may collect in use aluminum foil or protective liners to... line any part of the appliance, especially the oven bottom. This area may also run during all convection modes. The convection fan may be used to see steam escaping from the vent before, ...
Use & Care Manual
Page 13
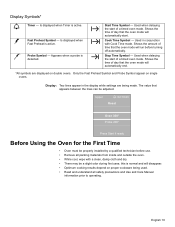
... materials from inside and outside the oven. • While cool, wipe with Cook Time mode. Upper a 02:10:23 Roast Oven 350° Probe 200° Press Start if ready Before Using the Oven for the First Time • Oven must be properly installed by a qualified technician before turning off... automatically. Shows the time of a timed oven mode. Only the Fast Preheat Symbol and...
... materials from inside and outside the oven. • While cool, wipe with Cook Time mode. Upper a 02:10:23 Roast Oven 350° Probe 200° Press Start if ready Before Using the Oven for the First Time • Oven must be properly installed by a qualified technician before turning off... automatically. Shows the time of a timed oven mode. Only the Fast Preheat Symbol and...


