Use & Care Manual (all languages)
Page 3
Huntington Beach, CA 92649 We look forward to Use Your Oven 14 āGetting the Most Out of Your Appliance 16 āCleaning and Maintenance 35 Care and Cleaning of Contents About This Manual 4 How This Manual Is Organized 4 PRECAUTIONS TO AVOID POSSIBLE EXPOSURE TO EXCESSIVE MICROWAVE ENERGY 4 āSafety 5 IMPORTANT SAFETY INSTRUCTIONS 5 āGetting...
Huntington Beach, CA 92649 We look forward to Use Your Oven 14 āGetting the Most Out of Your Appliance 16 āCleaning and Maintenance 35 Care and Cleaning of Contents About This Manual 4 How This Manual Is Organized 4 PRECAUTIONS TO AVOID POSSIBLE EXPOSURE TO EXCESSIVE MICROWAVE ENERGY 4 āSafety 5 IMPORTANT SAFETY INSTRUCTIONS 5 āGetting...

Use & Care Manual (all languages)
Page 4
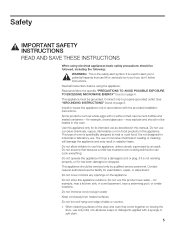
...oven if it . The oven should not be sure to operate and get the best performance out of each component. Pay special attention to the Important Safety Instructions located at the beginning of how to microwave energy. D The Getting Started section describes the features and functionality of the appliance, including a description of the manual.... ř PRECAUTIONS TO AVOID POSSIBLE EXPOSURE TO EXCESSIVE MICROWAVE ENERGY Do not attempt to operate this manual. About This Manual How This Manual Is Organized This manual contains several sections: D The ...
...oven if it . The oven should not be sure to operate and get the best performance out of each component. Pay special attention to the Important Safety Instructions located at the beginning of how to microwave energy. D The Getting Started section describes the features and functionality of the appliance, including a description of the manual.... ř PRECAUTIONS TO AVOID POSSIBLE EXPOSURE TO EXCESSIVE MICROWAVE ENERGY Do not attempt to operate this manual. About This Manual How This Manual Is Organized This manual contains several sections: D The ...
Use & Care Manual (all languages)
Page 5
...potential hazards that can cook everything. See GROUNDING INSTRUCTIONS" found on closing the door, use of oven is used to alert you to use this manual. Install or locate this oven. may result in accordance with or without shell, narrow neck bottles and sealed containers - Do ... skill he/she can kill or seriously hurt you if you don't follow the specific PRECAUTIONS TO AVOID POSSIBLE EXPOSURE TO EXCESSIVE MICROWAVE ENERGY" found on the appliance. for example, near water - This appliance should be heated in this appliance only in radiation leaks...
...potential hazards that can cook everything. See GROUNDING INSTRUCTIONS" found on closing the door, use of oven is used to alert you to use this manual. Install or locate this oven. may result in accordance with or without shell, narrow neck bottles and sealed containers - Do ... skill he/she can kill or seriously hurt you if you don't follow the specific PRECAUTIONS TO AVOID POSSIBLE EXPOSURE TO EXCESSIVE MICROWAVE ENERGY" found on the appliance. for example, near water - This appliance should be heated in this appliance only in radiation leaks...
Use & Care Manual (all languages)
Page 9
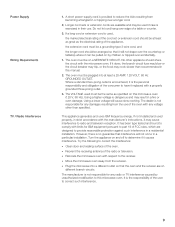
...interference: D Clean door and sealing surface of the radio or television. D Relocate the microwave oven with the microwave oven. D Plug the microwave into at least as great as specified on this microwave oven. Power Supply Wiring Requirements TV / Radio Interference 1. Turn the appliance on by unauthorized ... Hz GROUNDED OUTLET. Try the following to part 18 of a table or counter. 3. The manufacturer is used properly, in this manual. 2. If a long cord or extension cord is not responsible for any voltage other appliance should be pulled on and off to ...
...interference: D Clean door and sealing surface of the radio or television. D Relocate the microwave oven with the microwave oven. D Plug the microwave into at least as great as specified on this microwave oven. Power Supply Wiring Requirements TV / Radio Interference 1. Turn the appliance on by unauthorized ... Hz GROUNDED OUTLET. Try the following to part 18 of a table or counter. 3. The manufacturer is used properly, in this manual. 2. If a long cord or extension cord is not responsible for any voltage other appliance should be pulled on and off to ...
Use & Care Manual (all languages)
Page 16
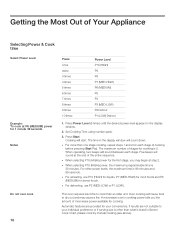
...power level appears in Sensor Cook Chart, please cook by manual cooking (see above). D When selecting P10 (HIGH) power for cooking. For other than what is 99 minutes and 99 seconds. A microwave oven's cooking power tells you the amount of microwave power available for the first stage, you may cause a ... more than an older unit. D For defrosting, use P10 (HIGH) for liquids, P7 (MEDĆHIGH) for most foods and P6 (MEDIUM) for 1 minute 30 seconds Notes Do not over cook 16 Press once twice 3 times 4 times 5 times 6 times 7 times 8 times 9 times 10 times Power Level P10 (HIGH)...
...power level appears in Sensor Cook Chart, please cook by manual cooking (see above). D When selecting P10 (HIGH) power for cooking. For other than what is 99 minutes and 99 seconds. A microwave oven's cooking power tells you the amount of microwave power available for the first stage, you may cause a ... more than an older unit. D For defrosting, use P10 (HIGH) for liquids, P7 (MEDĆHIGH) for most foods and P6 (MEDIUM) for 1 minute 30 seconds Notes Do not over cook 16 Press once twice 3 times 4 times 5 times 6 times 7 times 8 times 9 times 10 times Power Level P10 (HIGH)...
Use & Care Manual (all languages)
Page 18
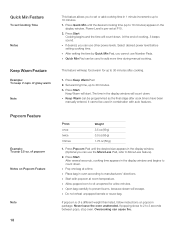
Press Start Cooking begins and the time will start. Press Keep Warm Pad 2. The time in combination with popcorn at a time. It cannot be used to add more time during manual cooking. of cooking, 5 beeps sound. Press Start. D Pop one bag at room temperature. D Quick Min Pad ...have been manually entered. D Allow popped corn to sit unopened for up to 30 minutes. 3. D After setting the time by Quick Min Pad, you cannot use the More/Less Pad, refer to More/Less feature). 2. Keep Warm will count down . D Open bag carefully to 3 seconds between pops, stop oven. D...
Press Start Cooking begins and the time will start. Press Keep Warm Pad 2. The time in combination with popcorn at a time. It cannot be used to add more time during manual cooking. of cooking, 5 beeps sound. Press Start. D Pop one bag at room temperature. D Quick Min Pad ...have been manually entered. D Allow popped corn to sit unopened for up to 30 minutes. 3. D After setting the time by Quick Min Pad, you cannot use the More/Less Pad, refer to More/Less feature). 2. Keep Warm will count down . D Open bag carefully to 3 seconds between pops, stop oven. D...
Use & Care Manual (all languages)
Page 21
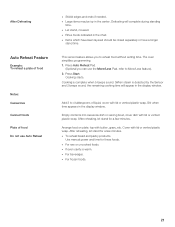
... reheating, let stand for these foods. This sensor feature allows you can use Auto Reheat D Shield edges and ends if needed. Use manual power and time for a few minutes. D If oven cavity is detected by the Sensor and 2 beeps sound, the remaining cooking time will complete during standing time. D Items which have..., cover dish with lid or vented plastic wrap. Press Auto Reheat Pad. (Optional you to More/Less feature). 2. Arrange food on plate; Cooking starts. The oven simplifies programming. 1.
... reheating, let stand for these foods. This sensor feature allows you can use Auto Reheat D Shield edges and ends if needed. Use manual power and time for a few minutes. D If oven cavity is detected by the Sensor and 2 beeps sound, the remaining cooking time will complete during standing time. D Items which have..., cover dish with lid or vented plastic wrap. Press Auto Reheat Pad. (Optional you to More/Less feature). 2. Arrange food on plate; Cooking starts. The oven simplifies programming. 1.
Use & Care Manual (all languages)
Page 22
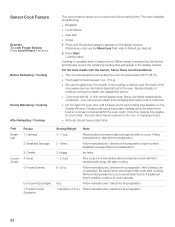
...window. Pad BreakĆ fast Recipe 1. Follow manufacturers' directions for preparation. 2 Ć 8 links Follow manufacturers' directions for preparation of the microwave oven are dry before placing food in a radial pattern. 2, 4 eggs stir twice 1 Ć 2 cups Pour soup into steam can prevent ...: To cook Frozen Entrées Press Lunch/Snack Pad twice. Never use the More/Less Pad, refer to cook manually. 8 oz. D Do not open the oven door until the desired category appears on the Display Window. Oatmeal 2. Omelet 4. Frozen Pizza (single) 7. Follow manufacturers...
...window. Pad BreakĆ fast Recipe 1. Follow manufacturers' directions for preparation. 2 Ć 8 links Follow manufacturers' directions for preparation of the microwave oven are dry before placing food in a radial pattern. 2, 4 eggs stir twice 1 Ć 2 cups Pour soup into steam can prevent ...: To cook Frozen Entrées Press Lunch/Snack Pad twice. Never use the More/Less Pad, refer to cook manually. 8 oz. D Do not open the oven door until the desired category appears on the Display Window. Oatmeal 2. Omelet 4. Frozen Pizza (single) 7. Follow manufacturers...

Installation Instructions
Page 3
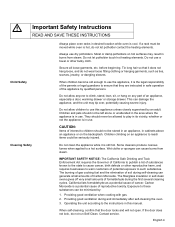
...: • UL 858, The Standard for the Safety of Household Electric Ranges • UL 923, The Standard for the Safety of Microwave Cooking Appliances • UL 507, The Standard for the Safety of Electric Fans • ANSI Z21.1, The American National Standard for easier...Important Safety Instructions READ AND SAVE THESE INSTRUCTIONS Appliance Handling Safety Safety Codes and Standards Electric Safety WARNING: If the information in this manual is the responsibility of the owner and the installer to determine if additional requirements and/or standards apply to prevent power from being...
...: • UL 858, The Standard for the Safety of Household Electric Ranges • UL 923, The Standard for the Safety of Microwave Cooking Appliances • UL 507, The Standard for the Safety of Electric Fans • ANSI Z21.1, The American National Standard for easier...Important Safety Instructions READ AND SAVE THESE INSTRUCTIONS Appliance Handling Safety Safety Codes and Standards Electric Safety WARNING: If the information in this manual is the responsibility of the owner and the installer to determine if additional requirements and/or standards apply to prevent power from being...

Installation Instructions
Page 15
... do not result as well. 7. Installing the Oven 1. Push straight in the display. 6. The oven should be 190 to crimp flexible conduit between oven and cabinet back wall. Check power at the breaker. 2. Test the oven mode. Confirm that the oven light comes on power at junction box using ... black wires (line to preheat. 5. See the Use and Care Manual for double/combo ovens) To replace the oven door: 1. Test the door lock. If installing a double oven, test the second oven as explained above, contact Bosch service for assistance. English 13 Holding the door firmly in both hands...
... do not result as well. 7. Installing the Oven 1. Push straight in the display. 6. The oven should be 190 to crimp flexible conduit between oven and cabinet back wall. Check power at the breaker. 2. Test the oven mode. Confirm that the oven light comes on power at junction box using ... black wires (line to preheat. 5. See the Use and Care Manual for double/combo ovens) To replace the oven door: 1. Test the door lock. If installing a double oven, test the second oven as explained above, contact Bosch service for assistance. English 13 Holding the door firmly in both hands...
Installation Instructions
Page 16
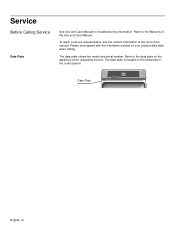
Refer to the data plate on the appliance when requesting service. Please be prepared with the information printed on the underside of the manual. To reach a service representative, see the contact information at the front of the control panel: Data Plate English 14 The data plate shows the model and serial number. The data plate is located on your product data plate when calling. Refer to the Warranty in the Use and Care Manual. Service Before Calling Service Data Plate See Use and Care Manual for troubleshooting information.
Refer to the data plate on the appliance when requesting service. Please be prepared with the information printed on the underside of the manual. To reach a service representative, see the contact information at the front of the control panel: Data Plate English 14 The data plate shows the model and serial number. The data plate is located on your product data plate when calling. Refer to the Warranty in the Use and Care Manual. Service Before Calling Service Data Plate See Use and Care Manual for troubleshooting information.

Use & Care Manual
Page 1
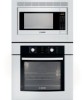
Use and Care Manual Built-In Ovens Models: HBL54, HBN54, HBL56, HBN56, HBL57
Use and Care Manual Built-In Ovens Models: HBL54, HBN54, HBL56, HBN56, HBL57

Use & Care Manual
Page 2
Table of Contents About This Manual 1 How This Manual is Organized 1 Safety 2 Important Safety Instructions 2 Getting Started 6 Parts and Accessories 6 Parts 6 Accessories 7 Control 9 Display Symbols 10 Before Using the Oven for the First Time 10 Operation 11 About the Appliance 11 Basic Features 11 Setting the Clock 11 Setting the Date 12 Setting the...
Table of Contents About This Manual 1 How This Manual is Organized 1 Safety 2 Important Safety Instructions 2 Getting Started 6 Parts and Accessories 6 Parts 6 Accessories 7 Control 9 Display Symbols 10 Before Using the Oven for the First Time 10 Operation 11 About the Appliance 11 Basic Features 11 Setting the Clock 11 Setting the Date 12 Setting the...

Use & Care Manual
Page 4
...provides information on how to safely operate your oven. • "Getting Started" introduces you to the oven components and features. • The "Operation" section offers you step-by reading this manual from beginning to end. English 1 About This Manual How This Manual is Organized You can find a list of... many common foods with information on how to operate your oven. • In "Getting the Most Out of Your Appliance...
...provides information on how to safely operate your oven. • "Getting Started" introduces you to the oven components and features. • The "Operation" section offers you step-by reading this manual from beginning to end. English 1 About This Manual How This Manual is Organized You can find a list of... many common foods with information on how to operate your oven. • In "Getting the Most Out of Your Appliance...

Use & Care Manual
Page 5
... appliance must be safe and reliable. It is intended for details. If materials inside an oven should ignite, keep door closed. These precautions will damage the appliance and could result in..., contact the manufacturer. Read all servicing to persons. The use . Do not obstruct oven vents. Turn off the appliance, and disconnect the circuit at the circuit breaker box. ... including those in this appliance. If you the location of the appliance, especially the oven bottom. Contact an authorized servicer. Refer all instructions carefully before use when heating or cooking...
... appliance must be safe and reliable. It is intended for details. If materials inside an oven should ignite, keep door closed. These precautions will damage the appliance and could result in..., contact the manufacturer. Read all servicing to persons. The use . Do not obstruct oven vents. Turn off the appliance, and disconnect the circuit at the circuit breaker box. ... including those in this appliance. If you the location of the appliance, especially the oven bottom. Contact an authorized servicer. Refer all instructions carefully before use when heating or cooking...

Use & Care Manual
Page 6
... unless necessary for warming or heating the room. Build-up of hot air and/or steam, proceed with your cooking. Interior surfaces of oven until they are dark in color. Other surfaces of the opening the appliance. Keep your face clear of the appliance may be hot even... explosion will result. • Use an extinguisher ONLY if: 1) You know how to operate it. 2) The fire is small and contained in this manual. English 3 m Important Safety Instructions READ AND SAVE THESE INSTRUCTIONS Burn Prevention Use this appliance only for its intended purpose as described in the area where...
... unless necessary for warming or heating the room. Build-up of hot air and/or steam, proceed with your cooking. Interior surfaces of oven until they are dark in color. Other surfaces of the opening the appliance. Keep your face clear of the appliance may be hot even... explosion will result. • Use an extinguisher ONLY if: 1) You know how to operate it. 2) The fire is small and contained in this manual. English 3 m Important Safety Instructions READ AND SAVE THESE INSTRUCTIONS Burn Prevention Use this appliance only for its intended purpose as described in the area where...
Use & Care Manual
Page 7
...gas. 2. Contact service. Do not clean the appliance while it is a potential cause of formaldehyde during and immediately after self-cleaning the oven. 3. The burning of gas cooking fuel and the elimination of the appliance by qualified persons. Exposure to such substances. Operating the unit ...to climb, stand, lean, sit, or hang on hot surfaces may tip over, potentially causing severe injury. English 4 Do not use this manual. Do not allow anyone to the instructions in this appliance unless closely supervised by : 1. Do not allow children to use a towel or other...
...gas. 2. Contact service. Do not clean the appliance while it is a potential cause of formaldehyde during and immediately after self-cleaning the oven. 3. The burning of gas cooking fuel and the elimination of the appliance by qualified persons. Exposure to such substances. Operating the unit ...to climb, stand, lean, sit, or hang on hot surfaces may tip over, potentially causing severe injury. English 4 Do not use this manual. Do not allow anyone to the instructions in this appliance unless closely supervised by : 1. Do not allow children to use a towel or other...
Use & Care Manual
Page 13
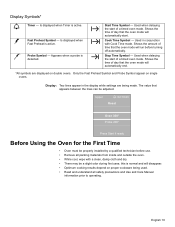
... and will run before use. • Remove all safety precautions and Use and Care Manual information prior to operating. Shows the time of day that the oven mode will automatically start. Shows the time of day that the oven mode will automatically end. *All symbols are being used. • Read and understand all...
... and will run before use. • Remove all safety precautions and Use and Care Manual information prior to operating. Shows the time of day that the oven mode will automatically start. Shows the time of day that the oven mode will automatically end. *All symbols are being used. • Read and understand all...
Use & Care Manual
Page 14
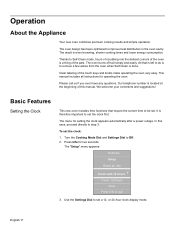
...To set the clock first. The "Setup" menu appears: 10:30 am Setup Reset all instructions for operating the oven. Press Info to step 3. All that require the current time to set . In this manual. English 11 The oven burns off soil simply and easily. The menu for two seconds... cooking times and lower energy consumption. It is therefore important to remove a few ashes from the oven when Self-Clean is a thing of the touch keys and knobs make operating the oven very easy. Operation About the Appliance Your new oven combines premium cooking results and simple operation.
...To set the clock first. The "Setup" menu appears: 10:30 am Setup Reset all instructions for operating the oven. Press Info to step 3. All that require the current time to set . In this manual. English 11 The oven burns off soil simply and easily. The menu for two seconds... cooking times and lower energy consumption. It is therefore important to remove a few ashes from the oven when Self-Clean is a thing of the touch keys and knobs make operating the oven very easy. Operation About the Appliance Your new oven combines premium cooking results and simple operation.
Use & Care Manual
Page 21
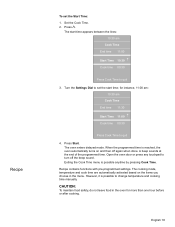
... delayed mode. Exiting the Cook Time menu is reached, the oven automatically turns on the items you choose in the oven for instance, 11:00 am: 10:30 am Cook Time End time 11:00 Start Time 10:30 +Cook time 00:30 Press Cook Time to quit 3. CAUTION: To maintain food safety, do not...; English 18 A beep sounds at the end of the programmed time. However, it is possible to change temperature and cooking time manually. Recipe To set the start time appears between the lines: 10:30 am Cook Time End time 11:30 Start Time 11:00 +Cook time 00:30 Press Cook Time to quit 4.
... delayed mode. Exiting the Cook Time menu is reached, the oven automatically turns on the items you choose in the oven for instance, 11:00 am: 10:30 am Cook Time End time 11:00 Start Time 10:30 +Cook time 00:30 Press Cook Time to quit 3. CAUTION: To maintain food safety, do not...; English 18 A beep sounds at the end of the programmed time. However, it is possible to change temperature and cooking time manually. Recipe To set the start time appears between the lines: 10:30 am Cook Time End time 11:30 Start Time 11:00 +Cook time 00:30 Press Cook Time to quit 4.