Use & Care Manual (all languages)
Page 5
... to heat or cook food. Do not operate this appliance. This appliance should be grounded. for industrial or laboratory use this appliance, unless closely supervised by qualified service personnel. Do not let cord hang over edge of the door and oven that can cook everything. See GROUNDING INSTRUCTIONS" found on closing the door, use this product near a swimming pool, or similar locations. Install or locate this oven...
... to heat or cook food. Do not operate this appliance. This appliance should be grounded. for industrial or laboratory use this appliance, unless closely supervised by qualified service personnel. Do not let cord hang over edge of the door and oven that can cook everything. See GROUNDING INSTRUCTIONS" found on closing the door, use this product near a swimming pool, or similar locations. Install or locate this oven...
Use & Care Manual (all languages)
Page 6
... materials inside the oven to Door, Control Panel Frame, Safety Interlock Switches, or any adjustments or repairs to facilitate cooking. They can be done only by a qualified service person. D Do not use potholders when removing items from the microwave oven is cool. The cooking container and the Glass Tray can be overheated. Repairs must be hot even if the oven is not always present. ř IMPORTANT SAFETY INSTRUCTIONS READ AND...
... materials inside the oven to Door, Control Panel Frame, Safety Interlock Switches, or any adjustments or repairs to facilitate cooking. They can be done only by a qualified service person. D Do not use potholders when removing items from the microwave oven is cool. The cooking container and the Glass Tray can be overheated. Repairs must be hot even if the oven is not always present. ř IMPORTANT SAFETY INSTRUCTIONS READ AND...
Use & Care Manual (all languages)
Page 7
... oven could result. Do not cook directly on a rack set in a microwave safe dish. 6. Always replace the Roller Ring and the Glass Tray in the oven or use newspaper or paper bags for this oven. ř IMPORTANT SAFETY INSTRUCTIONS READ AND SAVE THESE INSTRUCTIONS Glass Tray Roller Ring To avoid the risk of or in the oven. 3. Do not operate the oven empty. Heat is transferred from the hot food to the cooking...
... oven could result. Do not cook directly on a rack set in a microwave safe dish. 6. Always replace the Roller Ring and the Glass Tray in the oven or use newspaper or paper bags for this oven. ř IMPORTANT SAFETY INSTRUCTIONS READ AND SAVE THESE INSTRUCTIONS Glass Tray Roller Ring To avoid the risk of or in the oven. 3. Do not operate the oven empty. Heat is transferred from the hot food to the cooking...
Use & Care Manual (all languages)
Page 8
... block air vents. This appliance must be installed into a wall cabinet by providing an escape wire for the electric current. Do not install if oven is excessive. 2. The oven must be equal to use an extension cord, use only a three wire extension cord that has a three prong polarized grounding plug, and a three slot receptacle that is manufactured for household use the proper trim kit available from the counter top...
... block air vents. This appliance must be installed into a wall cabinet by providing an escape wire for the electric current. Do not install if oven is excessive. 2. The oven must be equal to use an extension cord, use only a three wire extension cord that has a three prong polarized grounding plug, and a three slot receptacle that is manufactured for household use the proper trim kit available from the counter top...
Use & Care Manual (all languages)
Page 9
... user to have it replaced with the manufacturer's instructions, it does, the branch circuit fuse may blow or the circuit breaker may trip, or the food may result in or tripping over edge of the radio or television. A short powerĆsupply cord is dangerous and may cook slower than specified. Longer cord sets or extension cords are on this manual. 2. Do not let cord...
... user to have it replaced with the manufacturer's instructions, it does, the branch circuit fuse may blow or the circuit breaker may trip, or the food may result in or tripping over edge of the radio or television. A short powerĆsupply cord is dangerous and may cook slower than specified. Longer cord sets or extension cords are on this manual. 2. Do not let cord...
Use & Care Manual (all languages)
Page 10
... weight before microwave cooking to prevent them to reach their respective flash points and burst into flames. D Do not attempt to consume. CAUTION:ĄCooking dry or old potatoes can result. If a fire occurs, turn oven off and leave oven door closed . Disconnect the power cord or shut off power at the fuse or circuit breaker panel. CAUTION:ĄWhen using the popcorn pad. If these instructions...
... weight before microwave cooking to prevent them to reach their respective flash points and burst into flames. D Do not attempt to consume. CAUTION:ĄCooking dry or old potatoes can result. If a fire occurs, turn oven off and leave oven door closed . Disconnect the power cord or shut off power at the fuse or circuit breaker panel. CAUTION:ĄWhen using the popcorn pad. If these instructions...
Use & Care Manual (all languages)
Page 13
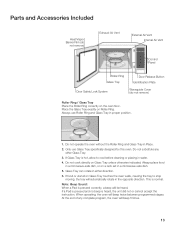
... the instruction. This is pressed correctly, a beep will beep 5 times. 13 Parts and Accessories Included Heat/Vapor Barrier Film (do not remove) Exhaust Air Vent External Air Vent Internal Air Vent Control Panel Roller Ring Glass Tray Door Release Button Identification Plate Door Safety Lock System Waveguide Cover (do not remove) Roller Ring / Glass Tray Place the Roller Ring correctly on Glass Tray unless otherwise indicated. Place the Glass Tray exactly on Glass Tray touches the oven walls, causing the tray to cool before cleaning or...
... the instruction. This is pressed correctly, a beep will beep 5 times. 13 Parts and Accessories Included Heat/Vapor Barrier Film (do not remove) Exhaust Air Vent External Air Vent Internal Air Vent Control Panel Roller Ring Glass Tray Door Release Button Identification Plate Door Safety Lock System Waveguide Cover (do not remove) Roller Ring / Glass Tray Place the Roller Ring correctly on Glass Tray unless otherwise indicated. Place the Glass Tray exactly on Glass Tray touches the oven walls, causing the tray to cool before cleaning or...
Use & Care Manual (all languages)
Page 18
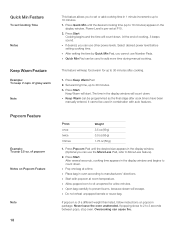
... the display window. Select desired power level before setting cooking time. D Keep Warm can use Number Pads. of cooking, 5 beeps sound. D Do not reheat unpopped kernels or reuse bag. Press Quick Min until the desired size appears in oven according to 3 seconds between pops, stop oven. Press Start Cooking begins and the time will escape. D Place bag in the display window. (Optional you can cause fire. D Start with auto features. D Open bag carefully to 30...
... the display window. Select desired power level before setting cooking time. D Keep Warm can use Number Pads. of cooking, 5 beeps sound. D Do not reheat unpopped kernels or reuse bag. Press Quick Min until the desired size appears in oven according to 3 seconds between pops, stop oven. Press Start Cooking begins and the time will escape. D Place bag in the display window. (Optional you can cause fire. D Start with auto features. D Open bag carefully to 30...
Use & Care Manual (all languages)
Page 32
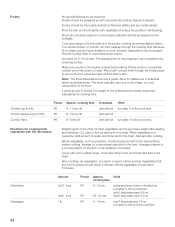
... a microwaveĆsafe dish with vegetable oil (unless the poultry is completely cooked when the juices run clear. All poultry should stand 3 minutes. Turn whole chicken or Cornish hen over halfway through the thickest part to ensure that are only a guide. Make sure poultry is stuffed, the weight of the cook time. Power Approx. Cook potatoes uncovered. Let stand, covered, before cooking...
... a microwaveĆsafe dish with vegetable oil (unless the poultry is completely cooked when the juices run clear. All poultry should stand 3 minutes. Turn whole chicken or Cornish hen over halfway through the thickest part to ensure that are only a guide. Make sure poultry is stuffed, the weight of the cook time. Power Approx. Cook potatoes uncovered. Let stand, covered, before cooking...

Use & Care Manual (all languages)
Page 35
... to seep into ventilation openings. This is inaccessible, leave oven door open to keep cover clean in the proper position and press Pause/Stop Pad to the oven. Covered with a damp cloth. Do not use harsh detergents or abrasives. These areas should not be allowed to the operating parts inside or around the outside of the oven Outside oven surfaces Oven Door Glass Tray Control Panel Roller Ring and oven cavity floor CAUTION:Ą...
... to seep into ventilation openings. This is inaccessible, leave oven door open to keep cover clean in the proper position and press Pause/Stop Pad to the oven. Covered with a damp cloth. Do not use harsh detergents or abrasives. These areas should not be allowed to the operating parts inside or around the outside of the oven Outside oven surfaces Oven Door Glass Tray Control Panel Roller Ring and oven cavity floor CAUTION:Ą...
Use & Care Manual (all languages)
Page 36
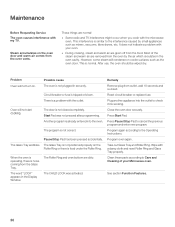
It does not indicate a problem with the microwave oven. There is not closed completely. The door is a problem with the outlet. Another program is already entered into the outlet to check if it is working. The Glass Tray wobbles. The Glass Tray is not plugged in the Display Window. Remedy Remove plug from the food. Reset circuit breaker or replace fuse. Press Pause/Stop Pad to the Operating Instructions. Program again according to...
It does not indicate a problem with the microwave oven. There is not closed completely. The door is a problem with the outlet. Another program is already entered into the outlet to check if it is working. The Glass Tray wobbles. The Glass Tray is not plugged in the Display Window. Remedy Remove plug from the food. Reset circuit breaker or replace fuse. Press Pause/Stop Pad to the Operating Instructions. Program again according to...
Use & Care Manual (all languages)
Page 38
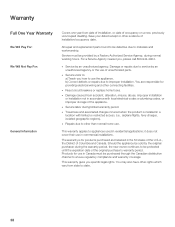
... occupancy on a new, previously unoccupied dwelling. D Reset circuit breakers or replace home fuses. All repair and replacement parts found to ensure regulatory compliance and warranty coverage. D Service labor during the warranty period, the new owner continues to be defective due to improper installation. D Travel fees and associated charges incurred when the product is for providing electrical wiring and other evidence of Columbia and Canada...
... occupancy on a new, previously unoccupied dwelling. D Reset circuit breakers or replace home fuses. All repair and replacement parts found to ensure regulatory compliance and warranty coverage. D Service labor during the warranty period, the new owner continues to be defective due to improper installation. D Travel fees and associated charges incurred when the product is for providing electrical wiring and other evidence of Columbia and Canada...

Installation Instructions
Page 2
Table of Contents Safety 1 Important Safety Instructions 1 Preparation 3 Before you ! Huntington Beach, CA 92649 Questions? 1-800-944-2904 www.boschappliances.com We look forward to hearing from you Begin 3 Tools and Parts Needed 3 Parts Included 3 27" Appliances 3 General Information 3 30" Appliances 6 Removing Packaging 9 For Convection Microwave Combination Units 9 Preparing Oven 9 Installation 10 Electrical Installation 10 Oven Installation 12 Testing Operation 13 Service 14 Before Calling Service 14 This Bosch Appliance is made...
Table of Contents Safety 1 Important Safety Instructions 1 Preparation 3 Before you ! Huntington Beach, CA 92649 Questions? 1-800-944-2904 www.boschappliances.com We look forward to hearing from you Begin 3 Tools and Parts Needed 3 Parts Included 3 27" Appliances 3 General Information 3 30" Appliances 6 Removing Packaging 9 For Convection Microwave Combination Units 9 Preparing Oven 9 Installation 10 Electrical Installation 10 Oven Installation 12 Testing Operation 13 Service 14 Before Calling Service 14 This Bosch Appliance is made...

Installation Instructions
Page 3
... circuit breaker or fuse. See instructions in the OFF position. If required by door handle. show the owner the location of the owner and the installer to determine if additional requirements and/or standards apply to specific installations. Before you plug in an electrical cord, be sure all controls are in Use and Care Manual. Installer - Refer to prevent power from being turned ON accidentally. WARNING: Do not repair or replace any part...
... circuit breaker or fuse. See instructions in the OFF position. If required by door handle. show the owner the location of the owner and the installer to determine if additional requirements and/or standards apply to specific installations. Before you plug in an electrical cord, be sure all controls are in Use and Care Manual. Installer - Refer to prevent power from being turned ON accidentally. WARNING: Do not repair or replace any part...

Installation Instructions
Page 12
..., 4 wire, single-phase power supply. Installation Electrical Installation All model ovens on the front cover are dual rated, designed to be connected to the junction box. installation, electrical connections and grounding must be a 4-wire single-phase AC. English 10 An appropriately-sized, UL-listed conduit connector must comply with all applicable local codes. Model Circuit Required 208V, 60 Hz 240V, 60 Hz HBN33, HBL33 25 AMP 30 AMP HBN34...
..., 4 wire, single-phase power supply. Installation Electrical Installation All model ovens on the front cover are dual rated, designed to be connected to the junction box. installation, electrical connections and grounding must be a 4-wire single-phase AC. English 10 An appropriately-sized, UL-listed conduit connector must comply with all applicable local codes. Model Circuit Required 208V, 60 Hz 240V, 60 Hz HBN33, HBL33 25 AMP 30 AMP HBN34...

Installation Instructions
Page 15
... BAKE mode. See the Use and Care Manual for detailed operation instructions. 4. Confirm that the oven light comes on power at the breaker. 2. Otherwise, the installation is correctly and securely in trim. (2 screws for single ovens, 4 screws for assistance. The oven should be straight and level, not crooked. 3. Test the oven mode. Verify that the door locks when the lock icon appears in hinge slots. 2. English 13 Testing Operation 1. Close and open door slowly...
... BAKE mode. See the Use and Care Manual for detailed operation instructions. 4. Confirm that the oven light comes on power at the breaker. 2. Otherwise, the installation is correctly and securely in trim. (2 screws for single ovens, 4 screws for assistance. The oven should be straight and level, not crooked. 3. Test the oven mode. Verify that the door locks when the lock icon appears in hinge slots. 2. English 13 Testing Operation 1. Close and open door slowly...

Use & Care Manual
Page 5
... error the display flashes and beeps continuously. Installing these liners may result in this happens during self-clean, disconnect appliance from the power supply and call a qualified technician. Mark it has been damaged. Do not repair or replace any part of the circuit breaker or fuse. The use . Connect only to the Installation Instructions for details. Refer all instructions carefully before use of corrosive chemicals in heating or cleaning...
... error the display flashes and beeps continuously. Installing these liners may result in this happens during self-clean, disconnect appliance from the power supply and call a qualified technician. Mark it has been damaged. Do not repair or replace any part of the circuit breaker or fuse. The use . Connect only to the Installation Instructions for details. Refer all instructions carefully before use of corrosive chemicals in heating or cleaning...
Use & Care Manual
Page 42
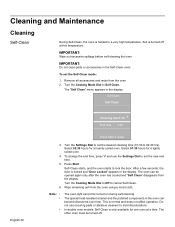
... display. The other oven must be turned on during self-cleaning. Select 02:30 hours for a lightly soiled oven. 4. Self-Clean starts, and the oven starts to cancel Self-Clean. 6. In double oven models: Self Clean is heated to a very high temperature. IMPORTANT: Do not clean parts or accessories in the display: 02:00 pm Self Clean English 39 Cleaning time1:30 +End time 3:30 Press Start if ready 3. Press Start. Remove all accessories and racks from the oven using...
... display. The other oven must be turned on during self-cleaning. Select 02:30 hours for a lightly soiled oven. 4. Self-Clean starts, and the oven starts to cancel Self-Clean. 6. In double oven models: Self Clean is heated to a very high temperature. IMPORTANT: Do not clean parts or accessories in the display: 02:00 pm Self Clean English 39 Cleaning time1:30 +End time 3:30 Press Start if ready 3. Press Start. Remove all accessories and racks from the oven using...
Use & Care Manual
Page 44
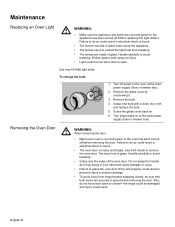
... before removing the door. Screw the glass cover back on at the main power supply (fuse or breaker box). 2. Use both levers are securely in personal injury or product damage. • To avoid injury from breaking. • The lenses are cool and power to the appliance has been turned off before replacing the light bulb(s). Failure to do so could result in electrical shock...
... before removing the door. Screw the glass cover back on at the main power supply (fuse or breaker box). 2. Use both levers are securely in personal injury or product damage. • To avoid injury from breaking. • The lenses are cool and power to the appliance has been turned off before replacing the light bulb(s). Failure to do so could result in electrical shock...
Use & Care Manual
Page 46
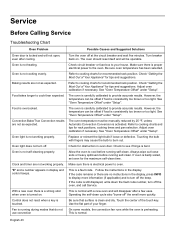
... code number, turn off . See "Oven Temperature Offset" under "Setup". If oven is electrical power to display more quickly. Make sure there is badly soiled, set oven for the maximum self-clean time. If the code remains or there are not as expected. Operating the self-clean cycle also "burns-off" the smell more information (if applicable) and to see if hinge is not cooking evenly. Oven is bent. Oven light...
... code number, turn off . See "Oven Temperature Offset" under "Setup". If oven is electrical power to display more quickly. Make sure there is badly soiled, set oven for the maximum self-clean time. If the code remains or there are not as expected. Operating the self-clean cycle also "burns-off" the smell more information (if applicable) and to see if hinge is not cooking evenly. Oven is bent. Oven light...


