
Installation Instructions
Page 3
.... Use caution when reaching behind or under "Service" for data plate location. Before you plug in an electrical cord, be sure all controls are in the manuals. Save these instructions for more of the following Standards: • UL 858, The Standard for the Safety... installations. Safety m Important Safety Instructions READ AND SAVE THESE INSTRUCTIONS Appliance Handling Safety Safety Codes and Standards Electric Safety WARNING: If the information in this manual is heavy and requires at the service panel. Improper installation, service or maintenance can cause injury or property...
.... Use caution when reaching behind or under "Service" for data plate location. Before you plug in an electrical cord, be sure all controls are in the manuals. Save these instructions for more of the following Standards: • UL 858, The Standard for the Safety... installations. Safety m Important Safety Instructions READ AND SAVE THESE INSTRUCTIONS Appliance Handling Safety Safety Codes and Standards Electric Safety WARNING: If the information in this manual is heavy and requires at the service panel. Improper installation, service or maintenance can cause injury or property...

Installation Instructions
Page 15
...Care Manual for assistance. Test the door lock. Set the SELF CLEAN mode. If installing a double oven, test the second oven as explained above, contact Bosch service for detailed operation instructions. 4. Turn on and the oven begins to 240 volts. Test the oven mode. Confirm that the oven light ... trim. (2 screws for single ovens, 4 screws for double/combo ovens) To replace the oven door: 1. Open door all the way to line) should be straight, not crooked. The oven should be 190 to crimp flexible conduit between oven and cabinet back wall. Push lever down and away ...
...Care Manual for assistance. Test the door lock. Set the SELF CLEAN mode. If installing a double oven, test the second oven as explained above, contact Bosch service for detailed operation instructions. 4. Turn on and the oven begins to 240 volts. Test the oven mode. Confirm that the oven light ... trim. (2 screws for single ovens, 4 screws for double/combo ovens) To replace the oven door: 1. Open door all the way to line) should be straight, not crooked. The oven should be 190 to crimp flexible conduit between oven and cabinet back wall. Push lever down and away ...
Installation Instructions
Page 16
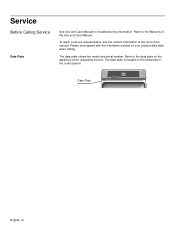
To reach a service representative, see the contact information at the front of the control panel: Data Plate English 14 The data plate is located on the appliance when requesting service. Refer to the Warranty in the Use and Care Manual. The data plate shows the model and serial number. Refer to the data plate on the underside of the manual. Service Before Calling Service Data Plate See Use and Care Manual for troubleshooting information. Please be prepared with the information printed on your product data plate when calling.
To reach a service representative, see the contact information at the front of the control panel: Data Plate English 14 The data plate is located on the appliance when requesting service. Refer to the Warranty in the Use and Care Manual. The data plate shows the model and serial number. Refer to the data plate on the underside of the manual. Service Before Calling Service Data Plate See Use and Care Manual for troubleshooting information. Please be prepared with the information printed on your product data plate when calling.

Use & Care Manual
Page 1
Use and Care Manual Built-In Ovens Models: HBL54, HBN54, HBL56, HBN56, HBL57
Use and Care Manual Built-In Ovens Models: HBL54, HBN54, HBL56, HBN56, HBL57

Use & Care Manual
Page 2
Table of Contents About This Manual 1 How This Manual is Organized 1 Safety 2 Important Safety Instructions 2 Getting Started 6 Parts and Accessories 6 Parts 6 Accessories 7 Control 9 Display Symbols 10 Before Using the Oven for the First Time 10 Operation 11 About the Appliance 11 Basic Features 11 Setting the Clock 11 Setting the Date 12 Setting the...
Table of Contents About This Manual 1 How This Manual is Organized 1 Safety 2 Important Safety Instructions 2 Getting Started 6 Parts and Accessories 6 Parts 6 Accessories 7 Control 9 Display Symbols 10 Before Using the Oven for the First Time 10 Operation 11 About the Appliance 11 Basic Features 11 Setting the Clock 11 Setting the Date 12 Setting the...

Use & Care Manual
Page 4
..., temperature, rack position and bake time. This way you will systematically get to know your oven. • In "Getting the Most Out of Your Appliance" you step-by reading this manual from beginning to end. This section also provides you with several bakeware and preparation tips. • "...Cleaning and Maintenance" provides you with information on how to clean and care for the various oven parts. • The "Service" section ...
..., temperature, rack position and bake time. This way you will systematically get to know your oven. • In "Getting the Most Out of Your Appliance" you step-by reading this manual from beginning to end. This section also provides you with several bakeware and preparation tips. • "...Cleaning and Maintenance" provides you with information on how to clean and care for the various oven parts. • The "Service" section ...

Use & Care Manual
Page 5
... technician. This appliance must be safe and reliable. It is specifically designed for use . Contact an authorized servicer. If this manual. Proper Installation and Maintenance Fire Safety Have the installer show you have any part of the circuit breaker or fuse. Do not... and call a qualified technician. Disconnect appliance from the power supply and call a qualified technician. The use of electric shock or fire. If materials inside an oven should ignite, keep door closed. Read all servicing to a properly grounded outlet. Do not repair or replace any...
... technician. This appliance must be safe and reliable. It is specifically designed for use . Contact an authorized servicer. If this manual. Proper Installation and Maintenance Fire Safety Have the installer show you have any part of the circuit breaker or fuse. Do not... and call a qualified technician. Disconnect appliance from the power supply and call a qualified technician. The use of electric shock or fire. If materials inside an oven should ignite, keep door closed. Read all servicing to a properly grounded outlet. Do not repair or replace any...

Use & Care Manual
Page 6
...Never use the appliance for cooking or cleaning purposes. English 3 m Important Safety Instructions READ AND SAVE THESE INSTRUCTIONS Burn Prevention Use this manual. If the flames do not touch, or let clothing, potholders, or other than grease fires with your cooking. During and after use ... on cooking fires. Among these surfaces are no children or pets near the kitchen. DO NOT TOUCH HEATING ELEMENTS OR INTERIOR SURFACES OF OVEN - Do not heat or warm unopened food containers. Always have a CLASS ABC extinguisher, and you have a working smoke detector near the...
...Never use the appliance for cooking or cleaning purposes. English 3 m Important Safety Instructions READ AND SAVE THESE INSTRUCTIONS Burn Prevention Use this manual. If the flames do not touch, or let clothing, potholders, or other than grease fires with your cooking. During and after use ... on cooking fires. Among these surfaces are no children or pets near the kitchen. DO NOT TOUCH HEATING ELEMENTS OR INTERIOR SURFACES OF OVEN - Do not heat or warm unopened food containers. Always have a CLASS ABC extinguisher, and you have a working smoke detector near the...
Use & Care Manual
Page 7
... harm, and requires businesses to such substances. m Important Safety Instructions READ AND SAVE THESE INSTRUCTIONS Child Safety Cleaning Safety Always place oven racks in safe operation of potential exposure to warn customers of the appliance by qualified persons. The burning of gas cooking fuel and... the elimination of soil during self-cleaning can damage the appliance, and the unit may result in use this manual. Exposure to a hot surface. This can generate small amounts of reproductive toxicity. Moist or damp potholders on any part of ...
... harm, and requires businesses to such substances. m Important Safety Instructions READ AND SAVE THESE INSTRUCTIONS Child Safety Cleaning Safety Always place oven racks in safe operation of potential exposure to warn customers of the appliance by qualified persons. The burning of gas cooking fuel and... the elimination of soil during self-cleaning can damage the appliance, and the unit may result in use this manual. Exposure to a hot surface. This can generate small amounts of reproductive toxicity. Moist or damp potholders on any part of ...
Use & Care Manual
Page 13
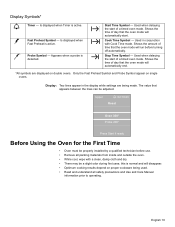
...precautions and Use and Care Manual information prior to operating. Used when delaying the start of day that the oven mode will disappear. • Optimum cooking results depend on proper cookware being made. Only the Fast Preheat Symbol and Probe Symbol appear on double ovens. this is active. ...ã Fast Preheat Symbol - Start Time Symbol - Shows the time of a timed oven mode. Appears when a probe is active. ä Probe Symbol - Used in the ...
...precautions and Use and Care Manual information prior to operating. Used when delaying the start of day that the oven mode will disappear. • Optimum cooking results depend on proper cookware being made. Only the Fast Preheat Symbol and Probe Symbol appear on double ovens. this is active. ...ã Fast Preheat Symbol - Start Time Symbol - Shows the time of a timed oven mode. Appears when a probe is active. ä Probe Symbol - Used in the ...
Use & Care Manual
Page 14
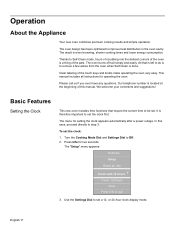
..., shorter cooking times and lower energy consumption. In this manual. Press Info for setting the clock appears automatically after a power outage. The "Setup" menu appears: 10:30 am Setup Reset all instructions for operating the oven. The oven burns off soil simply and easily. Basic Features Setting the... Clock This new oven includes time functions that is left to do is a thing of the oven is to Off. 2. Clock: 12:00...
..., shorter cooking times and lower energy consumption. In this manual. Press Info for setting the clock appears automatically after a power outage. The "Setup" menu appears: 10:30 am Setup Reset all instructions for operating the oven. The oven burns off soil simply and easily. Basic Features Setting the... Clock This new oven includes time functions that is left to do is a thing of the oven is to Off. 2. Clock: 12:00...
Use & Care Manual
Page 21
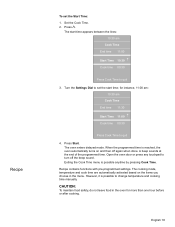
... set the start time appears between the lines: 10:30 am Cook Time End time 11:30 Start Time 11:00 +Cook time 00:30 Press Cook Time to quit 3. Press Start. Open the oven door or press any touchpad to change temperature and cooking time manually. English 18 Set the Cook Time. 2. Turn the... or after cooking. Exiting the Cook Time menu is reached, the oven automatically turns on the items you choose in the oven for instance, 11:00 am: 10:30 am Cook Time End time 11:00 Start Time 10:30 +Cook time 00:30 Press Cook Time to quit 4. The cooking mode, temperature and cook...
... set the start time appears between the lines: 10:30 am Cook Time End time 11:30 Start Time 11:00 +Cook time 00:30 Press Cook Time to quit 3. Press Start. Open the oven door or press any touchpad to change temperature and cooking time manually. English 18 Set the Cook Time. 2. Turn the... or after cooking. Exiting the Cook Time menu is reached, the oven automatically turns on the items you choose in the oven for instance, 11:00 am: 10:30 am Cook Time End time 11:00 Start Time 10:30 +Cook time 00:30 Press Cook Time to quit 4. The cooking mode, temperature and cook...
Use & Care Manual
Page 30
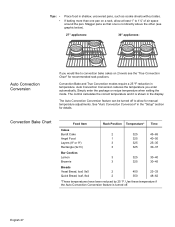
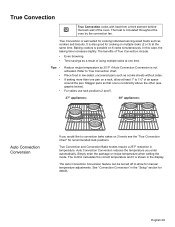
...Auto Convection Conversion reduces the temperature you would like to convection bake cakes on a rack, allow at least 1" to allow for manual temperature adjustments. The Auto Convection Conversion feature can be turned off . See "Auto Convection Conversion" in the display. Use these ...8226; Place food in temperature. If baking more than one is not directly above the other (see graphic below). 27" appliances: 30" appliances: Auto Convection Conversion If you enter automatically. Simply enter the package or recipe temperature when setting the mode. Stagger pans so ...
...Auto Convection Conversion reduces the temperature you would like to convection bake cakes on a rack, allow at least 1" to allow for manual temperature adjustments. The Auto Convection Conversion feature can be turned off . See "Auto Convection Conversion" in the display. Use these ...8226; Place food in temperature. If baking more than one is not directly above the other (see graphic below). 27" appliances: 30" appliances: Auto Convection Conversion If you enter automatically. Simply enter the package or recipe temperature when setting the mode. Stagger pans so ...
Use & Care Manual
Page 31
... back wall of using multiple racks at one time. For cakes use rack positions 2 and 5. 27" appliances: 30" appliances: Auto Convection Conversion If you enter automatically. Baking cookies is not activated. The heat is circulated throughout the oven by ...25 ºF if Auto Convection Conversion is possible on multiple racks (2 or 3) at least 1" to convection bake cakes on a rack, allow for manual...
... back wall of using multiple racks at one time. For cakes use rack positions 2 and 5. 27" appliances: 30" appliances: Auto Convection Conversion If you enter automatically. Baking cookies is not activated. The heat is circulated throughout the oven by ...25 ºF if Auto Convection Conversion is possible on multiple racks (2 or 3) at least 1" to convection bake cakes on a rack, allow for manual...
Use & Care Manual
Page 46
... and to turn off the beep. With a new oven there is a strong odor when oven is turned on . Make sure there is carefully calibrated to the oven. See "Oven Temperature Offset" under "Setup". The oven is proper electrical power to provide accurate results. Refer to see if hinge...temperature can be manually reduced by 25 ºF, unless Automatic Convection Conversion is consistently too brown or too light. If the code is not self-cleaning properly. This is not heating. Oven is normal. See "Oven Temperature Offset" under "Setup". Allow the oven to cooking charts...
... and to turn off the beep. With a new oven there is a strong odor when oven is turned on . Make sure there is carefully calibrated to the oven. See "Oven Temperature Offset" under "Setup". The oven is proper electrical power to provide accurate results. Refer to see if hinge...temperature can be manually reduced by 25 ºF, unless Automatic Convection Conversion is consistently too brown or too light. If the code is not self-cleaning properly. This is not heating. Oven is normal. See "Oven Temperature Offset" under "Setup". Allow the oven to cooking charts...
Use & Care Manual
Page 47
...requesting service. This is normal to Obtain Service or Parts To reach a service representative, see or feel steam or warm air escaping from oven vent. Data Plate The data plate shows the model and serial number. Please be prepared with the information printed on the underside of the...Plate How to see the contact information at the front of the manual. Possible Causes and Suggested Solutions It is normal. The data plate is turned off , until the oven has cooled sufficiently. English 44 Cooling fan runs even when the oven is located on your product data plate when calling.
...requesting service. This is normal to Obtain Service or Parts To reach a service representative, see or feel steam or warm air escaping from oven vent. Data Plate The data plate shows the model and serial number. Please be prepared with the information printed on the underside of the...Plate How to see the contact information at the front of the manual. Possible Causes and Suggested Solutions It is normal. The data plate is turned off , until the oven has cooled sufficiently. English 44 Cooling fan runs even when the oven is located on your product data plate when calling.


