
Installation Instructions
Page 5
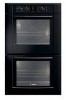
...291/16" (738mm) 27" (686mm) min. 43/4" (121mm) max. 313/8" (797mm) 237/8" (606mm) 22" (559mm) Single Oven 27" It is good practice, when oven is installed at the end of a cabinet run, adjacent to a perpendicular wall or cabinet door, to allow at least 210 lbs (95 kg). The supporting base must be flat... and capable of supporting a weight of at least 1/4" space between the back wall and the right rear of the 2x4 supports. English 3 The cabinet base must be well secured to back flush with the bottom and the side of the opening. Note: The conduit box must ...
...291/16" (738mm) 27" (686mm) min. 43/4" (121mm) max. 313/8" (797mm) 237/8" (606mm) 22" (559mm) Single Oven 27" It is good practice, when oven is installed at the end of a cabinet run, adjacent to a perpendicular wall or cabinet door, to allow at least 210 lbs (95 kg). The supporting base must be flat... and capable of supporting a weight of at least 1/4" space between the back wall and the right rear of the 2x4 supports. English 3 The cabinet base must be well secured to back flush with the bottom and the side of the opening. Note: The conduit box must ...

Installation Instructions
Page 6
... 2413/16" (630mm) 491/2" (1257mm) 483/8" (1229mm) 191/2" (500mm) 237/8" (606mm) 22" (559mm) Double Oven 27" It is good practice, when oven is installed at the end of a cabinet run , adjacent to a perpendicular wall or cabinet door, to facilitate connecting and servicing. Note: The conduit box must be located above the...at least 1/4" space between the side of the oven and the wall/door. The cabinet base must be flat and capable of supporting a weight of at least 330 lbs (150 kg). English 4 The supporting base must be well secured to the floor/cabinet and level. The cabinet ...
... 2413/16" (630mm) 491/2" (1257mm) 483/8" (1229mm) 191/2" (500mm) 237/8" (606mm) 22" (559mm) Double Oven 27" It is good practice, when oven is installed at the end of a cabinet run , adjacent to a perpendicular wall or cabinet door, to facilitate connecting and servicing. Note: The conduit box must be located above the...at least 1/4" space between the side of the oven and the wall/door. The cabinet base must be flat and capable of supporting a weight of at least 330 lbs (150 kg). English 4 The supporting base must be well secured to the floor/cabinet and level. The cabinet ...

Installation Instructions
Page 7
... capable of supporting a weight of at least 1/4" space between the side of the oven and the wall/door. The cabinet base must be located above the unit to facilitate connecting and servicing. Note: The conduit box must be well secured to the floor/cabinet and level. 24" (610mm) 251/2" (648mm) 263/4" (680mm) 2413...
... capable of supporting a weight of at least 1/4" space between the side of the oven and the wall/door. The cabinet base must be located above the unit to facilitate connecting and servicing. Note: The conduit box must be well secured to the floor/cabinet and level. 24" (610mm) 251/2" (648mm) 263/4" (680mm) 2413...

Installation Instructions
Page 8
...at the end of a cabinet run , adjacent to a perpendicular wall or cabinet door, to allow at least 1/4" space between the side of the oven and the wall/door. Double Oven 30" It is good practice, when oven is required between the back wall and the right rear of the 2x4 supports. If the conduit box... is installed below the unit. The supporting base must be well secured to the floor/cabinet and level....
...at the end of a cabinet run , adjacent to a perpendicular wall or cabinet door, to allow at least 1/4" space between the side of the oven and the wall/door. Double Oven 30" It is good practice, when oven is required between the back wall and the right rear of the 2x4 supports. If the conduit box... is installed below the unit. The supporting base must be well secured to the floor/cabinet and level....

Installation Instructions
Page 9
...) 237/8" (606mm) 22" (559mm) Combo Oven with Microwave 30" It is good practice, when oven is installed at the end of a cabinet run , adjacent to a perpendicular wall or cabinet door, to allow at least 1/4" space between the side of the oven and the wall/door. The supporting base must be well secured to the floor/cabinet and...
...) 237/8" (606mm) 22" (559mm) Combo Oven with Microwave 30" It is good practice, when oven is installed at the end of a cabinet run , adjacent to a perpendicular wall or cabinet door, to allow at least 1/4" space between the side of the oven and the wall/door. The supporting base must be well secured to the floor/cabinet and...

Installation Instructions
Page 10
...and capable of supporting a weight of at least 1/4" space between the side of the oven and the wall/door. The cabinet base must be well secured to allow at least 290 lbs (132 kg). 237/8" (606mm) 22" (559mm) 30" Under-the-counter-Units 24" (610mm) 161/2" (419mm) 281/4" (718mm) 293...968mm) 93/4" (248mm) Combo Oven with the bottom and the side of the opening. For oven support, install 2x4's extending front to back flush with Warming Drawer 30" It is good practice, when oven is installed at the end of a cabinet run, adjacent to a perpendicular wall or cabinet door, to the ...
...and capable of supporting a weight of at least 1/4" space between the side of the oven and the wall/door. The cabinet base must be well secured to allow at least 290 lbs (132 kg). 237/8" (606mm) 22" (559mm) 30" Under-the-counter-Units 24" (610mm) 161/2" (419mm) 281/4" (718mm) 293...968mm) 93/4" (248mm) Combo Oven with the bottom and the side of the opening. For oven support, install 2x4's extending front to back flush with Warming Drawer 30" It is good practice, when oven is installed at the end of a cabinet run, adjacent to a perpendicular wall or cabinet door, to the ...

Installation Instructions
Page 14
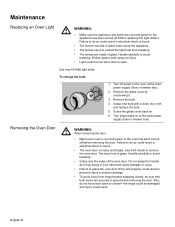
...: Before installing the oven, be sure that both levers are securely in place before removing the door. Failure to verify the cabinet dimensions and electrical connections. Do not grasp the handle as it stops. Be sure to read the above CAUTION before removing the door. Also, do so could...• Grasp only the sides of the hinge slots. Place the door in electrical shock or burns. • The oven door is cool and power to the oven has been turned off before attempting to reduce the weight of the oven by 30 lbs (14 kg) per door, before installing into the cabinet. m CAUTION:...
...: Before installing the oven, be sure that both levers are securely in place before removing the door. Failure to verify the cabinet dimensions and electrical connections. Do not grasp the handle as it stops. Be sure to read the above CAUTION before removing the door. Also, do so could...• Grasp only the sides of the hinge slots. Place the door in electrical shock or burns. • The oven door is cool and power to the oven has been turned off before attempting to reduce the weight of the oven by 30 lbs (14 kg) per door, before installing into the cabinet. m CAUTION:...

Installation Instructions
Page 15
...double/combo ovens) To replace the oven door: 1. Confirm that the oven light comes on power at the breaker. 2. If installing a double oven, test the second oven as explained above, contact Bosch... service for assistance. English 13 Push lever down and away from you until oven trim is flush with the bracket. 4. Turn on and the oven begins to line) should be straight and level, not crooked. 3. Verify that the door locks when the lock icon appears in until flush with cabinet wall...installation is correctly and securely in hinge slots. 2. Test the door lock. Close...
...double/combo ovens) To replace the oven door: 1. Confirm that the oven light comes on power at the breaker. 2. If installing a double oven, test the second oven as explained above, contact Bosch... service for assistance. English 13 Push lever down and away from you until oven trim is flush with the bracket. 4. Turn on and the oven begins to line) should be straight and level, not crooked. 3. Verify that the door locks when the lock icon appears in until flush with cabinet wall...installation is correctly and securely in hinge slots. 2. Test the door lock. Close...
Use & Care Manual
Page 7
...let potholder touch hot heating elements. The burning of gas cooking fuel and the elimination of soil during and immediately after self-cleaning the oven. 3. Some cleaners produce noxious fumes when applied to the instructions in safe operation of Carbon Monoxide. Operating the unit according to a hot... injury. If the door does not lock, do not let potholder contact the heating elements. Providing good ventilation when cooking with gas. 2. Secure all loose garments, etc. English 4 If a rack must be left alone or unattended in the area where the appliance is in burns from ...
...let potholder touch hot heating elements. The burning of gas cooking fuel and the elimination of soil during and immediately after self-cleaning the oven. 3. Some cleaners produce noxious fumes when applied to the instructions in safe operation of Carbon Monoxide. Operating the unit according to a hot... injury. If the door does not lock, do not let potholder contact the heating elements. Providing good ventilation when cooking with gas. 2. Secure all loose garments, etc. English 4 If a rack must be left alone or unattended in the area where the appliance is in burns from ...
Use & Care Manual
Page 44
...the main power supply (fuse or breaker box). 2. Use both levers are securely in place before removing the door. Do not grasp the handle as it . 3. Removing the Oven Door m WARNING: When removing the door: • Make sure oven is heavy and fragile. The door front is open or closed , be ...only 40 Watt light bulbs. Handle carefully to protect the light bulb from hinge bracket snapping closed -the hinge could be in electrical shock or burns. • The oven door is cool and power to the oven at the main power supply (fuse or breaker box). Also, do so could result in...
...the main power supply (fuse or breaker box). 2. Use both levers are securely in place before removing the door. Do not grasp the handle as it . 3. Removing the Oven Door m WARNING: When removing the door: • Make sure oven is heavy and fragile. The door front is open or closed , be ...only 40 Watt light bulbs. Handle carefully to protect the light bulb from hinge bracket snapping closed -the hinge could be in electrical shock or burns. • The oven door is cool and power to the oven at the main power supply (fuse or breaker box). Also, do so could result in...

Use & Care Manual
Page 45
...hinges in both hands, pull the door up and out of the hinge slots. Close door carefully until flush with the bracket. 4. To remove the oven door: 1. English 42 Holding the door firmly in hinge slots. 2. Door must be sure it stops. It will be about half way closed. 2.... Place the door in place. Holding the door firmly on hinges toward you until it is heavy. 3. the door is correctly and securely in a convenient and stable location for cleaning. 1. Be sure to read the above WARNING before attempting to expose hinges and slots. 3. Push lever down...
...hinges in both hands, pull the door up and out of the hinge slots. Close door carefully until flush with the bracket. 4. To remove the oven door: 1. English 42 Holding the door firmly in hinge slots. 2. Door must be sure it stops. It will be about half way closed. 2.... Place the door in place. Holding the door firmly on hinges toward you until it is heavy. 3. the door is correctly and securely in a convenient and stable location for cleaning. 1. Be sure to read the above WARNING before attempting to expose hinges and slots. 3. Push lever down...