
Use & Care Manual
Page 3
...parts, and before cleaning the appliance. 6. Do not place on or taking off " then remove plug from outlet when not in a heated oven. 11. To disconnect, turn any control to the nearest authorized service facility for other liquids. 4. To reduce the risk of a table or counter, or touch hot surfaces. 10. Use... in water or other than intended use outdoors. 9. To protect against fire, electric shock and personal injury, do not remove the base. Allow it to cool before cleaning. The use and before putting on or near children. 5. No user serviceable parts inside. Repair should ...
...parts, and before cleaning the appliance. 6. Do not place on or taking off " then remove plug from outlet when not in a heated oven. 11. To disconnect, turn any control to the nearest authorized service facility for other liquids. 4. To reduce the risk of a table or counter, or touch hot surfaces. 10. Use... in water or other than intended use outdoors. 9. To protect against fire, electric shock and personal injury, do not remove the base. Allow it to cool before cleaning. The use and before putting on or near children. 5. No user serviceable parts inside. Repair should ...

Use & Care Manual
Page 4
q Keep your voltage q Never use warm or hot water to fill the water container! q Never use . If the plug does not fit fully in a polarized outlet only one blade is wider than the other than cleaning and user maintenance should be sure that the voltage indicated on the name plate agrees with scouring powders or hard implements. q Never clean with your hands...
q Keep your voltage q Never use warm or hot water to fill the water container! q Never use . If the plug does not fit fully in a polarized outlet only one blade is wider than the other than cleaning and user maintenance should be sure that the voltage indicated on the name plate agrees with scouring powders or hard implements. q Never clean with your hands...

Use & Care Manual
Page 5
Supply line 2. Steam generation 5. Power switch with pilot lamp 4. Function selector knob - Overflow dish (two sections) 10. Overview 1. Preheating to generate steam - Base grille 11. Sieve holder a) Sieve for 1 cup b) Sieve for water tank 7. Espresso mode - ReadyĆlamp 6. Water tank (removable) 8. Steam tube (rotating) a) Sleeve b) Nozzle 9. Measuring spoon 5 Cover for 2 cups 12. Brewing head sieve 13. Stand by - Cable coiler 3.
Supply line 2. Steam generation 5. Power switch with pilot lamp 4. Function selector knob - Overflow dish (two sections) 10. Overview 1. Preheating to generate steam - Base grille 11. Sieve holder a) Sieve for 1 cup b) Sieve for water tank 7. Espresso mode - ReadyĆlamp 6. Water tank (removable) 8. Steam tube (rotating) a) Sleeve b) Nozzle 9. Measuring spoon 5 Cover for 2 cups 12. Brewing head sieve 13. Stand by - Cable coiler 3.

Use & Care Manual
Page 6
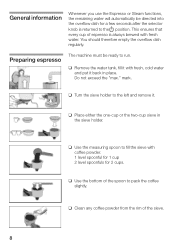
Before using your espresso maker Before using your espresso maker for use when the readyĆlamp lights up green. 6 It will light up . mark. The pilot lamp will be ready for the first time, or after extended storage, flush out the system by running several cups of water through it back in the electric cord. q Plug in place. q Turn the power switch to "I". q Remove the water tank, fill it with fresh, cold water and put it (without coffee powder). Note: Your machine is heating up red. Do not exceed the "max."
Before using your espresso maker Before using your espresso maker for use when the readyĆlamp lights up green. 6 It will light up . mark. The pilot lamp will be ready for the first time, or after extended storage, flush out the system by running several cups of water through it back in the electric cord. q Plug in place. q Turn the power switch to "I". q Remove the water tank, fill it with fresh, cold water and put it (without coffee powder). Note: Your machine is heating up red. Do not exceed the "max."

Use & Care Manual
Page 7
Fit the sieve holder with water. 3. Turn the function selector knob to the right until it to . 2. q Place a large container underneath the sieve holder. 1. Place the sieve in the sieve holder. 2. Turn the function selector knob back to . 7 Fill the container with the sieve into the sieve holder guide cutĆout on the left and turn it stops. 1.
Fit the sieve holder with water. 3. Turn the function selector knob to the right until it to . 2. q Place a large container underneath the sieve holder. 1. Place the sieve in the sieve holder. 2. Turn the function selector knob back to . 7 Fill the container with the sieve into the sieve holder guide cutĆout on the left and turn it stops. 1.
Use & Care Manual
Page 8
... espresso The machine must be directed into the overflow dish for 2 cups. q Use the measuring spoon to fill the sieve with fresh, cold water and put it back in the sieve holder. q Turn the sieve holder to the left and remove it with coffee powder. 1 level spoonful for 1 cup 2 level spoonfuls for a few seconds after the selector knob is always brewed with fresh water. q Clean any coffee...
... espresso The machine must be directed into the overflow dish for 2 cups. q Use the measuring spoon to fill the sieve with fresh, cold water and put it back in the sieve holder. q Turn the sieve holder to the left and remove it with coffee powder. 1 level spoonful for 1 cup 2 level spoonfuls for a few seconds after the selector knob is always brewed with fresh water. q Clean any coffee...

Use & Care Manual
Page 9
Knock out the coffee powder. q Fit the sieve holder into the sieve holder guide on the left and turn the function selector knob back to . 1. Remove the sieve holder to empty and clean it to the right. 1. Place a cup/cups under the sieve holder. 2. Tip: Preheat espresso cups with thick sides before preparing the espresso so that your espresso will stay warm longer. 9 Caution: Once you have filled the cup to and fill the cups(s). 3. q Empty the overflow dish. Pull back the clip holding the sieve. 3. Turn the function selector knob to the desired level, turn it . 2.
Knock out the coffee powder. q Fit the sieve holder into the sieve holder guide on the left and turn the function selector knob back to . 1. Remove the sieve holder to empty and clean it to the right. 1. Place a cup/cups under the sieve holder. 2. Tip: Preheat espresso cups with thick sides before preparing the espresso so that your espresso will stay warm longer. 9 Caution: Once you have filled the cup to and fill the cups(s). 3. q Empty the overflow dish. Pull back the clip holding the sieve. 3. Turn the function selector knob to the desired level, turn it . 2.
Use & Care Manual
Page 10
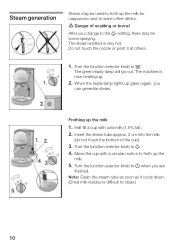
...used to froth up . 2. The steam emitted is difficult to clean.) 10 Turn the function selector knob to . 4. The machine is now heating up the milk for cappuccino and to when you can generate steam. Turn the function selector knob to warm other drinks. Insert the steam tube approx. 2 cm into the milk...it at others. 1. After you change to froth up the milk 1. Frothing up the milk. 5. Turn the function selector knob to . When the readyĆlamp lights up green again, you are finished. Half fill a cup with a circular motion to the setting, there may be some spraying....
...used to froth up . 2. The steam emitted is difficult to clean.) 10 Turn the function selector knob to . 4. The machine is now heating up the milk for cappuccino and to when you can generate steam. Turn the function selector knob to warm other drinks. Insert the steam tube approx. 2 cm into the milk...it at others. 1. After you change to froth up the milk 1. Frothing up the milk. 5. Turn the function selector knob to . When the readyĆlamp lights up green again, you are finished. Half fill a cup with a circular motion to the setting, there may be some spraying....

Use & Care Manual
Page 11
... machine with the drink. 2. Note: Clean the steam tube as soon as it cools down. (Dried residues are difficult to heat (do not touch the bottom of electric shock! Unplug the machine before cleaning. Never submerge the machine in water! Do not use a steam cleaner! Heat the liquid. 5. Do not use scouring agents. 11 Slowly turn the function selector knob to stop. Heating...
... machine with the drink. 2. Note: Clean the steam tube as soon as it cools down. (Dried residues are difficult to heat (do not touch the bottom of electric shock! Unplug the machine before cleaning. Never submerge the machine in water! Do not use a steam cleaner! Heat the liquid. 5. Do not use scouring agents. 11 Slowly turn the function selector knob to stop. Heating...
Use & Care Manual
Page 12
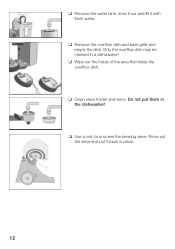
Do not put it with fresh water. q Clean sieve holder and sieve. Rinse out the sieve and put them in the dishwasher! Only the overflow dish may be cleaned in a dishwasher! q Wipe out the inside of the area that holds the overflow dish. q Use a coin to unscrew the brewing sieve. q Remove the overflow dish and base grille and empty the dish. q Remove the water tank, rinse it out and fill it back in place. 12
Do not put it with fresh water. q Clean sieve holder and sieve. Rinse out the sieve and put them in the dishwasher! Only the overflow dish may be cleaned in a dishwasher! q Wipe out the inside of the area that holds the overflow dish. q Use a coin to unscrew the brewing sieve. q Remove the overflow dish and base grille and empty the dish. q Remove the water tank, rinse it out and fill it back in place. 12

Use & Care Manual
Page 13
... water supply. 1. Pull out and clean the sleeve. Pay special attention to unscrew the steam tube. Tip: Let off the machine. 2. Important: The machine must cool down completely (at regular intervals as called for by the hardness of your unit at least 1 hour). 13 Cleaning the steam tube q Use ...a coin to the holes in the sleeve, which may be cleaned with a damp cloth. Pull...
... water supply. 1. Pull out and clean the sleeve. Pay special attention to unscrew the steam tube. Tip: Let off the machine. 2. Important: The machine must cool down completely (at regular intervals as called for by the hardness of your unit at least 1 hour). 13 Cleaning the steam tube q Use ...a coin to the holes in the sleeve, which may be cleaned with a damp cloth. Pull...

Use & Care Manual
Page 14
Put the brewing head sieve back in place. 14 Remove calcium and coffee residue. 3. q Remove the sieve holder. 1. Use a coin to unscrew the brewing head sieve. 2.
Put the brewing head sieve back in place. 14 Remove calcium and coffee residue. 3. q Remove the sieve holder. 1. Use a coin to unscrew the brewing head sieve. 2.

Use & Care Manual
Page 15
q Mix decalcifying agent in accordance with sieve back in . 2. q Put the sieve holder with manufacturer's instructions and pour it into the empty water tank. 1. Switch the unit on. 3. Immediately hold a cup under the steam tube. 15 Plug the machine back in place.
q Mix decalcifying agent in accordance with sieve back in . 2. q Put the sieve holder with manufacturer's instructions and pour it into the empty water tank. 1. Switch the unit on. 3. Immediately hold a cup under the steam tube. 15 Plug the machine back in place.

Use & Care Manual
Page 16
q Turn the function selector knob to run through for at the power switch, allow the decalcifying fluid to . q Place a large container underneath the sieve holder. q Move the function selector knob to and, after approx. 30 seconds, switch the unit off again. 16 Turn the machine back on at least 5 minutes. q Allow the decalcifying agent to work for approx. 30 seconds, and then turn the machine off .
q Turn the function selector knob to run through for at the power switch, allow the decalcifying fluid to . q Place a large container underneath the sieve holder. q Move the function selector knob to and, after approx. 30 seconds, switch the unit off again. 16 Turn the machine back on at least 5 minutes. q Allow the decalcifying agent to work for approx. 30 seconds, and then turn the machine off .

Use & Care Manual
Page 17
Turn the function selector knob back to . 3. Empty the container and put it back in place. 2. Turn the function selector knob to . q Fill the water tank with fresh water up to . 17 Turn knob back to the "max." q Allow the decalcifying agent to run through the machine. 3. Turn the power switch back on. 2. Allow the remaining decalcifying fluid to work for at least 10 minutes. 1. mark. 1. Let all of the water run through . 4.
Turn the function selector knob back to . 3. Empty the container and put it back in place. 2. Turn the function selector knob to . q Fill the water tank with fresh water up to . 17 Turn knob back to the "max." q Allow the decalcifying agent to run through the machine. 3. Turn the power switch back on. 2. Allow the remaining decalcifying fluid to work for at least 10 minutes. 1. mark. 1. Let all of the water run through . 4.

Use & Care Manual
Page 18
... correctly. Unscrew brewing head sieve and clean it. Wait until the readyĆlamp lights up . Fill water tank. Use fresh, cold milk. Water tank is blocked. Use fresh coffee grounds. Milk is not yet hot enough. The machine is not frothy enough. Fit water tank into place. Fit water tank into place. Resolving minor problems yourself Problem Espresso is very loud. Espresso has no "cream topping" (froth formation) The pump is not...
... correctly. Unscrew brewing head sieve and clean it. Wait until the readyĆlamp lights up . Fill water tank. Use fresh, cold milk. Water tank is blocked. Use fresh coffee grounds. Milk is not yet hot enough. The machine is not frothy enough. Fit water tank into place. Fit water tank into place. Resolving minor problems yourself Problem Espresso is very loud. Espresso has no "cream topping" (froth formation) The pump is not...

Use & Care Manual
Page 19
... prove defective under conditions of BOSCH. Repaired and replacement small appliances and parts shall be the same or as possible to the original for the purposes of BOSCH appliances should only be liable for commercial purposes. Repair of this warranty sets out your BOSCH small appliance, please contact customer service at no charge to you. BOSCH will repair or replace, at its sole option, any...
... prove defective under conditions of BOSCH. Repaired and replacement small appliances and parts shall be the same or as possible to the original for the purposes of BOSCH appliances should only be liable for commercial purposes. Repair of this warranty sets out your BOSCH small appliance, please contact customer service at no charge to you. BOSCH will repair or replace, at its sole option, any...

Use & Care Manual
Page 56
BSH Home Appliances Corporation 5551 McFadden Avenue Huntington Beach, CA 92649 USA Web site: www.boschsmallappliances.com Customer Service (toll free): 1-866-44BOSCH (1-866-442-6724) Appelez le serviceĆclient (gratuit) : 1-866-44BOSCH (1-866-442-6724) Servicio al cliente (libre de cargo): 1-866-44BOSCH (1-866-442-6724)
BSH Home Appliances Corporation 5551 McFadden Avenue Huntington Beach, CA 92649 USA Web site: www.boschsmallappliances.com Customer Service (toll free): 1-866-44BOSCH (1-866-442-6724) Appelez le serviceĆclient (gratuit) : 1-866-44BOSCH (1-866-442-6724) Servicio al cliente (libre de cargo): 1-866-44BOSCH (1-866-442-6724)


