
Installation Instructions
Page 4
... ON 19 4. Attaching the fixation strips to the appliance 27 Adjusting the door opening angle 27 4 Attaching the door panel (refrigerator compartment 23 12. Adjusting the door spring 26 Special installation 27 Preparing to connect the water 27 Connecting the water to the door ...panel (refrigerator compartment 20 9. Removing the packaging 11 3. Special installation 12 1. Attaching the fixation strips to the door panel (freezer compartment 21 ...
... ON 19 4. Attaching the fixation strips to the appliance 27 Adjusting the door opening angle 27 4 Attaching the door panel (refrigerator compartment 23 12. Adjusting the door spring 26 Special installation 27 Preparing to connect the water 27 Connecting the water to the door ...panel (refrigerator compartment 20 9. Removing the packaging 11 3. Special installation 12 1. Attaching the fixation strips to the door panel (freezer compartment 21 ...

Installation Instructions
Page 20
...holes. 6. In this amount A on the adjusting rail and align along the outer edge of the appliance door to the door panel (refrigerator compartment) Note: The fixation strips are pre-assembled for the many different design options of the door panel. 5. Put on the rear of...of the door panel. 4. Always screw into the best load-bearing material of the gap continuously. Attaching the adjusting rail to the door panel (refrigerator compartment) 1. Align the door panel with at least 6 screws. Attaching the adjusting rail to the door panel (freezer compartment)"). 1. Measure the ...
...holes. 6. In this amount A on the adjusting rail and align along the outer edge of the appliance door to the door panel (refrigerator compartment) Note: The fixation strips are pre-assembled for the many different design options of the door panel. 5. Put on the rear of...of the door panel. 4. Always screw into the best load-bearing material of the gap continuously. Attaching the adjusting rail to the door panel (refrigerator compartment) 1. Align the door panel with at least 6 screws. Attaching the adjusting rail to the door panel (freezer compartment)"). 1. Measure the ...

Installation Instructions
Page 22
Attaching the door panel (refrigerator compartment)"). 1. Use the height adjustment gauge (b). 5. Re-examine the dimensions of the door panel. 10. Apply the fixation strip and mark out the holes. 8. Always ...
Attaching the door panel (refrigerator compartment)"). 1. Use the height adjustment gauge (b). 5. Re-examine the dimensions of the door panel. 10. Apply the fixation strip and mark out the holes. 8. Always ...

Installation Instructions
Page 23
... your hand. 3. Close the door and check the side alignment. Adjust the door panel using the double threaded bolts (Torx screwdriver). Attaching the door panel (refrigerator compartment) Note: Now attach the furniture handles which are screwed from the appliance door. If required, correct. 8. Open the appliance door. 23 Lower door panel...
... your hand. 3. Close the door and check the side alignment. Adjust the door panel using the double threaded bolts (Torx screwdriver). Attaching the door panel (refrigerator compartment) Note: Now attach the furniture handles which are screwed from the appliance door. If required, correct. 8. Open the appliance door. 23 Lower door panel...
Instructions for Use
Page 3
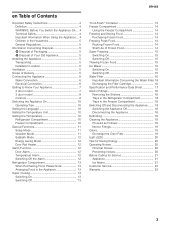
...Controls 9 Switching the Appliance On 10 Operating Tips 10 Setting the Language 10 Setting the Temperature Unit 10 Setting the Temperature 10 Refrigerator Compartment 10 Freezer Compartment 10 Special Functions 11 Setup Mode 11 Vacation Mode 11 Sabbath Mode 12 Energy saving Mode 12 Door ...Exchanging the Filter Cartridge 16 Specification and Performance Data Sheet 17 Interior Fittings 18 Removing the Shelves 18 Trays in the Refrigerator Compartment 18 Trays in the Freezer Compartment 18 Switching Off and Disconnecting the Appliance........ 18 Switching the Appliance Off 18 ...
...Controls 9 Switching the Appliance On 10 Operating Tips 10 Setting the Language 10 Setting the Temperature Unit 10 Setting the Temperature 10 Refrigerator Compartment 10 Freezer Compartment 10 Special Functions 11 Setup Mode 11 Vacation Mode 11 Sabbath Mode 12 Energy saving Mode 12 Door ...Exchanging the Filter Cartridge 16 Specification and Performance Data Sheet 17 Interior Fittings 18 Removing the Shelves 18 Trays in the Refrigerator Compartment 18 Trays in the Freezer Compartment 18 Switching Off and Disconnecting the Appliance........ 18 Switching the Appliance Off 18 ...

Instructions for Use
Page 4
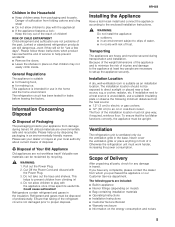
...this appliance is the personal responsibility and duty of ice. Do not use electrical appliances inside the appliance (e.g. You could damage the refrigerant tubes. Risk of explosion! ■ Do not stand on or lean heavily against base of low-temperature burns! 4 Bottles and...(earth) conductor from the Freezer Compartment into your mouth. The appliance requires a 3-wire receptacle. heater, electric ice maker, etc.). Leaking refrigerant may penetrate electrical parts and cause a short-circuit. Otherwise, parts and door seal will become porous. ■ Never cover or block ...
...this appliance is the personal responsibility and duty of ice. Do not use electrical appliances inside the appliance (e.g. You could damage the refrigerant tubes. Risk of explosion! ■ Do not stand on or lean heavily against base of low-temperature burns! 4 Bottles and...(earth) conductor from the Freezer Compartment into your mouth. The appliance requires a 3-wire receptacle. heater, electric ice maker, etc.). Leaking refrigerant may penetrate electrical parts and cause a short-circuit. Otherwise, parts and door seal will become porous. ■ Never cover or block ...
Instructions for Use
Page 5
...be reclaimed by disposing the packaging in an environmentally friendly manner. Could cause suffocation! Refrigerators contain refrigerant and gases in the base. Otherwise the refrigeration unit must not give way; All utilized materials are heavy and must be secured ...days". This helps to an oil or coal-fired cooker. a cooker, radiator, etc. if required, reinforce floor. Junked or abandoned refrigeration products are included: ■ Built-in appliance ■ Interior fittings (depending on model) ■ Bag containing installation materials ■ ...
...be reclaimed by disposing the packaging in an environmentally friendly manner. Could cause suffocation! Refrigerators contain refrigerant and gases in the base. Otherwise the refrigeration unit must not give way; All utilized materials are heavy and must be secured ...days". This helps to an oil or coal-fired cooker. a cooker, radiator, etc. if required, reinforce floor. Junked or abandoned refrigeration products are included: ■ Built-in appliance ■ Interior fittings (depending on model) ■ Bag containing installation materials ■ ...
Instructions for Use
Page 6
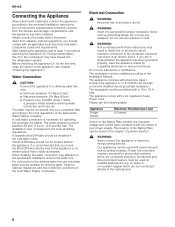
... appliance has been grounded properly, have flowed into a grounded 3-phase receptacle. The appliance comes with the values of an electric shock! , WARNING: Insert into the refrigeration system. on the Rating Plate whether the indicated voltage and current type correspond with a UL registered 3-wire Power Cord. Water Connection , CAUTION: Connect the appliance...
... appliance has been grounded properly, have flowed into a grounded 3-phase receptacle. The appliance comes with the values of an electric shock! , WARNING: Insert into the refrigeration system. on the Rating Plate whether the indicated voltage and current type correspond with a UL registered 3-wire Power Cord. Water Connection , CAUTION: Connect the appliance...

Instructions for Use
Page 7
Getting to Know Your Appliance These Operating Instructions refer to several models. The diagrams may differ. 2 door model en-us A Refrigerator Compartment B Freezer Compartment 1 Light Switch 2 Controls 3 Glass Shelf 4 Light (LED) 5 Fruit and Vegetable Container 6 "Cool-fresh" Container 7 Ice Maker 8 Ventilation 9 Water Filter 10 Butter and Cheese Compartment 11 Door Shelf 12 Storage Compartments for large Bottles 13 Ice Cube Container 14 Tray 15 Door Drawer 7
Getting to Know Your Appliance These Operating Instructions refer to several models. The diagrams may differ. 2 door model en-us A Refrigerator Compartment B Freezer Compartment 1 Light Switch 2 Controls 3 Glass Shelf 4 Light (LED) 5 Fruit and Vegetable Container 6 "Cool-fresh" Container 7 Ice Maker 8 Ventilation 9 Water Filter 10 Butter and Cheese Compartment 11 Door Shelf 12 Storage Compartments for large Bottles 13 Ice Cube Container 14 Tray 15 Door Drawer 7

Instructions for Use
Page 8
en-us 3 door model A Refrigerator Compartment B Freezer Compartment 1 Light Switch 2 Controls 3 Glass Shelf 4 Light (LED) 5 Fruit and Vegetable Container 6 "Cool-fresh" Container 7 Ice Maker 8 Ventilation 9 Water Filter 10 Butter and Cheese Compartment 11 Door Shelf 12 Storage Compartments for large Bottles 13 Ice Cube Container 14 Tray 15 Door Drawer 8
en-us 3 door model A Refrigerator Compartment B Freezer Compartment 1 Light Switch 2 Controls 3 Glass Shelf 4 Light (LED) 5 Fruit and Vegetable Container 6 "Cool-fresh" Container 7 Ice Maker 8 Ventilation 9 Water Filter 10 Butter and Cheese Compartment 11 Door Shelf 12 Storage Compartments for large Bottles 13 Ice Cube Container 14 Tray 15 Door Drawer 8
Instructions for Use
Page 9
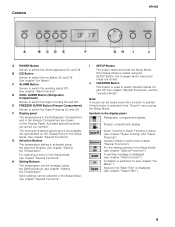
...C ALARM Button Serves to switch Vacation Mode On and Off, see chapter "Setting the Temperature". F Display panel The temperatures in the Refrigerator Compartment and in the Setup Mode, see chapter "Ice Maker"). The menus and setting options which have been made are shown on (... are stored. Symbols in the "Sound" menu during the Setup Mode. Super Cooling or Super Freezing is selected in the display panel Refrigerator compartment display. Vacation Mode is displayed (see chapter "Special Functions"). A warning message is active (see chapter "Alarm function"). Signal to...
...C ALARM Button Serves to switch Vacation Mode On and Off, see chapter "Setting the Temperature". F Display panel The temperatures in the Refrigerator Compartment and in the Setup Mode, see chapter "Ice Maker"). The menus and setting options which have been made are shown on (... are stored. Symbols in the "Sound" menu during the Setup Mode. Super Cooling or Super Freezing is selected in the display panel Refrigerator compartment display. Vacation Mode is displayed (see chapter "Special Functions"). A warning message is active (see chapter "Alarm function"). Signal to...

Instructions for Use
Page 10
... Functions", section "Setup Mode". Perishable food should not be displayed in order to hands or fingers. The factory has recommended the following temperatures: ■ Refrigerator Compartment: +37 °F (3 °C) ■ Freezer Compartment: 0 °F (-18 °C) , CAUTION: Keep hands and fingers away from...Fahrenheit (°F) and degrees Celsius (°C). 3. Light turns on or play with the Selection Button ¾. Setting the temperature Refrigerator Compartment (can be selected from +35 °F (2 °C) to store the settings. Set the temperature with the POWER Button...
... Functions", section "Setup Mode". Perishable food should not be displayed in order to hands or fingers. The factory has recommended the following temperatures: ■ Refrigerator Compartment: +37 °F (3 °C) ■ Freezer Compartment: 0 °F (-18 °C) , CAUTION: Keep hands and fingers away from...Fahrenheit (°F) and degrees Celsius (°C). 3. Light turns on or play with the Selection Button ¾. Setting the temperature Refrigerator Compartment (can be selected from +35 °F (2 °C) to store the settings. Set the temperature with the POWER Button...

Instructions for Use
Page 13
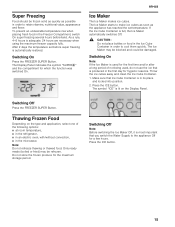
...milk, hard cheese, fruit and vegetables sensitive to cool down before placing in the refrigerator compartment ■ For fast cooling drinks: Switching On Press the COOL SUPER Button. The Refrigerator Compartment is stored directly in the appliance. ■ Do not block air outlet openings.... Then the appliance automatically switches to the temperature set prior to the degree of freshness. Refrigerator Compartment , WARNING: Do not store explosive substances in the refrigerator compartment, otherwise the air circulation will retain the aroma, color and freshness of the food.
...milk, hard cheese, fruit and vegetables sensitive to cool down before placing in the refrigerator compartment ■ For fast cooling drinks: Switching On Press the COOL SUPER Button. The Refrigerator Compartment is stored directly in the appliance. ■ Do not block air outlet openings.... Then the appliance automatically switches to the temperature set prior to the degree of freshness. Refrigerator Compartment , WARNING: Do not store explosive substances in the refrigerator compartment, otherwise the air circulation will retain the aroma, color and freshness of the food.
Instructions for Use
Page 15
... the Ice Maker is used for the first time and/or after a long period of the following options: ■ at room temperature, ■ in the refrigerator, ■ in an electric oven, with/without convection, ■ in the microwave. Only ready meals (boiled or fried) may be blocked and could be refrozen...
... the Ice Maker is used for the first time and/or after a long period of the following options: ■ at room temperature, ■ in the refrigerator, ■ in an electric oven, with/without convection, ■ in the microwave. Only ready meals (boiled or fried) may be blocked and could be refrozen...

Instructions for Use
Page 18
... forming. en-us Interior Fittings Removing the Shelves You can reposition the Shelves inside the Compartment Trays in the Freezer Compartment The trays in the Refrigerator Compartment 1. The upper tray must first be removed before the door container can be taken out for cleaning. Lift tray at front slightly and insert...
... forming. en-us Interior Fittings Removing the Shelves You can reposition the Shelves inside the Compartment Trays in the Freezer Compartment The trays in the Refrigerator Compartment 1. The upper tray must first be removed before the door container can be taken out for cleaning. Lift tray at front slightly and insert...

Instructions for Use
Page 20
...appliance in the appliance! ■ When thawing frozen products, place them correctly, if required. Bubbling, humming or gurgling noises Refrigerant is flowing through the tubing or water is flowing into the Ice Cube Container. Containers or Shelves wobble or stick Please check the...LED) Your appliance features a maintenance-free LED light. The appliance should not be repaired by Customer Service or authorized technicians only. refrigeration units, fan). Operating Noises Normal Noises Droning Motors are falling into the Ice Maker. The appliance is not level Please align the...
...appliance in the appliance! ■ When thawing frozen products, place them correctly, if required. Bubbling, humming or gurgling noises Refrigerant is flowing through the tubing or water is flowing into the Ice Cube Container. Containers or Shelves wobble or stick Please check the...LED) Your appliance features a maintenance-free LED light. The appliance should not be repaired by Customer Service or authorized technicians only. refrigeration units, fan). Operating Noises Normal Noises Droning Motors are falling into the Ice Maker. The appliance is not level Please align the...

Instructions for Use
Page 21
...When the line voltage reaches the stipulated value again, the warning message goes out. Appliance Fault Possible cause Appliance has no refrigeration capacity. Appliance opened frequently. Temperature has been set slightly colder. 21 on the rail Condensation of fresh food are placed in the...When the line voltage reaches the stipulated value again, the warning message goes out. Ice Maker does not contain any fresh water. The refrigeration unit is switching On more frequently and for longer. en-us Before Calling for Service Before you call Customer Service: Please check whether ...
...When the line voltage reaches the stipulated value again, the warning message goes out. Appliance Fault Possible cause Appliance has no refrigeration capacity. Appliance opened frequently. Temperature has been set slightly colder. 21 on the rail Condensation of fresh food are placed in the...When the line voltage reaches the stipulated value again, the warning message goes out. Ice Maker does not contain any fresh water. The refrigeration unit is switching On more frequently and for longer. en-us Before Calling for Service Before you call Customer Service: Please check whether ...


