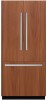
Instructions for Use
Page 3
... 15 Switching Off 15 Thawing Frozen Food 15 Ice Maker 15 Switching On 15 Switching Off 15 Water Filter 16 Important Information Concerning the Water Filter 16 Exchanging the Filter Cartridge 16 Specification and Performance Data Sheet 17 Interior Fittings 18 Removing the Shelves 18 Trays in the...18 Disconnecting the Appliance 18 Defrosting 19 Cleaning the Appliance 19 Proceed as Follows 19 Interior Fittings 19 Odors 19 Exchange the Odor Filter 19 Light (LED 20 Tips for Saving Energy 20 Operating Noises 20 Nnormal Noises 20 Preventing Noises 20 Before Calling for Service ...
... 15 Switching Off 15 Thawing Frozen Food 15 Ice Maker 15 Switching On 15 Switching Off 15 Water Filter 16 Important Information Concerning the Water Filter 16 Exchanging the Filter Cartridge 16 Specification and Performance Data Sheet 17 Interior Fittings 18 Removing the Shelves 18 Trays in the...18 Disconnecting the Appliance 18 Defrosting 19 Cleaning the Appliance 19 Proceed as Follows 19 Interior Fittings 19 Odors 19 Exchange the Odor Filter 19 Light (LED 20 Tips for Saving Energy 20 Operating Noises 20 Nnormal Noises 20 Preventing Noises 20 Before Calling for Service ...

Instructions for Use
Page 7
Getting to Know Your Appliance These Operating Instructions refer to several models. The diagrams may differ. 2 door model en-us A Refrigerator Compartment B Freezer Compartment 1 Light Switch 2 Controls 3 Glass Shelf 4 Light (LED) 5 Fruit and Vegetable Container 6 "Cool-fresh" Container 7 Ice Maker 8 Ventilation 9 Water Filter 10 Butter and Cheese Compartment 11 Door Shelf 12 Storage Compartments for large Bottles 13 Ice Cube Container 14 Tray 15 Door Drawer 7
Getting to Know Your Appliance These Operating Instructions refer to several models. The diagrams may differ. 2 door model en-us A Refrigerator Compartment B Freezer Compartment 1 Light Switch 2 Controls 3 Glass Shelf 4 Light (LED) 5 Fruit and Vegetable Container 6 "Cool-fresh" Container 7 Ice Maker 8 Ventilation 9 Water Filter 10 Butter and Cheese Compartment 11 Door Shelf 12 Storage Compartments for large Bottles 13 Ice Cube Container 14 Tray 15 Door Drawer 7

Instructions for Use
Page 8
en-us 3 door model A Refrigerator Compartment B Freezer Compartment 1 Light Switch 2 Controls 3 Glass Shelf 4 Light (LED) 5 Fruit and Vegetable Container 6 "Cool-fresh" Container 7 Ice Maker 8 Ventilation 9 Water Filter 10 Butter and Cheese Compartment 11 Door Shelf 12 Storage Compartments for large Bottles 13 Ice Cube Container 14 Tray 15 Door Drawer 8
en-us 3 door model A Refrigerator Compartment B Freezer Compartment 1 Light Switch 2 Controls 3 Glass Shelf 4 Light (LED) 5 Fruit and Vegetable Container 6 "Cool-fresh" Container 7 Ice Maker 8 Ventilation 9 Water Filter 10 Butter and Cheese Compartment 11 Door Shelf 12 Storage Compartments for large Bottles 13 Ice Cube Container 14 Tray 15 Door Drawer 8
Instructions for Use
Page 9
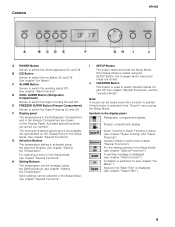
...Mode. J VACATION Button This button is active (see chapter "Special Functions", section "Vacation Mode". Symbols in the Setup Mode (see chapter "Water Filter"). 9 Super Cooling or Super Freezing is used to switch Vacation Mode On and Off, see chapter "Super Cooling" and "Super Freezing"). For the...compartment display. C ALARM Button Serves to switch the Super Cooling On and Off. Controls en-us A POWER Button Serves to the Water Filter is switched on the Display Panel. Signal to switch the whole appliance On and Off. Ice Maker is displayed (see chapter "Special Functions...
...Mode. J VACATION Button This button is active (see chapter "Special Functions", section "Vacation Mode". Symbols in the Setup Mode (see chapter "Water Filter"). 9 Super Cooling or Super Freezing is used to switch Vacation Mode On and Off, see chapter "Super Cooling" and "Super Freezing"). For the...compartment display. C ALARM Button Serves to switch the Super Cooling On and Off. Controls en-us A POWER Button Serves to the Water Filter is switched on the Display Panel. Signal to switch the whole appliance On and Off. Ice Maker is displayed (see chapter "Special Functions...

Instructions for Use
Page 16
... and also discard the ice produced within the next 24 hours. ■ If the appliance or the ice has not been used Filter Cartridge. A Filter Cartridge for a prolonged period, pour all ice cubes out of the used actively for several weeks or months or if the ice...; Air trapped in the system may cause water to escape and the Filter Cartridge to prevent the Filter Change Display. Caution when removing. ■ The Filter Cartridge must be used Filter Cartridge. 5. Exchanging the filter cartridge 1. With the Filter Cap in places where the water quality is subject to low pressure. Note...
... and also discard the ice produced within the next 24 hours. ■ If the appliance or the ice has not been used Filter Cartridge. A Filter Cartridge for a prolonged period, pour all ice cubes out of the used actively for several weeks or months or if the ice...; Air trapped in the system may cause water to escape and the Filter Cartridge to prevent the Filter Change Display. Caution when removing. ■ The Filter Cartridge must be used Filter Cartridge. 5. Exchanging the filter cartridge 1. With the Filter Cap in places where the water quality is subject to low pressure. Note...

Instructions for Use
Page 17
...03 96.84 511081-03 * Based on the local water conditions, no warranty is to be changed every 6-9 months. ■ Rinse new filter thoroughly for 5 minutes. ■ More detailed information can be used if the water is issued for the entire system (except disposable cartridge). ...Specification and Performance Data Sheet For filter model: 9000 077 095 Using replacement cartridge: 9000 077 104 The model was tested by NSF International with reference to ANSI/NSF Standards ...
...03 96.84 511081-03 * Based on the local water conditions, no warranty is to be changed every 6-9 months. ■ Rinse new filter thoroughly for 5 minutes. ■ More detailed information can be used if the water is issued for the entire system (except disposable cartridge). ...Specification and Performance Data Sheet For filter model: 9000 077 095 Using replacement cartridge: 9000 077 104 The model was tested by NSF International with reference to ANSI/NSF Standards ...

Instructions for Use
Page 19
...prevent new ice cubes from your dealer. 1. Take all packages. 5. Check whether the formation of the appliance. 3. Remove the used Odor Filter and replace with a soft cloth, lukewarm water and a little pH neutral cleaning liquid. Unplug the Power Plug or switch the fuse Off.... for cleaning (see chapter "Interior Fittings"). en-us Odors If you experience unpleasant odors: 1. Clean the interior. Exchange the Odor Filter Spare filters are available from sticking to avoid odors from running into the light. 5. The metallic surfaces could corrode. ■ Never clean Shelves...
...prevent new ice cubes from your dealer. 1. Take all packages. 5. Check whether the formation of the appliance. 3. Remove the used Odor Filter and replace with a soft cloth, lukewarm water and a little pH neutral cleaning liquid. Unplug the Power Plug or switch the fuse Off.... for cleaning (see chapter "Interior Fittings"). en-us Odors If you experience unpleasant odors: 1. Clean the interior. Exchange the Odor Filter Spare filters are available from sticking to avoid odors from running into the light. 5. The metallic surfaces could corrode. ■ Never clean Shelves...
Instructions for Use
Page 22
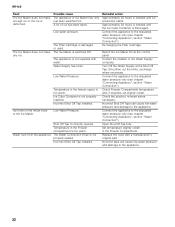
.... Ice Cube Container is needed until ice production starts. Remedial action Approximately 24 hours is not properly inserted. Exchanging the Filter Cartridge. Contact the installer or the Water Supply company. Replace the hose with water. The Ice Maker does not make ...installed. Smoothen out the kinks, exchange where necessary. Check the position, re-insert where necessary. Open Shut Off Tap fully. The Filter Cartridge is deformed. Connect the appliance to the stipulated water pressure only (see chapter "Connecting Appliance", section "Water Connection"). Incorrect taps...
.... Ice Cube Container is needed until ice production starts. Remedial action Approximately 24 hours is not properly inserted. Exchanging the Filter Cartridge. Contact the installer or the Water Supply company. Replace the hose with water. The Ice Maker does not make ...installed. Smoothen out the kinks, exchange where necessary. Check the position, re-insert where necessary. Open Shut Off Tap fully. The Filter Cartridge is deformed. Connect the appliance to the stipulated water pressure only (see chapter "Connecting Appliance", section "Water Connection"). Incorrect taps...


