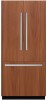
Instructions for Use
Page 3
... On 15 Switching Off 15 Thawing Frozen Food 15 Ice Maker 15 Switching On 15 Switching Off 15 Water Filter 16 Important Information Concerning the Water Filter 16 Exchanging the Filter Cartridge 16 Specification and Performance Data Sheet 17 Interior Fittings 18 Removing the Shelves 18 Trays in the ... Disconnecting the Appliance 18 Defrosting 19 Cleaning the Appliance 19 Proceed as Follows 19 Interior Fittings 19 Odors 19 Exchange the Odor Filter 19 Light (LED 20 Tips for Saving Energy 20 Operating Noises 20 Nnormal Noises 20 Preventing Noises 20 Before Calling for Service...
... On 15 Switching Off 15 Thawing Frozen Food 15 Ice Maker 15 Switching On 15 Switching Off 15 Water Filter 16 Important Information Concerning the Water Filter 16 Exchanging the Filter Cartridge 16 Specification and Performance Data Sheet 17 Interior Fittings 18 Removing the Shelves 18 Trays in the ... Disconnecting the Appliance 18 Defrosting 19 Cleaning the Appliance 19 Proceed as Follows 19 Interior Fittings 19 Odors 19 Exchange the Odor Filter 19 Light (LED 20 Tips for Saving Energy 20 Operating Noises 20 Nnormal Noises 20 Preventing Noises 20 Before Calling for Service...

Instructions for Use
Page 7
Getting to Know Your Appliance These Operating Instructions refer to several models. The diagrams may differ. 2 door model en-us A Refrigerator Compartment B Freezer Compartment 1 Light Switch 2 Controls 3 Glass Shelf 4 Light (LED) 5 Fruit and Vegetable Container 6 "Cool-fresh" Container 7 Ice Maker 8 Ventilation 9 Water Filter 10 Butter and Cheese Compartment 11 Door Shelf 12 Storage Compartments for large Bottles 13 Ice Cube Container 14 Tray 15 Door Drawer 7
Getting to Know Your Appliance These Operating Instructions refer to several models. The diagrams may differ. 2 door model en-us A Refrigerator Compartment B Freezer Compartment 1 Light Switch 2 Controls 3 Glass Shelf 4 Light (LED) 5 Fruit and Vegetable Container 6 "Cool-fresh" Container 7 Ice Maker 8 Ventilation 9 Water Filter 10 Butter and Cheese Compartment 11 Door Shelf 12 Storage Compartments for large Bottles 13 Ice Cube Container 14 Tray 15 Door Drawer 7

Instructions for Use
Page 8
en-us 3 door model A Refrigerator Compartment B Freezer Compartment 1 Light Switch 2 Controls 3 Glass Shelf 4 Light (LED) 5 Fruit and Vegetable Container 6 "Cool-fresh" Container 7 Ice Maker 8 Ventilation 9 Water Filter 10 Butter and Cheese Compartment 11 Door Shelf 12 Storage Compartments for large Bottles 13 Ice Cube Container 14 Tray 15 Door Drawer 8
en-us 3 door model A Refrigerator Compartment B Freezer Compartment 1 Light Switch 2 Controls 3 Glass Shelf 4 Light (LED) 5 Fruit and Vegetable Container 6 "Cool-fresh" Container 7 Ice Maker 8 Ventilation 9 Water Filter 10 Butter and Cheese Compartment 11 Door Shelf 12 Storage Compartments for large Bottles 13 Ice Cube Container 14 Tray 15 Door Drawer 8
Instructions for Use
Page 9
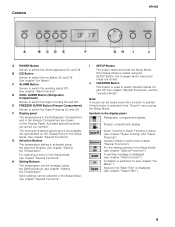
...Selection Buttons, see chapter "Special Functions"). See chapter "Special Functions". Ice Maker is activated using the Setting Buttons, see chapter "Water Filter"). 9 F Display panel The temperatures in the Refrigerator Compartment and in the Setup Mode (see chapter "Setting the Temperature". G ...Selection Buttons The temperature setting is switched on the Display Panel. Signal to the Water Filter is used to switch the warning signal Off. J VACATION Button This button is displayed (see chapter "Setting the Temperature". ...
...Selection Buttons, see chapter "Special Functions"). See chapter "Special Functions". Ice Maker is activated using the Setting Buttons, see chapter "Water Filter"). 9 F Display panel The temperatures in the Refrigerator Compartment and in the Setup Mode (see chapter "Setting the Temperature". G ...Selection Buttons The temperature setting is switched on the Display Panel. Signal to the Water Filter is used to switch the warning signal Off. J VACATION Button This button is displayed (see chapter "Setting the Temperature". ...

Instructions for Use
Page 16
... packet and remove the protective cap. 4. en-us Water Filter , WARNING: Do not use , the water system is risky or not sufficiently known about without a Water Filter. Pour water out of the used Filter Cartridge. Caution when removing. ■ The Filter Cartridge must be ejected. Important Information Concerning the Water Filter ■ After use the appliance in places where the...
... packet and remove the protective cap. 4. en-us Water Filter , WARNING: Do not use , the water system is risky or not sufficiently known about without a Water Filter. Pour water out of the used Filter Cartridge. Caution when removing. ■ The Filter Cartridge must be ejected. Important Information Concerning the Water Filter ■ After use the appliance in places where the...

Instructions for Use
Page 17
...and operated according to the guidelines recommended by the manufacturer. ■ The filter is to a value below . A system certified for cyst reduction should NOT be used for disinfected water which are dissolved in water and penetrate the system was reduced to be changed every 6-9 months. ■...Using replacement cartridge: 9000 077 104 The model was tested by NSF International with NSF/ANSI 42 and 53 for water discharged out of the indicated substances which possibly contains filterable cysts. waste water 1 0.49 69.000 2.0 mg/l + - 10% 0.05 97.3 > 50% 0.06 Min. With ...
...and operated according to the guidelines recommended by the manufacturer. ■ The filter is to a value below . A system certified for cyst reduction should NOT be used for disinfected water which are dissolved in water and penetrate the system was reduced to be changed every 6-9 months. ■...Using replacement cartridge: 9000 077 104 The model was tested by NSF International with NSF/ANSI 42 and 53 for water discharged out of the indicated substances which possibly contains filterable cysts. waste water 1 0.49 69.000 2.0 mg/l + - 10% 0.05 97.3 > 50% 0.06 Min. With ...

Instructions for Use
Page 19
...2. Ice cube production continues. Take all packages. 5. Check whether the formation of the appliance. 3. Exchange the odor filter. Remove the used Odor Filter and replace with clear water only and then wipe dry thoroughly. 6. The parts may become deformed! Unplug the Power Plug or switch the fuse ...Off. 3. Prevent the rinsing water from sticking to avoid odors from your dealer. 1. Wipe the Door Seal with a new Odor Filter. 3. After cleaning, reconnect and switch the appliance back On. 7. Cleaning the Ice Cube Container...
...2. Ice cube production continues. Take all packages. 5. Check whether the formation of the appliance. 3. Exchange the odor filter. Remove the used Odor Filter and replace with clear water only and then wipe dry thoroughly. 6. The parts may become deformed! Unplug the Power Plug or switch the fuse ...Off. 3. Prevent the rinsing water from sticking to avoid odors from your dealer. 1. Wipe the Door Seal with a new Odor Filter. 3. After cleaning, reconnect and switch the appliance back On. 7. Cleaning the Ice Cube Container...
Instructions for Use
Page 22
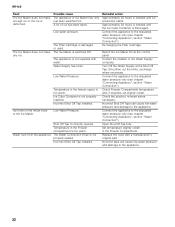
...-us Fault The Ice Maker does not make any ice. Low Water Pressure. Low Water Pressure. Incorrect Shut Off Tap installed. Exchanging the Filter Cartridge. Contact the installer or the Water Supply company. Turn Off the Water Supply at the control panel. Check Freezer Compartment temperature and, if required, set slightly colder. Check the position...
...-us Fault The Ice Maker does not make any ice. Low Water Pressure. Low Water Pressure. Incorrect Shut Off Tap installed. Exchanging the Filter Cartridge. Contact the installer or the Water Supply company. Turn Off the Water Supply at the control panel. Check Freezer Compartment temperature and, if required, set slightly colder. Check the position...


