
Installation Instructions
Page 4
...Furniture 7 Floor 7 Aligning the appliance 7 Connecting the power 8 Grounding instruction 8 Additional grounding procedure 8 Connecting the water 8 Installation dimensions 9 Required accessories and tools 10 Supplied accessories 10 Optional accessories 10 Other required accessories 10 Other 10 Tools 10 Installation instructions 11 ...14 3. Aligning the appliance in the installation enclosure 16 3. Aligning the base panel 18 3. Attaching the adjusting rail to the door panel (refrigerator compartment 20 9. Adjusting the door spring 26 Special installation 27 Preparing to...
...Furniture 7 Floor 7 Aligning the appliance 7 Connecting the power 8 Grounding instruction 8 Additional grounding procedure 8 Connecting the water 8 Installation dimensions 9 Required accessories and tools 10 Supplied accessories 10 Optional accessories 10 Other required accessories 10 Other 10 Tools 10 Installation instructions 11 ...14 3. Aligning the appliance in the installation enclosure 16 3. Aligning the base panel 18 3. Attaching the adjusting rail to the door panel (refrigerator compartment 20 9. Adjusting the door spring 26 Special installation 27 Preparing to...
Installation Instructions
Page 6
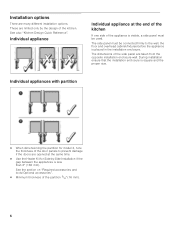
... than 6" (160 mm). See also "Kitchen Design Quick Reference". The dimensions of the kitchen. Individual appliances with partition When dimensioning the partition for Side-by the design of the side panel are many different installation options. See the section on "Required accessories and... tools/Optional accessories". Minimum thickness of the door panels to the wall, the floor...
... than 6" (160 mm). See also "Kitchen Design Quick Reference". The dimensions of the kitchen. Individual appliances with partition When dimensioning the partition for Side-by the design of the side panel are many different installation options. See the section on "Required accessories and... tools/Optional accessories". Minimum thickness of the door panels to the wall, the floor...

Installation Instructions
Page 7
.... Squareness can be irregular or the doors may provide additional stability. Floor , WARNING: A fully-loaded appliance is strongly recommended the top panel of the installation enclosure, this may not close properly. 7 The floor in a stable position is no step up or down). Installation enclosure...is essential that the appliance functions correctly, it is square. If in rooms which are connected securely to observe the specified dimensions of the installation enclosure for this reason it must be checked by suitable means. On account of the heavy weight of...
.... Squareness can be irregular or the doors may provide additional stability. Floor , WARNING: A fully-loaded appliance is strongly recommended the top panel of the installation enclosure, this may not close properly. 7 The floor in a stable position is no step up or down). Installation enclosure...is essential that the appliance functions correctly, it is square. If in rooms which are connected securely to observe the specified dimensions of the installation enclosure for this reason it must be checked by suitable means. On account of the heavy weight of...
Installation Instructions
Page 9
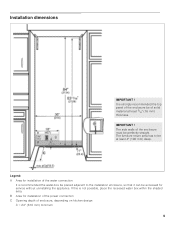
It is not possible, place the recessed water box within the shaded area. IMPORTANT ! If this is strongly recommended the top panel of the enclosure be accessed for installation of the power connection C Opening depth of the water connection It is recommended the water-box be placed ... 9 The furniture return area has to the installation enclosure, so that it can be of the enclosure must be at least 5/8" (16 mm) thickness. Installation dimensions IMPORTANT ! The side walls of solid material at least 4" (100 mm) deep.
It is not possible, place the recessed water box within the shaded area. IMPORTANT ! If this is strongly recommended the top panel of the enclosure be accessed for installation of the power connection C Opening depth of the water connection It is recommended the water-box be placed ... 9 The furniture return area has to the installation enclosure, so that it can be of the enclosure must be at least 5/8" (16 mm) thickness. Installation dimensions IMPORTANT ! The side walls of solid material at least 4" (100 mm) deep.
Installation Instructions
Page 16
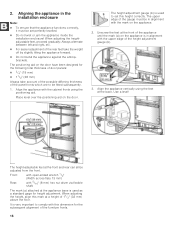
...the mark on the appliance. 2. The positioning aid on the door. Unscrew the feet at the appliance base is in alignment with this dimension for height adjustment. The upper edge of the furniture fronts. 16 Align the appliance vertically using the positioning aid. When adjusting the heightadjustable... feet, proceed gradually: Always alternate between left and right, etc. For easier adjustment of the panel fronts which are to be in alignment with the cabinet fronts using the feet at the front and rear can all be set this...
...the mark on the appliance. 2. The positioning aid on the door. Unscrew the feet at the appliance base is in alignment with this dimension for height adjustment. The upper edge of the furniture fronts. 16 Align the appliance vertically using the positioning aid. When adjusting the heightadjustable... feet, proceed gradually: Always alternate between left and right, etc. For easier adjustment of the panel fronts which are to be in alignment with the cabinet fronts using the feet at the front and rear can all be set this...

Installation Instructions
Page 18
... wooden panel to the dimensions A and tighten. 3. Screw wooden panel to the base panel from the adhesive pads. 2. Adjust the brackets (a) to the required length. 2. Stainless steel panel (accessory) 1. Fit the toe kick panel to the appliance (do not screw on ). 2. There are already screw holes in the base panel. Attach the base panel to the base panel and...
... wooden panel to the dimensions A and tighten. 3. Screw wooden panel to the base panel from the adhesive pads. 2. Adjust the brackets (a) to the required length. 2. Stainless steel panel (accessory) 1. Fit the toe kick panel to the appliance (do not screw on ). 2. There are already screw holes in the base panel. Attach the base panel to the base panel and...

Installation Instructions
Page 20
...the many different design options of the door panel. 8. Attaching the fixation strips to the door panel with the next installation step ("C / 9. Hang the door panel on the adjusting rail tightly. 3. Align the door panel with the double threaded bolts (Torx screwdriver).... 7. Attaching the adjusting rail to the door panel (freezer compartment)"). 1. Always screw into the best load-bearing material of door panels. Re-examine the dimensions of the door panel. 4....
...the many different design options of the door panel. 8. Attaching the fixation strips to the door panel with the next installation step ("C / 9. Hang the door panel on the adjusting rail tightly. 3. Align the door panel with the double threaded bolts (Torx screwdriver).... 7. Attaching the adjusting rail to the door panel (freezer compartment)"). 1. Always screw into the best load-bearing material of door panels. Re-examine the dimensions of the door panel. 4....

Installation Instructions
Page 22
... strips. 3. Re-examine the dimensions of the door panel parallel. 6. Apply the fixation strip and mark out the holes. 8. Remove the door panel. 22 Using the positioning aid, mark the vertical sides of the gap continuously. Pre-drill the holes. 9. Align the door panel with at least 10 screws. ...Using a square, extend the drill hole marks which you have just made to the door panel and mark. 4. Attaching the fixation strips to the door panel (freezer compartment) Note: The fixation strips are pre-assembled for the many different design options of holes for...
... strips. 3. Re-examine the dimensions of the door panel parallel. 6. Apply the fixation strip and mark out the holes. 8. Remove the door panel. 22 Using the positioning aid, mark the vertical sides of the gap continuously. Pre-drill the holes. 9. Align the door panel with at least 10 screws. ...Using a square, extend the drill hole marks which you have just made to the door panel and mark. 4. Attaching the fixation strips to the door panel (freezer compartment) Note: The fixation strips are pre-assembled for the many different design options of holes for...

Installation Instructions
Page 23
... appliance door. To do this, loosen the bracket screws (b) only. 4. Adjust the door panel using the double threaded bolts (Torx screwdriver). Hang the door panel with adjusting rail over the bracket screws (2.). 2. Re-examine the dimensions of the open door panel with the adjacent fronts. Tighten the bracket screws to fix the depth alignment. 9.
... appliance door. To do this, loosen the bracket screws (b) only. 4. Adjust the door panel using the double threaded bolts (Torx screwdriver). Hang the door panel with adjusting rail over the bracket screws (2.). 2. Re-examine the dimensions of the open door panel with the adjacent fronts. Tighten the bracket screws to fix the depth alignment. 9.

Installation Instructions
Page 24
...-examine the dimensions of the door. 3. If required, correct. 8. Close the door and check the side alignment. Attaching the door panel (freezer compartment) Note: Now attach the furniture handles which are screwed from the drawer. Close the door and check that the depth of the open door panel with the .... 9. Screw nuts onto the double threaded bolts and tighten. Correct by gently tapping the edge of the door panel is aligned with your hand. 24 Hang the door panel with adjusting rail over the fastening screws (2.). 12. Lower furniture door and push the fixing brackets down over the...
...-examine the dimensions of the door. 3. If required, correct. 8. Close the door and check the side alignment. Attaching the door panel (freezer compartment) Note: Now attach the furniture handles which are screwed from the drawer. Close the door and check that the depth of the open door panel with the .... 9. Screw nuts onto the double threaded bolts and tighten. Correct by gently tapping the edge of the door panel is aligned with your hand. 24 Hang the door panel with adjusting rail over the fastening screws (2.). 12. Lower furniture door and push the fixing brackets down over the...


