
Installation Instructions
Page 5
... Proper installation is the responsibility of not observing this appliance, and to reduce the risk of tipping forward. See the Owner's Manual for use . Observe all governing codes and ordinances. General These installation instructions are top-heavy and must be made by licensed ... required. Repairs should be properly grounded. Product failure due to the product - Note to something in accordance with your Owner's Manual for local inspector's use by qualified installers. latest edition/Provincial and Municipal codes and/or local codes. Anti-tip protection is...
... Proper installation is the responsibility of not observing this appliance, and to reduce the risk of tipping forward. See the Owner's Manual for use . Observe all governing codes and ordinances. General These installation instructions are top-heavy and must be made by licensed ... required. Repairs should be properly grounded. Product failure due to the product - Note to something in accordance with your Owner's Manual for local inspector's use by qualified installers. latest edition/Provincial and Municipal codes and/or local codes. Anti-tip protection is...
Installation Instructions
Page 13
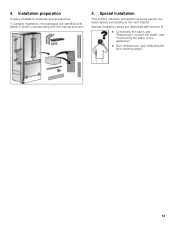
Installation preparation Unpack installation materials and accessories. Special installation This symbol indicates that additional steps need to be taken before proceeding to the appliance". Door limitation pin, see "Preparing to connect the water" and "Connecting the water to the next chapter. Special installation steps are identified with labels A and B corresponding with the manual sections. 5. To simplify installation, the packages are described after section B. Connecting the water, see "Adjusting the door opening angle". 13 4.
Installation preparation Unpack installation materials and accessories. Special installation This symbol indicates that additional steps need to be taken before proceeding to the appliance". Door limitation pin, see "Preparing to connect the water" and "Connecting the water to the next chapter. Special installation steps are identified with labels A and B corresponding with the manual sections. 5. To simplify installation, the packages are described after section B. Connecting the water, see "Adjusting the door opening angle". 13 4.


