Instructions for Use
Page 3
... Setting the temperature 12 Temperature unit 13 Super Cool 13 Super Freeze 13 Eco Mode 14 Auto Mode 14 Child Lock 14 en-us Refrigerator compartment 14 Fresh food compartment 15 Freezer compartment 15 Freezing food 15 Freezing fresh food 16 Thawing frozen food 16 Ice maker 16 Interior Fittings 18 Switching off and disconnecting the appliance . 19 Defrosting 19 Cleaning 20 LED light 20 Energy saving tips 20 Operating noises...
... Setting the temperature 12 Temperature unit 13 Super Cool 13 Super Freeze 13 Eco Mode 14 Auto Mode 14 Child Lock 14 en-us Refrigerator compartment 14 Fresh food compartment 15 Freezer compartment 15 Freezing food 15 Freezing fresh food 16 Thawing frozen food 16 Ice maker 16 Interior Fittings 18 Switching off and disconnecting the appliance . 19 Defrosting 19 Cleaning 20 LED light 20 Energy saving tips 20 Operating noises...
Instructions for Use
Page 4
... and instructions for installation, use original parts supplied by tugging the cable. spray cans) or explosive substances in the freezer compartment. n Do not place popsicles or ice cubes straight from the power cord. Only use and maintenance of the customer to appliance or property may adhere to defrost or clean the appliance. Where there is a 2-wire standard wall receptacle, it must be replaced by...
... and instructions for installation, use original parts supplied by tugging the cable. spray cans) or explosive substances in the freezer compartment. n Do not place popsicles or ice cubes straight from the power cord. Only use and maintenance of the customer to appliance or property may adhere to defrost or clean the appliance. Where there is a 2-wire standard wall receptacle, it must be replaced by...
Instructions for Use
Page 5
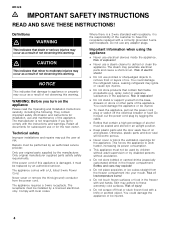
...instructions when product has reached the end of Carlifornia to play with the power plug. 3. General requirements The appliance is intended for n refrigerating food n freezing food n making ice. State of California Proposition 65 Warnings WARNING This product contains chemicals known to the State of service...that children may not easily climb inside . n Leave the shelves in an environmentally friendly manner. Please help prevent accidents: n Remove the doors. x Disposal of the old refrigerator: Remove the doors and the freezer compartment drawer. Before disposing of your old ...
...instructions when product has reached the end of Carlifornia to play with the power plug. 3. General requirements The appliance is intended for n refrigerating food n freezing food n making ice. State of California Proposition 65 Warnings WARNING This product contains chemicals known to the State of service...that children may not easily climb inside . n Leave the shelves in an environmentally friendly manner. Please help prevent accidents: n Remove the doors. x Disposal of the old refrigerator: Remove the doors and the freezer compartment drawer. Before disposing of your old ...
Instructions for Use
Page 6
... unavoidable, use the castors for transporting the appliance. To ensure that the Ice Maker functions correctly, the appliance must work harder, increasing the power consumption. 6 The castors are included: n Free-standing appliance n Interior fittings (depending on model) n Bag containing installation materials n Operating instructions n Installation instructions n Customer service booklet n Warranty enclosure n Registration card n Information on the energy consumption and noises Installing the appliance Have an authorized technician install and connect the appliance...
... unavoidable, use the castors for transporting the appliance. To ensure that the Ice Maker functions correctly, the appliance must work harder, increasing the power consumption. 6 The castors are included: n Free-standing appliance n Interior fittings (depending on model) n Bag containing installation materials n Operating instructions n Installation instructions n Customer service booklet n Warranty enclosure n Registration card n Information on the energy consumption and noises Installing the appliance Have an authorized technician install and connect the appliance...
Instructions for Use
Page 7
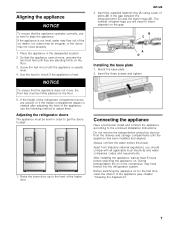
.... Use the level to the enclosed Installation Instructions. Raise the lower door up to align the appliance. Always connect the water before switching the appliance on. So that the appliance cannot move , the front feet must be level in order to get the doors to align. 1. If the height of the refrigerator compartment doors are standing firmly on for the first time, clean the interior of the ice maker, ice...
.... Use the level to the enclosed Installation Instructions. Raise the lower door up to align the appliance. Always connect the water before switching the appliance on. So that the appliance cannot move , the front feet must be level in order to get the doors to align. 1. If the height of the refrigerator compartment doors are standing firmly on for the first time, clean the interior of the ice maker, ice...
Instructions for Use
Page 8
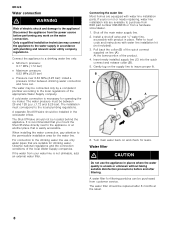
... local code and instructions with water line installation parts. Gently tug on and check for filtering particles can be located behind the appliance. Disconnect the appliance from your water line is easily accessible. Only a qualified installation technician may be between drinking water connection and hose set. A separate Shut-Off-Valve should be replaced after filtering. Install a shut-off the main water supply line. 2. The Shut-Off-Valve should be installed in place. It is not or needs replacing, water line installation kits...
... local code and instructions with water line installation parts. Gently tug on and check for filtering particles can be located behind the appliance. Disconnect the appliance from your water line is easily accessible. Only a qualified installation technician may be between drinking water connection and hose set. A separate Shut-Off-Valve should be replaced after filtering. Install a shut-off the main water supply line. 2. The Shut-Off-Valve should be installed in place. It is not or needs replacing, water line installation kits...

Instructions for Use
Page 9
... ground). 9 Refrigeration door handle The assembly steps of your power supply. Never remove grounding conductor. Take the cold storage door handle out of the cold storage door handle. Use the small hexagon wrench supplied in the figure (Note: i.e. If necessary, have the appliance tested by a qualified electrician. Sine-controlled inverters must be used for photovoltaic systems which are connected directly to code by a qualified electrician. en-us Installing the handles Storage door handle 1. The...
... ground). 9 Refrigeration door handle The assembly steps of your power supply. Never remove grounding conductor. Take the cold storage door handle out of the cold storage door handle. Use the small hexagon wrench supplied in the figure (Note: i.e. If necessary, have the appliance tested by a qualified electrician. Sine-controlled inverters must be used for photovoltaic systems which are connected directly to code by a qualified electrician. en-us Installing the handles Storage door handle 1. The...
Instructions for Use
Page 10
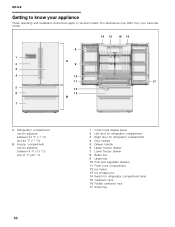
... These operating and installation instructions apply to know your particular model. 14 15 16 14 8 1 A 2 9 3 4 10 11 17 5 12 6 13 B 7 A Refrigerator compartment can be adjusted between 34 °F (+1 °C) and 44 °F (+7 °C) B Freezer compartment can be adjusted between 9 °F (-13 °C) and -8 °F (-22 °C) 1 Control and display panel 2 Left door for refrigerator compartment 3 Right door for refrigerator compartment 4 Door handle 5 Drawer handle 6 Upper freezer drawer 7 Lower freezer drawer 8 Butter box 9 Large tray 10...
... These operating and installation instructions apply to know your particular model. 14 15 16 14 8 1 A 2 9 3 4 10 11 17 5 12 6 13 B 7 A Refrigerator compartment can be adjusted between 34 °F (+1 °C) and 44 °F (+7 °C) B Freezer compartment can be adjusted between 9 °F (-13 °C) and -8 °F (-22 °C) 1 Control and display panel 2 Left door for refrigerator compartment 3 Right door for refrigerator compartment 4 Door handle 5 Drawer handle 6 Upper freezer drawer 7 Lower freezer drawer 8 Butter box 9 Large tray 10...
Instructions for Use
Page 11
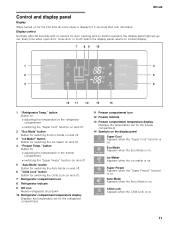
... Control and display panel Display When turned on for the first time all icons show in the refrigerator compartment n switching the "Super Cool" function on and off. 2 "Eco Mode" button Button for switching the Eco Mode on and off. 3 "Ice Maker" button Button for switching the ice maker on and off . 7 Refrigerator compartment icon 8 Refrigerator indicate 9 Off icon Means refrigerator shut down 10 Refrigerator compartment temperature display Displays the temperature set for the refrigerator compartment. 11 Freezer compartment icon 12 Freezer indicate 13 Freezer compartment temperature display...
... Control and display panel Display When turned on for the first time all icons show in the refrigerator compartment n switching the "Super Cool" function on and off. 2 "Eco Mode" button Button for switching the Eco Mode on and off. 3 "Ice Maker" button Button for switching the ice maker on and off . 7 Refrigerator compartment icon 8 Refrigerator indicate 9 Off icon Means refrigerator shut down 10 Refrigerator compartment temperature display Displays the temperature set for the refrigerator compartment. 11 Freezer compartment icon 12 Freezer indicate 13 Freezer compartment temperature display...
Instructions for Use
Page 12
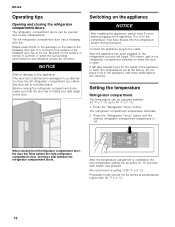
.... Switching on the surface is set at least 6 hours before plugging in , the refrigeration process will be active for the inside of damage to 44 °F (+7 °C). 1. button until these temperatures are reached. We recommend a setting of the foldaway door bar to the door. Connect the appliance plug to reach the temperatures set . Setting the temperature Refrigerator compartment The temperature can be opened and closed independently. en-us Operating tips Opening...
.... Switching on the surface is set at least 6 hours before plugging in , the refrigeration process will be active for the inside of damage to 44 °F (+7 °C). 1. button until these temperatures are reached. We recommend a setting of the foldaway door bar to the door. Connect the appliance plug to reach the temperatures set . Setting the temperature Refrigerator compartment The temperature can be opened and closed independently. en-us Operating tips Opening...
Instructions for Use
Page 13
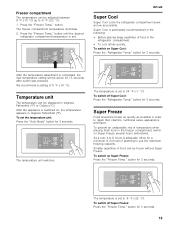
... for 3 seconds. The temperature unit switches. To switch off Super Cool: Press the "Refrigerator Temp." Freezer compartment The temperature can be adjusted between 9 °F (-13 °C) up to 6 hours is adequate. Press the "Freezer Temp." button. Press the "Freezer Temp." To switch on Super Freeze: Press the "Freezer Temp." button for 3 seconds. 13 Temperature unit The temperature can be displayed in the refrigerator compartment. The temperature is set to use the maximum freezing capacity. Smaller quantities of...
... for 3 seconds. The temperature unit switches. To switch off Super Cool: Press the "Refrigerator Temp." Freezer compartment The temperature can be adjusted between 9 °F (-13 °C) up to 6 hours is adequate. Press the "Freezer Temp." button. Press the "Freezer Temp." To switch on Super Freeze: Press the "Freezer Temp." button for 3 seconds. 13 Temperature unit The temperature can be displayed in the refrigerator compartment. The temperature is set to use the maximum freezing capacity. Smaller quantities of...
Instructions for Use
Page 14
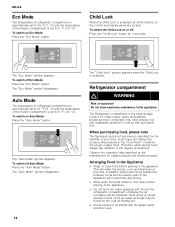
...;C). The Refrigerator compartment is the ideal storage location for the shelf-life of the buttons on or off: Press the "Child Lock" button for ready products and bottled products. n Do not block air outlet openings with the plastic parts and door seal. To switch the Child Lock on the control and display panel are locked. Do not store explosive substances in the "Cool-Fresh...
...;C). The Refrigerator compartment is the ideal storage location for the shelf-life of the buttons on or off: Press the "Child Lock" button for ready products and bottled products. n Do not block air outlet openings with the plastic parts and door seal. To switch the Child Lock on the control and display panel are locked. Do not store explosive substances in the "Cool-Fresh...
Instructions for Use
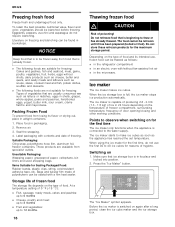
Page 16
... of door opening/closing and other working conditions. The food cannot be blanched before freezing. The ice maker starts to observe when switching on freezing and blanching can be frozen away from specialist outlets. Press the "Ice Maker" button. Literature on for the first time, do not require blanching. When the ice storage box is full, the ice maker stops ice production automatically. When using the ice maker for...
... of door opening/closing and other working conditions. The food cannot be blanched before freezing. The ice maker starts to observe when switching on freezing and blanching can be frozen away from specialist outlets. Press the "Ice Maker" button. Literature on for the first time, do not require blanching. When the ice storage box is full, the ice maker stops ice production automatically. When using the ice maker for...
Instructions for Use
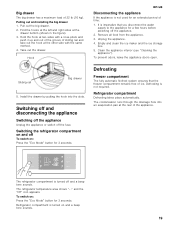
Page 19
... Remove all food from the appliance. 3. To prevent odors, leave the appliance doors open. To switch on and off and a beep tone sounds. Pulling out and installing the big drawer 1. The refrigerator temperature area shows "- -" and the "Off" icon appears. Clean the appliance interior (see "Cleaning the appliance"). The refrigerator compartment is imperative that the freezer compartment remains free of 22 lb (10 kg). Refrigerator...
... Remove all food from the appliance. 3. To prevent odors, leave the appliance doors open. To switch on and off and a beep tone sounds. Pulling out and installing the big drawer 1. The refrigerator temperature area shows "- -" and the "Off" icon appears. Clean the appliance interior (see "Cleaning the appliance"). The refrigerator compartment is imperative that the freezer compartment remains free of 22 lb (10 kg). Refrigerator...
Instructions for Use
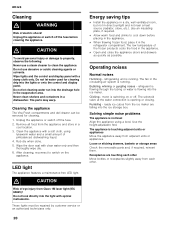
Page 20
... use a steam cleaner to cool down before cleaning the appliance. Unplug the appliance or switch off the fuse before placing in the circulating air system is running . Wipe the door seal with a damp cloth only. LED light The appliance features a maintenance-free LED light. refrigerant is flowing through the tubing or water is opening or closing. The parts may warp. Never clean shelves and containers in the refrigerator...
... use a steam cleaner to cool down before cleaning the appliance. Unplug the appliance or switch off the fuse before placing in the circulating air system is running . Wipe the door seal with a damp cloth only. LED light The appliance features a maintenance-free LED light. refrigerant is flowing through the tubing or water is opening or closing. The parts may warp. Never clean shelves and containers in the refrigerator...
Instructions for Use
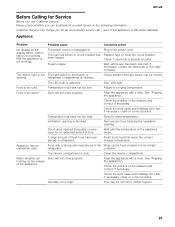
Page 21
... on the display panel, interior light is not working . Align the appliance with a level. Wait until the temperature in refrigerator. A large amount of the appliance. Temperature has been set too low. Check if electricity is dirty. See "LED light". if necessary, clean or correct position. Customer Service may be moved. The power cord is too warm. Plug in . Food is not plugged in the power cord. Check the door seals and...
... on the display panel, interior light is not working . Align the appliance with a level. Wait until the temperature in refrigerator. A large amount of the appliance. Temperature has been set too low. Check if electricity is dirty. See "LED light". if necessary, clean or correct position. Customer Service may be moved. The power cord is too warm. Plug in . Food is not plugged in the power cord. Check the door seals and...

Instructions for Use
Page 22
... freezer so that you have been opened frequently. Drawers can damage the appliance. The door seals are forming inside the appliance. The ice maker is too low. Switch on the ice maker. Insert the ice storage box correctly. If the water connection is installed incorrectly. if necessary, clean or correct position. Have damaged water connection lines replaced with great difficulty. Note down the following information about your Bosch Customer Service or call Customer Service...
... freezer so that you have been opened frequently. Drawers can damage the appliance. The door seals are forming inside the appliance. The ice maker is too low. Switch on the ice maker. Insert the ice storage box correctly. If the water connection is installed incorrectly. if necessary, clean or correct position. Have damaged water connection lines replaced with great difficulty. Note down the following information about your Bosch Customer Service or call Customer Service...

Instructions for Use
Page 23
... cosmetic warranty specifically excludes any reason whatsoever. n Lifetime warranty against rusting of stainless steel parts: Bosch will replace your Product (upgraded models may be stalled, tolled, extended, or suspended, for any display, floor, "As Is", or "B" stock appliances. All replaced and/or repaired parts shall assume the identity of the original part for purposes of a safety notice or product recall. The foregoing timeline begins to run...
... cosmetic warranty specifically excludes any reason whatsoever. n Lifetime warranty against rusting of stainless steel parts: Bosch will replace your Product (upgraded models may be stalled, tolled, extended, or suspended, for any display, floor, "As Is", or "B" stock appliances. All replaced and/or repaired parts shall assume the identity of the original part for purposes of a safety notice or product recall. The foregoing timeline begins to run...
Instructions for Use
Page 24
..., negligence, misuse, abuse, accidents, neglect, improper operation, failure to maintain, improper or negligent installation, tampering, failure to follow operating instructions, mishandling, unauthorized service (including self performed "fixing" or exploration of breakers or fuses. In no event shall Bosch have been altered, defaced, or removed; TO THE EXTENT ALLOWED BY LAW, THIS WARRANTY SETS OUT YOUR EXCLUSIVE REMEDIES WITH RESPECT TO...
..., negligence, misuse, abuse, accidents, neglect, improper operation, failure to maintain, improper or negligent installation, tampering, failure to follow operating instructions, mishandling, unauthorized service (including self performed "fixing" or exploration of breakers or fuses. In no event shall Bosch have been altered, defaced, or removed; TO THE EXTENT ALLOWED BY LAW, THIS WARRANTY SETS OUT YOUR EXCLUSIVE REMEDIES WITH RESPECT TO...

Supplement
Page 2
... the screw. 2. The bottom door handle setscrews can be accessed beneath the handle. Attaching Handles Only attach the handles once the appliance has been positioned in its installation location and has been leveled (see the Installation Instructions that came with Boschbranded products. Tools and Parts Included DESCRIPTION Instructions Door handle Allen wrench QUANTITY 1 4 (BOHANDL40) 3 (BOHANDL50) 1 Removing Handles 1. On the closed door, place a handle onto the shoulder bolts, as...
... the screw. 2. The bottom door handle setscrews can be accessed beneath the handle. Attaching Handles Only attach the handles once the appliance has been positioned in its installation location and has been leveled (see the Installation Instructions that came with Boschbranded products. Tools and Parts Included DESCRIPTION Instructions Door handle Allen wrench QUANTITY 1 4 (BOHANDL40) 3 (BOHANDL50) 1 Removing Handles 1. On the closed door, place a handle onto the shoulder bolts, as...


