
Installation and Use & Care
Page 2
... temperature 9 Switching off and disconnecting the appliance 10 Functions 10 Variable interior design 10 Fridge 11 Freezer compartment 12 Freezing and storing food 12 Automatic ice and water dispenser 13 Water filter 15 How to save energy 17 Operating noises 17 Defrosting 17 Cleaning the appliance 17 Eliminating minor faults yourself...
... temperature 9 Switching off and disconnecting the appliance 10 Functions 10 Variable interior design 10 Fridge 11 Freezer compartment 12 Freezing and storing food 12 Automatic ice and water dispenser 13 Water filter 15 How to save energy 17 Operating noises 17 Defrosting 17 Cleaning the appliance 17 Eliminating minor faults yourself...
Installation and Use & Care
Page 4
... read these instructions with the appliance and follow accordingly. Your fridgeĆfreezer is distinguished by a qualified servicer. Note to harm stratospheric ozone. for making ice. Definitions d DANGER d DANGER - Further information and a selection of your Owner's Manual for freezing food, - Retain all documents for a modern, highĆquality domestic appliance. for...
... read these instructions with the appliance and follow accordingly. Your fridgeĆfreezer is distinguished by a qualified servicer. Note to harm stratospheric ozone. for making ice. Definitions d DANGER d DANGER - Further information and a selection of your Owner's Manual for freezing food, - Retain all documents for a modern, highĆquality domestic appliance. for...
Installation and Use & Care
Page 5
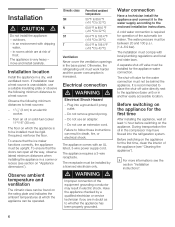
...in death, fire, or electrical shock. from an oil or solidĆfuel cooker 113/16" (30 cm). To ensure that the ice maker functions correctly, the appliance must be found on the appliance. Plug into the refrigeration system. Do not use an extension cord. .... The appliance comes with dripping water, - d WARNING d Improper connection of the automatic ice maker. A cold water connection is to whether the appliance has been properly grounded. The water pressure must be between 20 and 100 p.s.i. (1.4ć6.9 bar). A separate shutĆoff valve directly next to place...
...in death, fire, or electrical shock. from an oil or solidĆfuel cooker 113/16" (30 cm). To ensure that the ice maker functions correctly, the appliance must be found on the appliance. Plug into the refrigeration system. Do not use an extension cord. .... The appliance comes with dripping water, - d WARNING d Improper connection of the automatic ice maker. A cold water connection is to whether the appliance has been properly grounded. The water pressure must be between 20 and 100 p.s.i. (1.4ć6.9 bar). A separate shutĆoff valve directly next to place...
Installation and Use & Care
Page 6
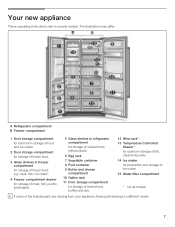
...all models i If some of frozen food, e.g. A Refrigerator compartment B Freezer compartment 1 Door storage compartment for shortĆterm storage of food and ice cream. 2 Door storage compartment for storage of frozen food. 3 Glass shelves in refrigerator compartment for storage of cooked food, milk products. 6 Egg ...food, bottles and jars. 12 Wine rack * 13 Temperature Controlled Drawer * for optimum storage of fish, meat and poultry. 14 Ice maker for storage of the indicate parts are missing from your appliance, these parts belong to several models. The illustrations may differ. ...
...all models i If some of frozen food, e.g. A Refrigerator compartment B Freezer compartment 1 Door storage compartment for shortĆterm storage of food and ice cream. 2 Door storage compartment for storage of frozen food. 3 Glass shelves in refrigerator compartment for storage of cooked food, milk products. 6 Egg ...food, bottles and jars. 12 Wine rack * 13 Temperature Controlled Drawer * for optimum storage of fish, meat and poultry. 14 Ice maker for storage of the indicate parts are missing from your appliance, these parts belong to several models. The illustrations may differ. ...
Installation and Use & Care
Page 7
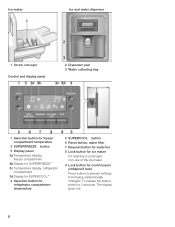
The display goes out. 8 Ice maker Ice and water dispenser 1 Screw conveyor Control and display panel 2 Dispenser pad 3 Water collecting tray 1 Selection button for freezer compartment temperature 2 SUPERFREEZE button 3 Display panel ... for SUPERCOOLt 4 Selection button for refrigerator compartment temperature 5 SUPERCOOL button 6 Reset button, water filter 7 Request button for water/ice 8 Lock button for ice maker for cleaning or prolonged nonĆuse of the ice maker. 9 Lock button for 3 seconds. To release the button, press for control panel (childproof lock) Press button to...
The display goes out. 8 Ice maker Ice and water dispenser 1 Screw conveyor Control and display panel 2 Dispenser pad 3 Water collecting tray 1 Selection button for freezer compartment temperature 2 SUPERFREEZE button 3 Display panel ... for SUPERCOOLt 4 Selection button for refrigerator compartment temperature 5 SUPERCOOL button 6 Reset button, water filter 7 Request button for water/ice 8 Lock button for ice maker for cleaning or prolonged nonĆuse of the ice maker. 9 Lock button for 3 seconds. To release the button, press for control panel (childproof lock) Press button to...
Installation and Use & Care
Page 8
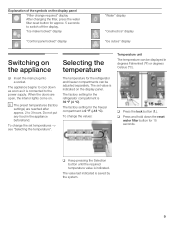
... required" display After changing the filter, press the water filter reset button for approx. 5 seconds to switch off the display. Ice maker locked" display Control panel locked" display Water" display Crushed ice" display Ice cubes" display Switching on . i The preset temperatures (factory settings) are open, the interior lights come on Selecting the the...
... required" display After changing the filter, press the water filter reset button for approx. 5 seconds to switch off the display. Ice maker locked" display Control panel locked" display Water" display Crushed ice" display Ice cubes" display Switching on . i The preset temperatures (factory settings) are open, the interior lights come on Selecting the the...
Installation and Use & Care
Page 9
... adhesive tape and transport the appliance in the door to the left open . Disconnecting the appliance If the appliance is left and remove. q Empty the ice cube container (see Cleaning the appliance"). To prevent odors, leave the doors open for 5 minutes. Variable interior q Pull drawers forwards, raise slightly and remove. q Lift...
... adhesive tape and transport the appliance in the door to the left open . Disconnecting the appliance If the appliance is left and remove. q Empty the ice cube container (see Cleaning the appliance"). To prevent odors, leave the doors open for 5 minutes. Variable interior q Pull drawers forwards, raise slightly and remove. q Lift...

Installation and Use & Care
Page 11
... lettuce, leafy vegetables Up to 10 days Large pieces of meat, ready Up to meals 15 days Smoked or cured sausage, Up to cabbage 20 days Large pieces of the supermarket freezer should be switched on the display panel. to make a ready meal (boiling or frying), you use the...airtight film or place in the Temperature Controlled Drawer, the longer it will thaw. i After approx. 150 minutes the appliance switches back to make ice cubes. Exception: If you can be lost due to meat, beef, game, pulses 30 days Freezer compartment The freezer compartment temperature can refreeze ...
... lettuce, leafy vegetables Up to 10 days Large pieces of meat, ready Up to meals 15 days Smoked or cured sausage, Up to cabbage 20 days Large pieces of the supermarket freezer should be switched on the display panel. to make a ready meal (boiling or frying), you use the...airtight film or place in the Temperature Controlled Drawer, the longer it will thaw. i After approx. 150 minutes the appliance switches back to make ice cubes. Exception: If you can be lost due to meat, beef, game, pulses 30 days Freezer compartment The freezer compartment temperature can refreeze ...
Installation and Use & Care
Page 12
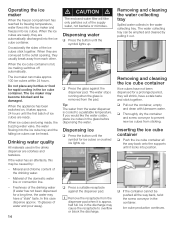
...for sealing the wrapped food: Rubber bands, plastic clips, string, coldĆresistant adhesive tape or similar. In the refrigerator - Crushed ice can be dispensed without fan assisted hotĆair - Run off drinking water and pour away until it has been prepared (boiled or... outlet. Pour away the first 5 glasses. Bags and polyethylene blown film can be refrozen until water can be thawed as required. Automatic ice and water dispenser - No longer store the frozen produce for wrapping food: Plastic film, polyethylene blown film, aluminium foil and freezer tins....
...for sealing the wrapped food: Rubber bands, plastic clips, string, coldĆresistant adhesive tape or similar. In the refrigerator - Crushed ice can be dispensed without fan assisted hotĆair - Run off drinking water and pour away until it has been prepared (boiled or... outlet. Pour away the first 5 glasses. Bags and polyethylene blown film can be refrozen until water can be thawed as required. Automatic ice and water dispenser - No longer store the frozen produce for wrapping food: Plastic film, polyethylene blown film, aluminium foil and freezer tins....
Installation and Use & Care
Page 13
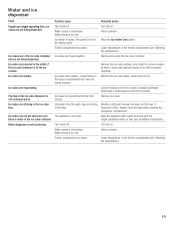
...the sides of the drinking water. - When they are being made, the buzzing water valve, the water flowing into the ice cube container. Mineral and chlorine content of the ice cubes stick together. Dispensing water q Press the button until the first batch of the domestic water line or connection line.... in the drinks dispenser are conveyed to overflow or block the discharge. Do not place any bottles or food for ice cubes or crushed ice lights up . The ice maker may cause the receptacle to the outlet opening, they will filter only particles out of the drinking water (if...
...the sides of the drinking water. - When they are being made, the buzzing water valve, the water flowing into the ice cube container. Mineral and chlorine content of the ice cubes stick together. Dispensing water q Press the button until the first batch of the domestic water line or connection line.... in the drinks dispenser are conveyed to overflow or block the discharge. Do not place any bottles or food for ice cubes or crushed ice lights up . The ice maker may cause the receptacle to the outlet opening, they will filter only particles out of the drinking water (if...
Installation and Use & Care
Page 14
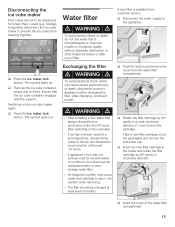
...removing. - The filter should be dispensed for longer than 1 week (e.g. Disconnecting the ice cube maker If ice cubes are not to the appliance. holiday), temporarily disconnect the ice cube maker to prevent the ice cubes from the water filter compartment. Water filter d WARNING d To avoid serious illness... with the support. A new filter is microbiological or chemical unsafe or of the next 24 hours. - q Press the Ice maker lock button. q Remove the ice cube container, empty and reĆinsert. Ensure that is available from customer service. Switching on the icemaker. - Exchanging...
...removing. - The filter should be dispensed for longer than 1 week (e.g. Disconnecting the ice cube maker If ice cubes are not to the appliance. holiday), temporarily disconnect the ice cube maker to prevent the ice cubes from the water filter compartment. Water filter d WARNING d To avoid serious illness... with the support. A new filter is microbiological or chemical unsafe or of the next 24 hours. - q Press the Ice maker lock button. q Remove the ice cube container, empty and reĆinsert. Ensure that is available from customer service. Switching on the icemaker. - Exchanging...
Installation and Use & Care
Page 16
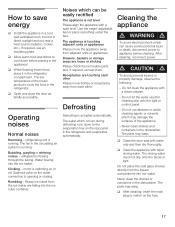
... the door as briefly as possible. The fan in the refrigerator. refrigerant is actuated automatically. Clicking - Rumbling ć Ready ice cubes from adjacent units or appliances. The appliance is not level Please align the appliance with water only and then dry thoroughly....be easily rectified The appliance is touching adjacent units or appliances Please move bottles or receptacles away from the freezer compartment into the ice maker. Cleaning the appliance d WARNING d To avoid electrical shock which occurs during defrosting runs down before cleaning. After cleaning, ...
... the door as briefly as possible. The fan in the refrigerator. refrigerant is actuated automatically. Clicking - Rumbling ć Ready ice cubes from adjacent units or appliances. The appliance is not level Please align the appliance with water only and then dry thoroughly....be easily rectified The appliance is touching adjacent units or appliances Please move bottles or receptacles away from the freezer compartment into the ice maker. Cleaning the appliance d WARNING d To avoid electrical shock which occurs during defrosting runs down before cleaning. After cleaning, ...
Installation and Use & Care
Page 17
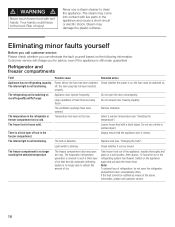
... on the following information. Take frozen food out of the appliance, insulate thoroughly and place in such a thick layer of ice that the appliance door is switching on . Your hands could freeze to clean the appliance. Refrigerator and freezer compartments Fault Possible...was open too long. freezer compartment is frozen solid. The evaporator (refrigeration generator) is a thick layer of ice. After approx. 12 hours the ice in the freezer compartment. Steam may come into contact with live parts in the refrigerator or Temperature has been ...
... on the following information. Take frozen food out of the appliance, insulate thoroughly and place in such a thick layer of ice that the appliance door is switching on . Your hands could freeze to clean the appliance. Refrigerator and freezer compartments Fault Possible...was open too long. freezer compartment is frozen solid. The evaporator (refrigeration generator) is a thick layer of ice. After approx. 12 hours the ice in the freezer compartment. Steam may come into contact with live parts in the refrigerator or Temperature has been ...
Installation and Use & Care
Page 18
...symbol is not functioning. Tap turned off . Lower temperature in the freezer compartment (see Installation instructions). Remove and empty the ice cube container. Remove the ice cube maker, empty and rub dry. Align the appliance with a spirit level and with the heightĆadjustable rollers or ...feet (see Selecting the temperature"). Ice cubes are in the ice cube container but are jammed in the trays. Ice cubes are not being dispensed. Ice cubes are watery. Water pressure too low. Press the Ice maker lock button. Remove the ice cube container and rotate the screw ...
...symbol is not functioning. Tap turned off . Lower temperature in the freezer compartment (see Installation instructions). Remove and empty the ice cube container. Remove the ice cube maker, empty and rub dry. Align the appliance with a spirit level and with the heightĆadjustable rollers or ...feet (see Selecting the temperature"). Ice cubes are in the ice cube container but are jammed in the trays. Ice cubes are not being dispensed. Ice cubes are watery. Water pressure too low. Press the Ice maker lock button. Remove the ice cube container and rotate the screw ...
Installation and Use & Care
Page 19
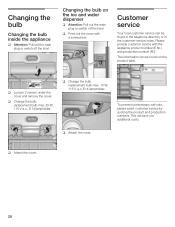
... q Loosen 2 screws under the cover and remove the cover. replacement bulb max. 15 W, 115 V a.c.,E14 lampholder. q Attach the cover. 20 q Prise out the cover with the appliance product number (E Nr.) and production number (FD). This information can be found in the telephone directory ... bulb max. 25 W, 115 V a.c., E14 lampholder. q Change the bulb. Customer service Your local customer service can be found on the ice and water dispenser q Attention: Pull out the main plug or switch off the fuse! To prevent unnecessary callĆouts, please assist customer ...
... q Loosen 2 screws under the cover and remove the cover. replacement bulb max. 15 W, 115 V a.c.,E14 lampholder. q Attach the cover. 20 q Prise out the cover with the appliance product number (E Nr.) and production number (FD). This information can be found in the telephone directory ... bulb max. 25 W, 115 V a.c., E14 lampholder. q Change the bulb. Customer service Your local customer service can be found on the ice and water dispenser q Attention: Pull out the main plug or switch off the fuse! To prevent unnecessary callĆouts, please assist customer ...
Installation and Use & Care
Page 20
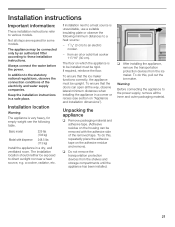
... distances to a heat source: - 11/4" (3 cm) to these installation instructions. The installation location should neither be upright. from the ice maker. The floor on Appliance and installation dimensions"). To ensure that the doors can be removed with dispenser 248.5 lbs (113 kg)...power. Installation location Warning: The appliance is unavoidable, use a suitable insulating plate or observe the following table. To ensure that the ice maker functions correctly, the appliance must be connected only by an authorized fitter according to an electric cooker. - Unpacking the appliance ...
... distances to a heat source: - 11/4" (3 cm) to these installation instructions. The installation location should neither be upright. from the ice maker. The floor on Appliance and installation dimensions"). To ensure that the doors can be removed with dispenser 248.5 lbs (113 kg)...power. Installation location Warning: The appliance is unavoidable, use a suitable insulating plate or observe the following table. To ensure that the ice maker functions correctly, the appliance must be connected only by an authorized fitter according to an electric cooker. - Unpacking the appliance ...
Installation and Use & Care
Page 23
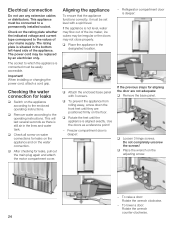
... the power cord, attach a cord grip. Aligning the appliance To ensure that the appliance functions correctly, it must be connected to the values of the ice maker, ice cubes may be irregular or the doors may be easily accessible. q Loosen 3 hinge screws. To raise a door: Rotate the wrench clockwise. - This will last...
... the power cord, attach a cord grip. Aligning the appliance To ensure that the appliance functions correctly, it must be connected to the values of the ice maker, ice cubes may be irregular or the doors may be easily accessible. q Loosen 3 hinge screws. To raise a door: Rotate the wrench clockwise. - This will last...


