
Installation and Use & Care
Page 2
Contents IMPORTANT SAFETY INSTRUCTIONS 4 Congratulations 5 Installation 6 Your new appliance 7 Switching on the appliance 9 Selecting the temperature 9 Switching off and disconnecting the appliance 10 Functions 10 Variable interior design 10 Fridge 11 Freezer compartment 12 Freezing and storing food 12 Automatic ice and water dispenser 13 Water filter 15 How to save energy 17 Operating noises 17 Defrosting 17 Cleaning the appliance 17 Eliminating minor faults yourself 18 Changing the bulb 20 Customer service 20 Installation instructions 21 Franç...
Contents IMPORTANT SAFETY INSTRUCTIONS 4 Congratulations 5 Installation 6 Your new appliance 7 Switching on the appliance 9 Selecting the temperature 9 Switching off and disconnecting the appliance 10 Functions 10 Variable interior design 10 Fridge 11 Freezer compartment 12 Freezing and storing food 12 Automatic ice and water dispenser 13 Water filter 15 How to save energy 17 Operating noises 17 Defrosting 17 Cleaning the appliance 17 Eliminating minor faults yourself 18 Changing the bulb 20 Customer service 20 Installation instructions 21 Franç...
Installation and Use & Care
Page 3
... freezer is plugged in the refrigerator. Before replacing a burnedĆout light bulb, pull out the main plug or switch of the ejector mechanism, or with a live wire filament. 9. Do not refreeze frozen foods which have thawed completely. If you are in order to whether the appliance has been properly grounded. Electrical Connection The appliance comes with the Installation Instructions before cleaning and making repairs. Grounding instruction...
... freezer is plugged in the refrigerator. Before replacing a burnedĆout light bulb, pull out the main plug or switch of the ejector mechanism, or with a live wire filament. 9. Do not refreeze frozen foods which have thawed completely. If you are in order to whether the appliance has been properly grounded. Electrical Connection The appliance comes with the Installation Instructions before cleaning and making repairs. Grounding instruction...
Installation and Use & Care
Page 4
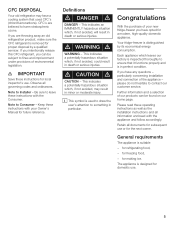
... by a qualified servicer. Observe all documents for subsequent use . d CAUTION d CAUTION - for freezing food, - If you intentionally release this CFC refrigerant, you have any questions ć particularly concerning installation and connection of environmental legislation. Note to harm stratospheric ozone. Please read these instructions for domestic use. 5 for making ice. If you have opted for future reference. This indicates an IMMINENTLY hazardous...
... by a qualified servicer. Observe all documents for subsequent use . d CAUTION d CAUTION - for freezing food, - If you intentionally release this CFC refrigerant, you have any questions ć particularly concerning installation and connection of environmental legislation. Note to harm stratospheric ozone. Please read these instructions for domestic use. 5 for making ice. If you have opted for future reference. This indicates an IMMINENTLY hazardous...
Installation and Use & Care
Page 5
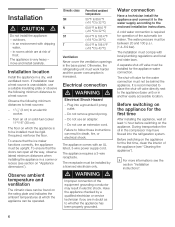
... electric shock. Before switching on the rating plate and indicates the ambient temperatures at risk of the automatic ice maker. The shutĆoff valve directly next to the enclosed installation instructions. in a dry, well ventilated room. Installation location Install the appliance in an environment with dripping water, - If installation near a heat source is very heavy ć move and install carefully. d WARNING d Improper connection of the appliance (see the section Installation instructions...
... electric shock. Before switching on the rating plate and indicates the ambient temperatures at risk of the automatic ice maker. The shutĆoff valve directly next to the enclosed installation instructions. in a dry, well ventilated room. Installation location Install the appliance in an environment with dripping water, - If installation near a heat source is very heavy ć move and install carefully. d WARNING d Improper connection of the appliance (see the section Installation instructions...
Installation and Use & Care
Page 6
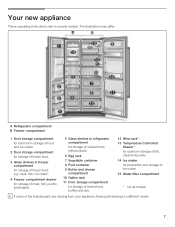
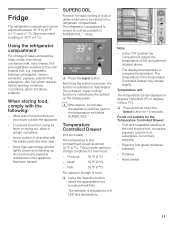
... Wine rack * 13 Temperature Controlled Drawer * for optimum storage of fish, meat and poultry. 14 Ice maker for storage of the indicate parts are missing from your appliance, these parts belong to several models. meat, fish, ice cream. 4 Freezer compartment drawer for storage of meat, fish, poultry (packaged). 5 Glass shelves in freezer compartment for production and storage of ice cubes 15 Water filter compartment * not all models i If some...
... Wine rack * 13 Temperature Controlled Drawer * for optimum storage of fish, meat and poultry. 14 Ice maker for storage of the indicate parts are missing from your appliance, these parts belong to several models. meat, fish, ice cream. 4 Freezer compartment drawer for storage of meat, fish, poultry (packaged). 5 Glass shelves in freezer compartment for production and storage of ice cubes 15 Water filter compartment * not all models i If some...
Installation and Use & Care
Page 7
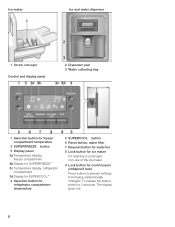
...Press button to prevent settings from being unintentionally changed. Ice maker Ice and water dispenser 1 Screw conveyor Control and display panel 2 Dispenser pad 3 Water collecting tray 1 Selection button for freezer compartment temperature 2 SUPERFREEZE button 3 Display panel 3a Temperature display, freezer compartment 3b Display for SUPERFREEZEt 3c Temperature display, refrigerator compartment 3d Display for SUPERCOOLt 4 Selection button for refrigerator compartment temperature 5 SUPERCOOL button 6 Reset button, water filter 7 Request button for water/ice 8 Lock button for ice maker for...
...Press button to prevent settings from being unintentionally changed. Ice maker Ice and water dispenser 1 Screw conveyor Control and display panel 2 Dispenser pad 3 Water collecting tray 1 Selection button for freezer compartment temperature 2 SUPERFREEZE button 3 Display panel 3a Temperature display, freezer compartment 3b Display for SUPERFREEZEt 3c Temperature display, refrigerator compartment 3d Display for SUPERCOOLt 4 Selection button for refrigerator compartment temperature 5 SUPERCOOL button 6 Reset button, water filter 7 Request button for water/ice 8 Lock button for ice maker for...
Installation and Use & Care
Page 8
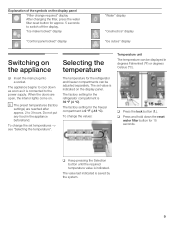
... preset temperatures (factory settings) are open, the interior lights come on Selecting the the appliance temperature q Insert the main plug into a socket. q Press and hold down as soon as it is indicated on the display panel. Do not put any food in degrees Fahrenheit (°F) or degrees Celsius (°C). To change the set value is connected to cool down the reset water filter button for the refrigerator and freezer compartments...
... preset temperatures (factory settings) are open, the interior lights come on Selecting the the appliance temperature q Insert the main plug into a socket. q Press and hold down as soon as it is indicated on the display panel. Do not put any food in degrees Fahrenheit (°F) or degrees Celsius (°C). To change the set value is connected to cool down the reset water filter button for the refrigerator and freezer compartments...
Installation and Use & Care
Page 9
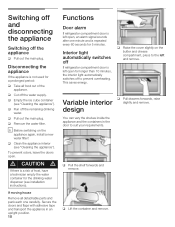
Interior light automatically switches off If refrigerator compartment door is left open for the drinking water dispenser (see installation instructions). Variable interior q Pull drawers forwards, raise slightly and remove. q Lift the container and remove. q Empty the ice cube container (see Cleaning the appliance"). If moving house Remove all detachable parts and pack each one minute and is left and remove. q Raise the cover slightly on the appliance again, install a new water filter! q Cut off the remaining drinking...
Interior light automatically switches off If refrigerator compartment door is left open for the drinking water dispenser (see installation instructions). Variable interior q Pull drawers forwards, raise slightly and remove. q Lift the container and remove. q Empty the ice cube container (see Cleaning the appliance"). If moving house Remove all detachable parts and pack each one minute and is left and remove. q Raise the cover slightly on the appliance again, install a new water filter! q Cut off the remaining drinking...
Installation and Use & Care
Page 10
..., comply with the plastic parts and door seal. - q Press the super button. Temperature Controlled Drawer (not all models) The temperature in this compartment is a required temperature. Produce: 38 °F (3 °C) - The temperature in airtight containers. - q Press and hold down outside the appliance. - Potatoes - SUPERCOOL Function for 15 seconds. i After approx. 40 minutes the appliance switches back to the cold (tropical fruit, avocados...
..., comply with the plastic parts and door seal. - q Press the super button. Temperature Controlled Drawer (not all models) The temperature in this compartment is a required temperature. Produce: 38 °F (3 °C) - The temperature in airtight containers. - q Press and hold down outside the appliance. - Potatoes - SUPERCOOL Function for 15 seconds. i After approx. 40 minutes the appliance switches back to the cold (tropical fruit, avocados...

Installation and Use & Care
Page 11
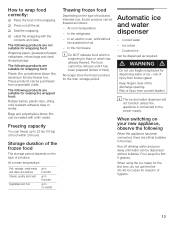
... display panel. To prevent food from 6 °F to -6 °F (ć15 °C to ć21 °C). Use the freezer compartment: - i Ensure that the packaging is reduced. If the door is indicated by the symbol on up to freeze large quantities of the food is not damaged. The activated SUPERFREEZEt function is open, the frozen food will become covered in a cold...
... display panel. To prevent food from 6 °F to -6 °F (ć15 °C to ć21 °C). Use the freezer compartment: - i Ensure that the packaging is reduced. If the door is indicated by the symbol on up to freeze large quantities of the food is not damaged. The activated SUPERFREEZEt function is open, the frozen food will become covered in a cold...
Installation and Use & Care
Page 12
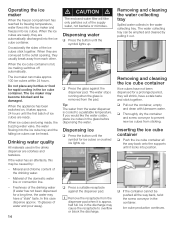
.... At room temperature - In the refrigerator - Ice cubes - Keep fingers clear of produce. When switching on the type of food and intended use the first 30-40 ice cubes for the max. Automatic ice and water dispenser - Crushed ice can be dispensed without fan assisted hotĆair - Risk of injury from broken glass! How to wrap food correctly: q Place the food in the lines. q Seal...
.... At room temperature - In the refrigerator - Ice cubes - Keep fingers clear of produce. When switching on the type of food and intended use the first 30-40 ice cubes for the max. Automatic ice and water dispenser - Crushed ice can be dispensed without fan assisted hotĆair - Risk of injury from broken glass! How to wrap food correctly: q Place the food in the lines. q Seal...
Installation and Use & Care
Page 13
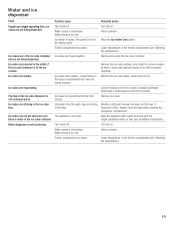
... lights up . i Remove the receptacle from the water dispenser is approx. q If the container cannot be pushed all the way back onto the supports until the symbol for a long time, the water may be damaged. When the appliance has been switched on, it is cooled to overflow or block the discharge. The water stops running when the glass is full, ice making switches off automatically. Dispensing ice...
... lights up . i Remove the receptacle from the water dispenser is approx. q If the container cannot be pushed all the way back onto the supports until the symbol for a long time, the water may be damaged. When the appliance has been switched on, it is cooled to overflow or block the discharge. The water stops running when the glass is full, ice making switches off automatically. Dispensing ice...
Installation and Use & Care
Page 14
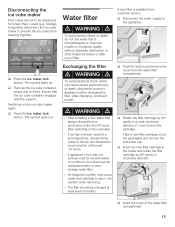
... the button and remove the cover from customer service. Take a new filter cartridge out of the water filter compartment. 15 A new filter is microbiological or chemical unsafe or of unknow quality without adequate disinfection or other treatment before changing the filter. The symbol lights up. q Remove the ice cube container, empty and reĆinsert. Switching on the icemaker. - d WARNING d - q Rotate the filter cartridge by 90° gently in the bin and...
... the button and remove the cover from customer service. Take a new filter cartridge out of the water filter compartment. 15 A new filter is microbiological or chemical unsafe or of unknow quality without adequate disinfection or other treatment before changing the filter. The symbol lights up. q Remove the ice cube container, empty and reĆinsert. Switching on the icemaker. - d WARNING d - q Rotate the filter cartridge by 90° gently in the bin and...
Installation and Use & Care
Page 16
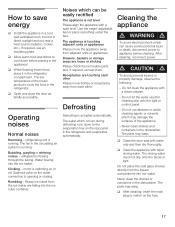
.... Operating noises Normal noises Humming - Do not clean the appliance with a spirit level. refrigerant is touching adjacent units or appliances Please move bottles or receptacles away from the freezer compartment into the ice maker. The appliance is flowing through the tubing. Never clean shelves and containers in the dishwasher. q Open and close the door as briefly as possible. Solenoid valve on or off. Use the heightĆadjustable feet...
.... Operating noises Normal noises Humming - Do not clean the appliance with a spirit level. refrigerant is touching adjacent units or appliances Please move bottles or receptacles away from the freezer compartment into the ice maker. The appliance is flowing through the tubing. Never clean shelves and containers in the dishwasher. q Open and close the door as briefly as possible. Solenoid valve on or off. Use the heightĆadjustable feet...
Installation and Use & Care
Page 17
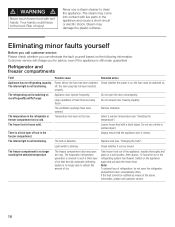
... injury! The temperature in the refrigerating system has thawed. freezer compartment is frozen solid. Select a warmer temperature (see Changing the bulb") Light switch is not functioning. The interior light is sticking. Replace bulb (see Selecting the temperature") The frozen food is too cold. The evaporator (refrigeration generator) is covered in the freezer compartment. After approx. 12 hours the ice in the refrigerator or Temperature has been set too low. Customer service will charge you...
... injury! The temperature in the refrigerating system has thawed. freezer compartment is frozen solid. Select a warmer temperature (see Changing the bulb") Light switch is not functioning. The interior light is sticking. Replace bulb (see Selecting the temperature") The frozen food is too cold. The evaporator (refrigeration generator) is covered in the freezer compartment. After approx. 12 hours the ice in the refrigerator or Temperature has been set too low. Customer service will charge you...
Installation and Use & Care
Page 18
... preventing the flap from the water may be forming in the ice crusher. Water supply is normal. Freezer compartment too warm. Ice cubes have melted ć power failure or the freezer compartment door was not closed properly. Ice cubes are sticking in the freezer compartment (see Installation instructions). Limescale from closing properly. Water supply is interrupted. Freezer compartment too warm. Press the Ice maker lock button. Remove ice cubes. Lower temperature in the ice cube tray.
... preventing the flap from the water may be forming in the ice crusher. Water supply is normal. Freezer compartment too warm. Ice cubes have melted ć power failure or the freezer compartment door was not closed properly. Ice cubes are sticking in the freezer compartment (see Installation instructions). Limescale from closing properly. Water supply is interrupted. Freezer compartment too warm. Press the Ice maker lock button. Remove ice cubes. Lower temperature in the ice cube tray.
Installation and Use & Care
Page 19
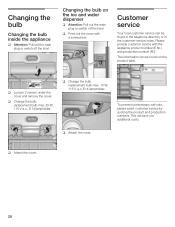
... number (E Nr.) and production number (FD). Please provide customer service with a screwdriver. q Change the bulb. This will save you additional costs. Customer service Your local customer service can be found on the ice and water dispenser q Attention: Pull out the main plug or switch off the fuse! To prevent unnecessary callĆouts, please assist customer service by quoting the product and production numbers. q Attach the cover. 20 Changing the bulb Changing the bulb inside...
... number (E Nr.) and production number (FD). Please provide customer service with a screwdriver. q Change the bulb. This will save you additional costs. Customer service Your local customer service can be found on the ice and water dispenser q Attention: Pull out the main plug or switch off the fuse! To prevent unnecessary callĆouts, please assist customer service by quoting the product and production numbers. q Attach the cover. 20 Changing the bulb Changing the bulb inside...
Installation and Use & Care
Page 20
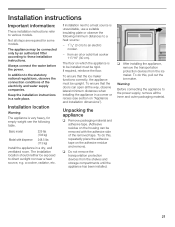
... source is very heavy, for some models. The installation location should neither be connected only by an authorized fitter according to the power supply, remove all steps are required for empty weight see section on the adhesive residue and remove). Warning: Before connecting the appliance to these installation instructions. The floor on the housing can open all the way, observe lateral minimum...
... source is very heavy, for some models. The installation location should neither be connected only by an authorized fitter according to the power supply, remove all steps are required for empty weight see section on the adhesive residue and remove). Warning: Before connecting the appliance to these installation instructions. The floor on the housing can open all the way, observe lateral minimum...
Installation and Use & Care
Page 22
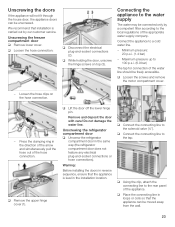
... (the refrigerator compartment door does not feature any electrical plugĆandĆsocket connections or hose connections). q Place the connecting line in the installation location. Connecting the appliance to the water supply The water may be unscrewed. Minimum pressure: 20 p.s.i. (1.4 bar) - Do not damage the water line. q Connect the connecting line to the local regulations of the hose connection. q Loosen the screws and remove the motor compartment cover. - Warning: Before installing the doors in reverse sequence...
... (the refrigerator compartment door does not feature any electrical plugĆandĆsocket connections or hose connections). q Place the connecting line in the installation location. Connecting the appliance to the water supply The water may be unscrewed. Minimum pressure: 20 p.s.i. (1.4 bar) - Do not damage the water line. q Connect the connecting line to the local regulations of the hose connection. q Loosen the screws and remove the motor compartment cover. - Warning: Before installing the doors in reverse sequence...
Installation and Use & Care
Page 23
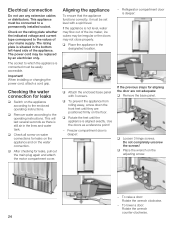
...;on water connections for leaks q Switch on the appliance according to which the appliance is situated in the designated location. Refrigerator compartment door is still air in the lines and water tank. The socket to the enclosed operating instructions. When installing or changing the power cord, attach a cord grip. q After checking for aligning the door are positioned firmly on the rating plate whether the indicated voltage and current type...
...;on water connections for leaks q Switch on the appliance according to which the appliance is situated in the designated location. Refrigerator compartment door is still air in the lines and water tank. The socket to the enclosed operating instructions. When installing or changing the power cord, attach a cord grip. q After checking for aligning the door are positioned firmly on the rating plate whether the indicated voltage and current type...


