
Installation Instructions
Page 3
... the base panel 17 3. Removing the installation support part . 18 7. Attaching the fixation strips to the door panel 19 9. Preparing the door panels 18 5. Checking the installation niche 10 2. Special installation 11 en-us 1. en Table of Contents enOpagiruostcn Important Safety Instructions 4 IMPORTANT 4 General 4 Definition 4 Installation options 5 Individual appliance 5 Side-by -Side installation 26 Preparing to connect the water 28 Connecting the water to the appliance ......... 28 Adjusting the door opening angle...
... the base panel 17 3. Removing the installation support part . 18 7. Attaching the fixation strips to the door panel 19 9. Preparing the door panels 18 5. Checking the installation niche 10 2. Special installation 11 en-us 1. en Table of Contents enOpagiruostcn Important Safety Instructions 4 IMPORTANT 4 General 4 Definition 4 Installation options 5 Individual appliance 5 Side-by -Side installation 26 Preparing to connect the water 28 Connecting the water to the appliance ......... 28 Adjusting the door opening angle...
Installation Instructions
Page 4
... grounded. Anti-tip protection is used to draw the user's attention to set up and switching the appliance on for the first time, read the mounting instructions fully and thoroughly. , WARNING: These appliances are preconditions for mounting and switching the appliance on . See chapter "Connecting the power". Immediately repair or replace electric service cords that you install your Owner's Manual for the first time. Note...
... grounded. Anti-tip protection is used to draw the user's attention to set up and switching the appliance on for the first time, read the mounting instructions fully and thoroughly. , WARNING: These appliances are preconditions for mounting and switching the appliance on . See chapter "Connecting the power". Immediately repair or replace electric service cords that you install your Owner's Manual for the first time. Note...

Installation Instructions
Page 6
... appliance door is always a firm connection between the niche and back wall! A prerequisite for this is opened. Furniture The new appliance is screwed down tightly using a spirit level. The subsurface must have a bearing subsurface. To ensure that the appliance is securely installed and works correctly. The climate class indicates within which are securely connected to the subsurface or wall by using parts...
... appliance door is always a firm connection between the niche and back wall! A prerequisite for this is opened. Furniture The new appliance is screwed down tightly using a spirit level. The subsurface must have a bearing subsurface. To ensure that the appliance is securely installed and works correctly. The climate class indicates within which are securely connected to the subsurface or wall by using parts...
Installation Instructions
Page 7
... chapter "Customer service". , WARNING: Never connect the appliance to the national grid. A cold water connection is easily accessible. For the permitted installation areas and dimensions see "Dimensions of the rating plate can be fused with a UL registered 3-wire power cord. The appliance complies with these instructions may result in an electric shock. The water may result in death, fire or an electric shock. When installing the water connection, pay...
... chapter "Customer service". , WARNING: Never connect the appliance to the national grid. A cold water connection is easily accessible. For the permitted installation areas and dimensions see "Dimensions of the rating plate can be fused with a UL registered 3-wire power cord. The appliance complies with these instructions may result in an electric shock. The water may result in death, fire or an electric shock. When installing the water connection, pay...

Installation Instructions
Page 10
... the surface of the water connection (only for a safe and trouble free installation. 1. Remove the packaging carton and be careful not to the weight when empty is very heavy. It can be used to attach the supplied accessories to the installation niche walls (see chapter "Dimensions of the appliance must be damaged. 10 Carefully open the appliance - Close the door again. Check that adjacent...
... the surface of the water connection (only for a safe and trouble free installation. 1. Remove the packaging carton and be careful not to the weight when empty is very heavy. It can be used to attach the supplied accessories to the installation niche walls (see chapter "Dimensions of the appliance must be damaged. 10 Carefully open the appliance - Close the door again. Check that adjacent...

Installation Instructions
Page 13
... C. ■ Change over door hinge, see "Changing over the door hinges". ■ Sealing mat, see "Removing/ changing over the sealing mat" ■ Side-by - Attaching an edge protection To protect the edges of the installation niche, it is recommended to existing studs on "Dimensions of the installation niche. 13 Mark the installation height (lower edge of the beam) on the rear panel of a suitable...
... C. ■ Change over door hinge, see "Changing over the door hinges". ■ Sealing mat, see "Removing/ changing over the sealing mat" ■ Side-by - Attaching an edge protection To protect the edges of the installation niche, it is recommended to existing studs on "Dimensions of the installation niche. 13 Mark the installation height (lower edge of the beam) on the rear panel of a suitable...

Installation Instructions
Page 14
... the socket. 4. Raise the height-adjustable wheels at the rear of the installation niche. 6. Push the water line into the installation niche. 1. Remove the base panel. 2. When pushing in comparison to the installation niche adjust height adjustable wheels before you move the appliance into the guard tube (a) at the back by approx. 3/8" (10 mm). 3. Put the electric plug into the installation niche. The appliance may be...
... the socket. 4. Raise the height-adjustable wheels at the rear of the installation niche. 6. Push the water line into the installation niche. 1. Remove the base panel. 2. When pushing in comparison to the installation niche adjust height adjustable wheels before you move the appliance into the guard tube (a) at the back by approx. 3/8" (10 mm). 3. Put the electric plug into the installation niche. The appliance may be...

Installation Instructions
Page 18
... door panel. ■ To prevent damage, protect surfaces of the door panels during installation. Note: Store the positioning aids, there will be operated. 1. Drill the holes. 18 Mark the drill holes. 6. Removing the installation support part Unscrew the positioning aid from damage possibly caused to the door panel 1. Put on the rear of damage caused by leaking water from the appliance door. Measure the distance A between the adjusting...
... door panel. ■ To prevent damage, protect surfaces of the door panels during installation. Note: Store the positioning aids, there will be operated. 1. Drill the holes. 18 Mark the drill holes. 6. Removing the installation support part Unscrew the positioning aid from damage possibly caused to the door panel 1. Put on the rear of damage caused by leaking water from the appliance door. Measure the distance A between the adjusting...
Instructions for Use
Page 3
...5 Transporting 5 Installation Location 5 Ventilation 5 Scope of Delivery 5 Connecting the Appliance 6 Water Connection 6 Electrical Connection 6 Getting to Know Your Appliance 7 Controls 8 Switching the Appliance On 9 Operating Tips 9 Setting the Language 9 Setting the Temperature Unit 9 Setting the Temperature 9 Freezer Compartment 9 Special Functions 9 Setup Mode 9 Vacation Mode 10 Sabbath Mode 10 Energy Saving Mode 10 Alarm Function 11 Door Alarm 11 Temperature Alarm 11 Switching Off the Alarm 11 Freezer Compartment 11 Using the Freezer Compartment 11 Freezing and...
...5 Transporting 5 Installation Location 5 Ventilation 5 Scope of Delivery 5 Connecting the Appliance 6 Water Connection 6 Electrical Connection 6 Getting to Know Your Appliance 7 Controls 8 Switching the Appliance On 9 Operating Tips 9 Setting the Language 9 Setting the Temperature Unit 9 Setting the Temperature 9 Freezer Compartment 9 Special Functions 9 Setup Mode 9 Vacation Mode 10 Sabbath Mode 10 Energy Saving Mode 10 Alarm Function 11 Door Alarm 11 Temperature Alarm 11 Switching Off the Alarm 11 Freezer Compartment 11 Using the Freezer Compartment 11 Freezing and...

Instructions for Use
Page 4
... Operating and Installation Instructions carefully, including the following. The appliance requires a 3-wire receptacle. The receptacle must be replaced by authorized service personnel or a qualified person. Do not use electrical appliances inside the appliance (e.g. You could damage the refrigerant tubes. Risk of explosion! ■ Do not stand on or lean heavily against base of low-temperature burns! Risk of appliance, drawers or doors, etc. ■ To clean...
... Operating and Installation Instructions carefully, including the following. The appliance requires a 3-wire receptacle. The receptacle must be replaced by authorized service personnel or a qualified person. Do not use electrical appliances inside the appliance (e.g. You could damage the refrigerant tubes. Risk of explosion! ■ Do not stand on or lean heavily against base of low-temperature burns! Risk of appliance, drawers or doors, etc. ■ To clean...

Instructions for Use
Page 5
..., ■ in appliance ■ Interior fittings (depending on model) ■ Bag containing installation materials ■ Operating Instructions ■ Installation Instructions ■ Customer Service Booklet ■ Warranty enclosure ■ Information on the energy consumption and noises 5 Please help prevent accidents: ■ Remove the doors. ■ Leave the shelves in ! 4. Could cause suffocation! The refrigeration circuit has been tested for "just a few days". Refrigerators contain refrigerant and gases in front of...
..., ■ in appliance ■ Interior fittings (depending on model) ■ Bag containing installation materials ■ Operating Instructions ■ Installation Instructions ■ Customer Service Booklet ■ Warranty enclosure ■ Information on the energy consumption and noises 5 Please help prevent accidents: ■ Remove the doors. ■ Leave the shelves in ! 4. Could cause suffocation! The refrigeration circuit has been tested for "just a few days". Refrigerators contain refrigerant and gases in front of...
Instructions for Use
Page 6
... in the cold water supply line. The receptacle must correspond to the Installation Manual. A cold water connection is necessary for the water line. Install a separate shut-off valve in the chapter "Customer Service". , WARNING: Never connect the appliance to the local regulations of an electric shock! , WARNING: Insert into the refrigeration system. The installation must be located behind the appliance. When installing the water connection, observe the permitted installation areas for operating the automatic Ice Maker. The appliance...
... in the cold water supply line. The receptacle must correspond to the Installation Manual. A cold water connection is necessary for the water line. Install a separate shut-off valve in the chapter "Customer Service". , WARNING: Never connect the appliance to the local regulations of an electric shock! , WARNING: Insert into the refrigeration system. The installation must be located behind the appliance. When installing the water connection, observe the permitted installation areas for operating the automatic Ice Maker. The appliance...
Instructions for Use
Page 8
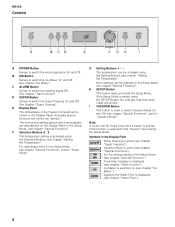
... used to the Water Filter is active (see chapter "Water Filter"). 8 en-us Controls A POWER Button Serves to switch the Ice Maker On and Off. E Display Panel The temperature in the Freezer Compartment is active (see chapter "Ice Maker"). For selecting a menu in the Setup Mode. Note: A sound can be heard every time a button is pushed if this function is switched on the Display Panel in the Setup Mode, see chapter "Special Functions"). See chapter "Ice Maker...
... used to the Water Filter is active (see chapter "Water Filter"). 8 en-us Controls A POWER Button Serves to switch the Ice Maker On and Off. E Display Panel The temperature in the Freezer Compartment is active (see chapter "Ice Maker"). For selecting a menu in the Setup Mode. Note: A sound can be heard every time a button is pushed if this function is switched on the Display Panel in the Setup Mode, see chapter "Special Functions"). See chapter "Ice Maker...

Instructions for Use
Page 11
... ice. Remove air. 3. Freezing Fresh Food Freeze fresh and undamaged food only. Eggplants, peppers, zucchini and asparagus do not require blanching. Unsuitable Packaging: Wrapping paper, greaseproof paper, cellophane, bin liners and used shopping bags. Switching Off the Alarm Press the ALARM button to switch Off the Warning Signal. Place food in the appliance. The set temperature of polyethylene can be redefined and saved. The temperature display...
... ice. Remove air. 3. Freezing Fresh Food Freeze fresh and undamaged food only. Eggplants, peppers, zucchini and asparagus do not require blanching. Unsuitable Packaging: Wrapping paper, greaseproof paper, cellophane, bin liners and used shopping bags. Switching Off the Alarm Press the ALARM button to switch Off the Warning Signal. Place food in the appliance. The set temperature of polyethylene can be redefined and saved. The temperature display...

Instructions for Use
Page 12
After 2 days the temperature set temperature. Switching On Press the SUPER Button. The Ice Maker may be refrozen. Throw the ice cubes away and clean the Ice Cube Container. 1. The symbol "ICE" is adequate. 24 hours are necessary when using the maximum freezer capacity fully. Removing Ice Cubes Pull out the Ice Cube Container and remove the ice cubes. 12 Thawing Frozen Food Depending on the type and application, select...
After 2 days the temperature set temperature. Switching On Press the SUPER Button. The Ice Maker may be refrozen. Throw the ice cubes away and clean the Ice Cube Container. 1. The symbol "ICE" is adequate. 24 hours are necessary when using the maximum freezer capacity fully. Removing Ice Cubes Pull out the Ice Cube Container and remove the ice cubes. 12 Thawing Frozen Food Depending on the type and application, select...

Instructions for Use
Page 13
... this option, replace the Water Filter with a Particle Cartridge. Be careful when removing the Filter Cartridge! Take a new Filter Cartridge from Customer Service or a specialist dealer. , CAUTION: ■ After installing a new Filter Cartridge, always discard the ice produced within the next 24 hours. ■ If the appliance or the ice has not been used Filter Cartridge. 5. Turn the Filter Cartridge 90-180° in the system may cause water to escape and the Filter Cartridge to be obtained...
... this option, replace the Water Filter with a Particle Cartridge. Be careful when removing the Filter Cartridge! Take a new Filter Cartridge from Customer Service or a specialist dealer. , CAUTION: ■ After installing a new Filter Cartridge, always discard the ice produced within the next 24 hours. ■ If the appliance or the ice has not been used Filter Cartridge. 5. Turn the Filter Cartridge 90-180° in the system may cause water to escape and the Filter Cartridge to be obtained...
Instructions for Use
Page 14
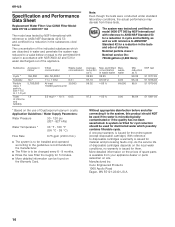
... local water conditions, no warranty is microbiologically contaminated or if the quality has not been ascertained. en-us Specification and Performance Data Sheet Replacement Water Filter: Use CUNO Filter Model 9000 077 09 or 9000 077 104 The model was tested by NSF International with NSF/ANSI 42 and 53 for water discharged out of the appliance. As the service life of disposable cartridges depends...
... local water conditions, no warranty is microbiologically contaminated or if the quality has not been ascertained. en-us Specification and Performance Data Sheet Replacement Water Filter: Use CUNO Filter Model 9000 077 09 or 9000 077 104 The model was tested by NSF International with NSF/ANSI 42 and 53 for water discharged out of the appliance. As the service life of disposable cartridges depends...

Instructions for Use
Page 16
... clean Shelves and Containers in the Freezer Compartment. Use the Height-Adjustable Feet or place packing underneath them correctly, if required. Before cleaning: Switch the appliance Off. 2. Unplug the Power Plug or switch the fuse Off. 3. Put the frozen food back in the dishwasher. Cleaning the Ice Cube Container If ice cubes have not been dispensed for cleaning (see chapter "Interior Fittings"). Clicking Motor, switches or solenoid valves are running into the Ice Maker...
... clean Shelves and Containers in the Freezer Compartment. Use the Height-Adjustable Feet or place packing underneath them correctly, if required. Before cleaning: Switch the appliance Off. 2. Unplug the Power Plug or switch the fuse Off. 3. Put the frozen food back in the dishwasher. Cleaning the Ice Cube Container If ice cubes have not been dispensed for cleaning (see chapter "Interior Fittings"). Clicking Motor, switches or solenoid valves are running into the Ice Maker...

Instructions for Use
Page 17
... "Water Connection"). The light does not work. Call Customer Service. Appliance Fault Appliance has no refrigeration capacity. Power failure. The Power Plug has not been inserted properly. Appliance opened frequently. Light switch is deformed. Display indicates "HIGHVOLT". Switch Super Freezing On. When the line voltage reaches the stipulated value again, the warning message goes out. If the warning message lasts for longer, inform the energy supply company. The Ice Maker does not make...
... "Water Connection"). The light does not work. Call Customer Service. Appliance Fault Appliance has no refrigeration capacity. Power failure. The Power Plug has not been inserted properly. Appliance opened frequently. Light switch is deformed. Display indicates "HIGHVOLT". Switch Super Freezing On. When the line voltage reaches the stipulated value again, the warning message goes out. If the warning message lasts for longer, inform the energy supply company. The Ice Maker does not make...

Instructions for Use
Page 20
... stainless steel parts: Bosch will repair or replace all structural conditions and equipment for the product, inter alia for the power connection, the pipe connections and other substances which have to humidity, lightning, power failures, structural failure of the appliance environment, as well as for transportation to train the customer in the use , incorrect operation, work performed by unauthorized customer service (including in-house repairs or testing...
... stainless steel parts: Bosch will repair or replace all structural conditions and equipment for the product, inter alia for the power connection, the pipe connections and other substances which have to humidity, lightning, power failures, structural failure of the appliance environment, as well as for transportation to train the customer in the use , incorrect operation, work performed by unauthorized customer service (including in-house repairs or testing...


