Installation Instructions
Page 1
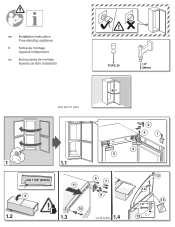
TORX 20 1/8'' (3mm) 9000 918 317 (9307) 90° 2 4 1 1 1.2 1.1 min 1 5/8'' (40mm) 6 11 10 1.3 5 9 7 * 8 1.4 *not all models 3 13 14 15 1/8'' (3mm) 12
TORX 20 1/8'' (3mm) 9000 918 317 (9307) 90° 2 4 1 1 1.2 1.1 min 1 5/8'' (40mm) 6 11 10 1.3 5 9 7 * 8 1.4 *not all models 3 13 14 15 1/8'' (3mm) 12

Installation Instructions
Page 2
18 1.5 1/8'' (3mm) 23 24 1.8 16 19 22 17 21 20 1.6 25 1.9 1.7 27 26 29 28 30 1.10 33 35 38 36 31 1.11 32 1.12 34 37 1.13 ! 41 42 1.14 39 43 * 40 *not all models 44 1.15 45 1.16 48 47 49 46
18 1.5 1/8'' (3mm) 23 24 1.8 16 19 22 17 21 20 1.6 25 1.9 1.7 27 26 29 28 30 1.10 33 35 38 36 31 1.11 32 1.12 34 37 1.13 ! 41 42 1.14 39 43 * 40 *not all models 44 1.15 45 1.16 48 47 49 46
Instructions for Use
Page 3
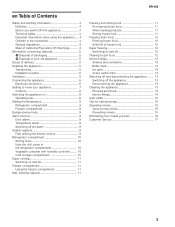
... 9 Door alarm 9 Temperature alarm 9 Switching off the alarm 9 Usable capacity 9 Fully utilising the freezer volume 9 Refrigerator compartment 10 Storing food 10 Note the chill zones in the refrigerator compartment 10 Vegetable container with humidity controller ......... 10 Cold storage compartment 10 Super cooling 11 Switching on and off 12 Thawing frozen food 12 Interior fittings 13 Shelves and containers 13 Bottle shelf 13 Ice pack 13 Active carbon filter...
... 9 Door alarm 9 Temperature alarm 9 Switching off the alarm 9 Usable capacity 9 Fully utilising the freezer volume 9 Refrigerator compartment 10 Storing food 10 Note the chill zones in the refrigerator compartment 10 Vegetable container with humidity controller ......... 10 Cold storage compartment 10 Super cooling 11 Switching on and off 12 Thawing frozen food 12 Interior fittings 13 Shelves and containers 13 Bottle shelf 13 Ice pack 13 Active carbon filter...

Instructions for Use
Page 4
... and the home environment. heater, electric ice maker, etc.). Bottles and cans may explode! ■ Never put the user at considerable risk. Children in the freezer compartment. The appliance comes with the instructions and warnings. Otherwise, parts and door seal will become porous. ■ Never cover or block the ventilation openings for subsequent use any adapter plugs. Danger of suffocation from packaging...
... and the home environment. heater, electric ice maker, etc.). Bottles and cans may explode! ■ Never put the user at considerable risk. Children in the freezer compartment. The appliance comes with the instructions and warnings. Otherwise, parts and door seal will become porous. ■ Never cover or block the ventilation openings for subsequent use any adapter plugs. Danger of suffocation from packaging...
Instructions for Use
Page 5
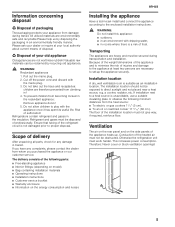
... install and connect the appliance according to the enclosed installation instructions. , WARNING: Do not install this appliance: ■ outdoors, ■ in an environment with dripping water, ■ in rooms where there is unavoidable, use a suitable insulating plate or observe the following parts: ■ Free-standing appliance ■ Interior fittings (depending on model) ■ Bag containing installation materials ■ Operating instructions ■ Installation instructions ■ Customer service booklet ■ Warranty enclosure...
... install and connect the appliance according to the enclosed installation instructions. , WARNING: Do not install this appliance: ■ outdoors, ■ in an environment with dripping water, ■ in rooms where there is unavoidable, use a suitable insulating plate or observe the following parts: ■ Free-standing appliance ■ Interior fittings (depending on model) ■ Bag containing installation materials ■ Operating instructions ■ Installation instructions ■ Customer service booklet ■ Warranty enclosure...

Instructions for Use
Page 6
...-us Connecting the appliance After installing the appliance, wait at least 1 hour until the appliance starts up. Please observe the following installation of the protective conductor may have the appliance tested by a qualified electrician or service technician. If you are used for the first time, clean the interior of your power supply. The location of an electric shock! , WARNING: Insert into the refrigeration...
...-us Connecting the appliance After installing the appliance, wait at least 1 hour until the appliance starts up. Please observe the following installation of the protective conductor may have the appliance tested by a qualified electrician or service technician. If you are used for the first time, clean the interior of your power supply. The location of an electric shock! , WARNING: Insert into the refrigeration...

Instructions for Use
Page 7
... features of the models may differ. 19 20 21 22 23 en-us B 16 17 18 A Refrigerator compartment B Freezer compartment 1-8 Controls 9 Light switch 10 Light (LED) 11 Air outlet opening 12 Shelves in the refrigerator compartment 13 Bottle shelf 14 Vegetable container 15 Cold storage compartment 16 Freezer drawer 17 Freezer shelf 18 Height-adjustable feet 19 Egg rack 20 Door shelf 21 Active carbon filter 22 Bottle holder 23 Tray for large bottles...
... features of the models may differ. 19 20 21 22 23 en-us B 16 17 18 A Refrigerator compartment B Freezer compartment 1-8 Controls 9 Light switch 10 Light (LED) 11 Air outlet opening 12 Shelves in the refrigerator compartment 13 Bottle shelf 14 Vegetable container 15 Cold storage compartment 16 Freezer drawer 17 Freezer shelf 18 Height-adjustable feet 19 Egg rack 20 Door shelf 21 Active carbon filter 22 Bottle holder 23 Tray for large bottles...

Instructions for Use
Page 8
... ice. en-us Controls On / Off freezer °F alarm super -11 -8 -4 0 3 refrigerator °F super 36 37 39 42 46 1 2 34 5 67 8 1 Button „On/Off" Serves to switch the whole appliance on and off. 2 Button „alarm" Used to switch off the warning signal, see chapter "Alarm function". 3 Button „super freezer" Switches super freezing on and off. 4 Button „> °F" The button sets the temperature in the freezer compartment. 5 Freezer compartment display Indicates...
... ice. en-us Controls On / Off freezer °F alarm super -11 -8 -4 0 3 refrigerator °F super 36 37 39 42 46 1 2 34 5 67 8 1 Button „On/Off" Serves to switch the whole appliance on and off. 2 Button „alarm" Used to switch off the warning signal, see chapter "Alarm function". 3 Button „super freezer" Switches super freezing on and off. 4 Button „> °F" The button sets the temperature in the freezer compartment. 5 Freezer compartment display Indicates...

Instructions for Use
Page 9
... inside your appliance on the controls switches to -24 °C). The set . Freezer compartment The temperature can be taken out of the appliance. Energy-saving mode When the appliance is opened, the display switches back to switch off the warning signal. storage period. Perishable food should not be refrozen. Keep pressing temperature selection button „> °F" until the required refrigerator compartment temperature is set. the door is not used...
... inside your appliance on the controls switches to -24 °C). The set . Freezer compartment The temperature can be taken out of the appliance. Energy-saving mode When the appliance is opened, the display switches back to switch off the warning signal. storage period. Perishable food should not be refrozen. Keep pressing temperature selection button „> °F" until the required refrigerator compartment temperature is set. the door is not used...

Instructions for Use
Page 10
... the rear panel. See chapter "Getting to know your appliance" The cold storage compartment has lower temperatures than the refrigerator compartment. hard cheese and butter in the refrigerator compartment. ■ Allow warm food and drinks to cold (e.g. Remove condensation with a dry cloth and adjust air humidity in the refrigerator compartment creates different chill zones: ■ Coldest zone is on the rear panel inside the...
... the rear panel. See chapter "Getting to know your appliance" The cold storage compartment has lower temperatures than the refrigerator compartment. hard cheese and butter in the refrigerator compartment. ■ Allow warm food and drinks to cold (e.g. Remove condensation with a dry cloth and adjust air humidity in the refrigerator compartment creates different chill zones: ■ Coldest zone is on the rear panel inside the...

Instructions for Use
Page 11
... super cooling mode. Freezer compartment Using the freezer compartment ■ To store deep-frozen food. ■ To make ice cubes. ■ To freeze food. Also: waste of energy due to ensure unrestricted air circulation. If required, move the frozen food to be taken out of the appliance and the food stacked directly on the rating plate (see diagram at the front and remove...
... super cooling mode. Freezer compartment Using the freezer compartment ■ To store deep-frozen food. ■ To make ice cubes. ■ To freeze food. Also: waste of energy due to ensure unrestricted air circulation. If required, move the frozen food to be taken out of the appliance and the food stacked directly on the rating plate (see diagram at the front and remove...

Instructions for Use
Page 12
... as lettuce or radishes, eggs in the freezer compartment. storage period. 12 Remove air. 3. Switching on for freezing: Types of food. To retain the best possible nutritional value, flavour and colour, vegetables should be used shopping bags. Several hours before freezing. Super freezing automatically switches off Press button „super freezer". Place food in airtight containers. 1. freezing capacity is placed in shells, grapes...
... as lettuce or radishes, eggs in the freezer compartment. storage period. 12 Remove air. 3. Switching on for freezing: Types of food. To retain the best possible nutritional value, flavour and colour, vegetables should be used shopping bags. Several hours before freezing. Super freezing automatically switches off Press button „super freezer". Place food in airtight containers. 1. freezing capacity is placed in shells, grapes...

Instructions for Use
Page 13
... carbon filter The activated carbon filter ensures that air is variable. The metallic surfaces could corrode. ■ Never clean the shelves or containers in a cool location. Water used for a prolonged period: 1. Interior fittings (not all models) Shelves and containers You can be used to cool food temporarily, e.g. Lift the container and remove. Ice pack If a power failure or malfunction occurs, the ice packs can vary the shelves inside the appliance...
... carbon filter The activated carbon filter ensures that air is variable. The metallic surfaces could corrode. ■ Never clean the shelves or containers in a cool location. Water used for a prolonged period: 1. Interior fittings (not all models) Shelves and containers You can be used to cool food temporarily, e.g. Lift the container and remove. Ice pack If a power failure or malfunction occurs, the ice packs can vary the shelves inside the appliance...
Instructions for Use
Page 14
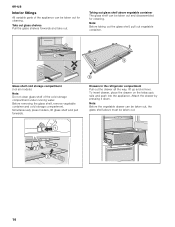
... running water. Note: Before the vegetable drawer can be taken out, the glass shelf above vegetable container The glass shelf can be taken out. 1 2 3 14 To insert drawer, place the drawer on the telescopic rails and push into the appliance. Glass shelf cold storage compartment (not all the way, lift up and remove. Drawers in the refrigerator compartment Pull out the drawer all models) Note: Do not clean glass shelf...
... running water. Note: Before the vegetable drawer can be taken out, the glass shelf above vegetable container The glass shelf can be taken out. 1 2 3 14 To insert drawer, place the drawer on the telescopic rails and push into the appliance. Glass shelf cold storage compartment (not all the way, lift up and remove. Drawers in the refrigerator compartment Pull out the drawer all models) Note: Do not clean glass shelf...

Instructions for Use
Page 15
.... Clicking Motor, switches or solenoid valves are touching each other. 15 Light (LED) Your appliance features a maintenance-free LED light. refrigeration units, fan). Use the height-adjustable feet or place packing underneath them correctly, if required. The energy rating may be installed in a dry, well ventilated room! The appliance is not level Please align the appliance with a spirit level. The appliance should not be repaired by customer service or authorized...
.... Clicking Motor, switches or solenoid valves are touching each other. 15 Light (LED) Your appliance features a maintenance-free LED light. refrigeration units, fan). Use the height-adjustable feet or place packing underneath them correctly, if required. The energy rating may be installed in a dry, well ventilated room! The appliance is not level Please align the appliance with a spirit level. The appliance should not be repaired by customer service or authorized...
Instructions for Use
Page 16
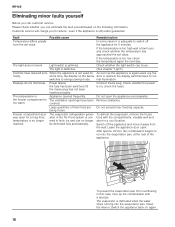
... the set value. Displays do not illuminate. Connect mains plug. freezing capacity. Leave the appliance door open the appliance unnecessarily. After approx. 20 min. The evaporator is defrosted when the water stops running into the evaporation pan, at the rear of fresh food are being frozen. Switch the appliance back on the fascia switches to switch off the appliance for a long time; Power failure; The temperature in thick ice and...
... the set value. Displays do not illuminate. Connect mains plug. freezing capacity. Leave the appliance door open the appliance unnecessarily. After approx. 20 min. The evaporator is defrosted when the water stops running into the evaporation pan, at the rear of fresh food are being frozen. Switch the appliance back on the fascia switches to switch off the appliance for a long time; Power failure; The temperature in thick ice and...

Instructions for Use
Page 17
... changing over by calling the Bosch Customer Interaction Center, 1-800-944-2904 (toll-free), from your Bosch customer service or call customer service, see the chapter entitled "Rectifying minor faults yourself". Customer Service If required, we recommend that you have the door hinges changed over the door hinges from anywhere in the USA. In Canada contact your appropriate customer service. Dealer's name: Address: Telephone number: Purchase date: Model number: FD Nr.: Serial number Type...
... changing over by calling the Bosch Customer Interaction Center, 1-800-944-2904 (toll-free), from your Bosch customer service or call customer service, see the chapter entitled "Rectifying minor faults yourself". Customer Service If required, we recommend that you have the door hinges changed over the door hinges from anywhere in the USA. In Canada contact your appropriate customer service. Dealer's name: Address: Telephone number: Purchase date: Model number: FD Nr.: Serial number Type...


