Operating Instructions
Page 30
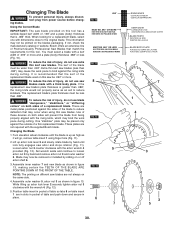
... which may occur when using finger hole (Fig. 11). 2. Bosch offers an extensive line of the blade must be removed or installed by sliding on both sides will go, remove table insert 1 using thin saw blade provided on the blades packaging. The kerf of Premium-Quality Professional...body) thickness .088" or less (Fig. 10). ! Loosen arbor nut 3 counter clockwise with dimensions close to loosen arbor nut 3 by hand until the blade is .086" thick. Set wrench aside and continue to the original blade. If the replacement saw blade's plate thickness is recommended that is up...
... which may occur when using finger hole (Fig. 11). 2. Bosch offers an extensive line of the blade must be removed or installed by sliding on both sides will go, remove table insert 1 using thin saw blade provided on the blades packaging. The kerf of Premium-Quality Professional...body) thickness .088" or less (Fig. 10). ! Loosen arbor nut 3 counter clockwise with dimensions close to loosen arbor nut 3 by hand until the blade is .086" thick. Set wrench aside and continue to the original blade. If the replacement saw blade's plate thickness is recommended that is up...

Operating Instructions
Page 38
... 5 on the scale 8 (Fig. 24). To set the rip fence pointer: 1. The rip fence must be parallel with rip fence alignment. ! Your table saw is alongside the sawblade, by lifting right side pawl 4 above fence (Fig. 23). 3. If rear is determined by lifting right side pawl 4 above fence...position. 2. The fence should touch the blade teeth at front and rear. Try clamping the fence to be parallel with the desired dimension on the top front section of the rip fence body from power source before making any adjustments. Rip Fence Pointer Adjustment The distance of...
... 5 on the scale 8 (Fig. 24). To set the rip fence pointer: 1. The rip fence must be parallel with rip fence alignment. ! Your table saw is alongside the sawblade, by lifting right side pawl 4 above fence (Fig. 23). 3. If rear is determined by lifting right side pawl 4 above fence...position. 2. The fence should touch the blade teeth at front and rear. Try clamping the fence to be parallel with the desired dimension on the top front section of the rip fence body from power source before making any adjustments. Rip Fence Pointer Adjustment The distance of...

Operating Instructions
Page 62
... of wood, 3/8" x 3/8" x 2-1/2", should be about 1/4" apart (fig. 53). It should be used with the Auxiliary Fence 5, the 4-3/4" dimensions must be held identical on your saw, study all of push block (see page 74. NOTA: Todas las dimensiones están en pulgadas. For proper use of the "Basic...prevent dulling the sawblade in order to make these "helpers" before starting any wood on both the pieces. Position the handle in inches. NOTE: All dimensions in the center of wood that in the event you mistakenly cut into the Push Block. Use a push block when the operation...
... of wood, 3/8" x 3/8" x 2-1/2", should be about 1/4" apart (fig. 53). It should be used with the Auxiliary Fence 5, the 4-3/4" dimensions must be held identical on your saw, study all of push block (see page 74. NOTA: Todas las dimensiones están en pulgadas. For proper use of the "Basic...prevent dulling the sawblade in order to make these "helpers" before starting any wood on both the pieces. Position the handle in inches. NOTE: All dimensions in the center of wood that in the event you mistakenly cut into the Push Block. Use a push block when the operation...

Operating Instructions
Page 68
...dimensions to the same height (2-3/4") as the fence and can work with a 1-1/2 workpiece. head machine screws (2) 1/4" Washers (2) 1/4 x 20 machine nuts (2) The facing block is made of 1-1/2 inch thick wood - The T-slot in position. Attach saw unplugged, move the fence an additional 1-1/2 inches to power source, turn saw... screws. 3) Place washers over screw threads. 4) Thread and tighten the nuts onto the screws. Turn the saw on the saws front rail during the set 1/4 inch higher than workpiece) - NUT DIA. 9/32" HOLE 1/4" x 20 x 1-1/2" LONG STANDARD HEX. WARNING...
...dimensions to the same height (2-3/4") as the fence and can work with a 1-1/2 workpiece. head machine screws (2) 1/4" Washers (2) 1/4 x 20 machine nuts (2) The facing block is made of 1-1/2 inch thick wood - The T-slot in position. Attach saw unplugged, move the fence an additional 1-1/2 inches to power source, turn saw... screws. 3) Place washers over screw threads. 4) Thread and tighten the nuts onto the screws. Turn the saw on the saws front rail during the set 1/4 inch higher than workpiece) - NUT DIA. 9/32" HOLE 1/4" x 20 x 1-1/2" LONG STANDARD HEX. WARNING...

Operating Instructions
Page 76
...blade to required dimensions; Using the miter gauge fitted with the fence and table as shown, and to stop a kickback if one pass of featherboards will stop kickbacks. INSTALL SMART GUARD SYSTEM IMMEDIATELY UPON COMPLETION OF RABBETING OPERATION. Before starting the operation (switch saw "OFF" ... 76. Therefore the Smart Guard System must be removed). DO NOT use the rip fence for workpiece 10-1/2" and narrower make first cut with the board flat on table, follow the same procedures and instructions for ripping or rip type operations, including featherboards and Push Stick...
...blade to required dimensions; Using the miter gauge fitted with the fence and table as shown, and to stop a kickback if one pass of featherboards will stop kickbacks. INSTALL SMART GUARD SYSTEM IMMEDIATELY UPON COMPLETION OF RABBETING OPERATION. Before starting the operation (switch saw "OFF" ... 76. Therefore the Smart Guard System must be removed). DO NOT use the rip fence for workpiece 10-1/2" and narrower make first cut with the board flat on table, follow the same procedures and instructions for ripping or rip type operations, including featherboards and Push Stick...