
Operating Instructions
Page 2
...REMOVE ADJUSTING KEYS AND WRENCHES When not in use , before plugging in serious personal injury. Accessories that may result in tool. AVOID DANGEROUS ENVIRONMENTS Don't use circular saw for example; Learn its operation. WARNING All repairs, electrical or mechanical, should be attempted...precautions may affect its application and limitations as well as the specific potential hazards peculiar to the tool. Contact the nearest Bosch Factory Service Center, Authorized Service Station or other drug. It's safer than using alcohol or other competent repair service....
...REMOVE ADJUSTING KEYS AND WRENCHES When not in use , before plugging in serious personal injury. Accessories that may result in tool. AVOID DANGEROUS ENVIRONMENTS Don't use circular saw for example; Learn its operation. WARNING All repairs, electrical or mechanical, should be attempted...precautions may affect its application and limitations as well as the specific potential hazards peculiar to the tool. Contact the nearest Bosch Factory Service Center, Authorized Service Station or other drug. It's safer than using alcohol or other competent repair service....
Operating Instructions
Page 3
... or the power cord ... If in place and operating properly. WARNING For your own safety, do not operate your table saw is removed for lubricating and changing accessories. Adjustments 34-42 6. b. Keeping sawblade guard, spreader and anti-kickback pawls in doubt, DO NOT PLUG IN THE... TOOL. f. h. above). 10. such as damage to the instructions ... Wear ear plugs or muffs during certain operations such as ...
... or the power cord ... If in place and operating properly. WARNING For your own safety, do not operate your table saw is removed for lubricating and changing accessories. Adjustments 34-42 6. b. Keeping sawblade guard, spreader and anti-kickback pawls in doubt, DO NOT PLUG IN THE... TOOL. f. h. above). 10. such as damage to the instructions ... Wear ear plugs or muffs during certain operations such as ...

Operating Instructions
Page 4
... friction wheels (metal slitting blades) wire wheels or buffing wheels. NOTE AND FOLLOW SAFETY INSTRUCTIONS THAT APPEAR ON THE FRONT OF YOUR TABLE SAW. 4. The blade could endanger your fingers and hands in diameter than one or more conveniently worked and with the sawblade. KNOW YOUR... an auxiliary wood facing is parallel with a potential kickback. Keep all sides except for the operation being performed. a. USE ONLY RECOMMENDED ACCESSORIES. g. NEVER place your face or body in line with either the rip fence or the miter gauge to stand, in normal operating ...
... friction wheels (metal slitting blades) wire wheels or buffing wheels. NOTE AND FOLLOW SAFETY INSTRUCTIONS THAT APPEAR ON THE FRONT OF YOUR TABLE SAW. 4. The blade could endanger your fingers and hands in diameter than one or more conveniently worked and with the sawblade. KNOW YOUR... an auxiliary wood facing is parallel with a potential kickback. Keep all sides except for the operation being performed. a. USE ONLY RECOMMENDED ACCESSORIES. g. NEVER place your face or body in line with either the rip fence or the miter gauge to stand, in normal operating ...
Operating Instructions
Page 6
... Loose Parts 24 Assembly 26-32 Attaching Smart Guard System Components .......26, 28 Changing The Blade 30 Attaching The Rip Fence 32 Mounting Table Saw to Workbench 32 Page Adjustments 34-40 Adjusting 0 & 45 Degree Positive Stops 34 Adjusting Blade Parallel to the Miter Gauge Slot ........36 Miter ... Repetitive Crosscutting 68 Miter Cutting 70 Bevel Crosscutting 70 Compound Miter Cutting 70 Using the Rip Fence 70, 72 Ripping 74 Non Thru-Sawing 76 Rabbeting 76 Dadoing & Molding Cutting 78-82 Maintaining Your Table Saw 84 Lubrication 86 Accessories 86 Trouble Shooting 88 6.
... Loose Parts 24 Assembly 26-32 Attaching Smart Guard System Components .......26, 28 Changing The Blade 30 Attaching The Rip Fence 32 Mounting Table Saw to Workbench 32 Page Adjustments 34-40 Adjusting 0 & 45 Degree Positive Stops 34 Adjusting Blade Parallel to the Miter Gauge Slot ........36 Miter ... Repetitive Crosscutting 68 Miter Cutting 70 Bevel Crosscutting 70 Compound Miter Cutting 70 Using the Rip Fence 70, 72 Ripping 74 Non Thru-Sawing 76 Rabbeting 76 Dadoing & Molding Cutting 78-82 Maintaining Your Table Saw 84 Lubrication 86 Accessories 86 Trouble Shooting 88 6.
Operating Instructions
Page 48
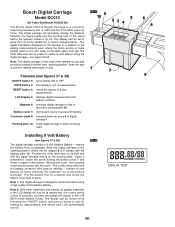
...sets display's unit of fence 9 or parking plate 10. Remove the cover - Bosch Digital Carriage Model DC010 (On Table Saw Model 4100DG-09) FIG. 37 6 10 234 5 The Bosch Model DC010 Digital Carriage is a precision measuring accessory that is used with the 4100 table saw 's rip fence 9 to digital carriage 1. see ...is only used . FIG. 38 DISPLAY TEST 48. 6 8 9 The display can be set to the 1/16 INCH mode (default mode). Position the 4100 table saw 's front rail. The 4100 table saw 's blade and the working side of cuts. 1 7 Features (see figures 37 & 38) ON/OFF button ...
...sets display's unit of fence 9 or parking plate 10. Remove the cover - Bosch Digital Carriage Model DC010 (On Table Saw Model 4100DG-09) FIG. 37 6 10 234 5 The Bosch Model DC010 Digital Carriage is a precision measuring accessory that is used with the 4100 table saw 's rip fence 9 to digital carriage 1. see ...is only used . FIG. 38 DISPLAY TEST 48. 6 8 9 The display can be set to the 1/16 INCH mode (default mode). Position the 4100 table saw 's front rail. The 4100 table saw 's blade and the working side of cuts. 1 7 Features (see figures 37 & 38) ON/OFF button ...

Operating Instructions
Page 72
...head machine screws Three (3) 1/4" Washers Three (3) 1/4 x 20 machine nuts The facing is made of 3/4 inch thick wood - Assembly: 1) Place the hex. head 1 of material or FOR ANY OTHER REASON. 10. NUT DIA. to free the blade. 9. to pull the workpiece through 9/32" holes, then counter-sink...Turn the saw . After the blade has stopped turning, lift the guard and remove the piece. 12. This will help prevent damage to size Three (3) 1/4 x 20 x 3/4" long hex. This will prevent it from the table. then slide each hole (down 3/8 inch) using dado or molding head accessories, an auxiliary...
...head machine screws Three (3) 1/4" Washers Three (3) 1/4 x 20 machine nuts The facing is made of 3/4 inch thick wood - Assembly: 1) Place the hex. head 1 of material or FOR ANY OTHER REASON. 10. NUT DIA. to free the blade. 9. to pull the workpiece through 9/32" holes, then counter-sink...Turn the saw . After the blade has stopped turning, lift the guard and remove the piece. 12. This will help prevent damage to size Three (3) 1/4 x 20 x 3/4" long hex. This will prevent it from the table. then slide each hole (down 3/8 inch) using dado or molding head accessories, an auxiliary...

Operating Instructions
Page 74
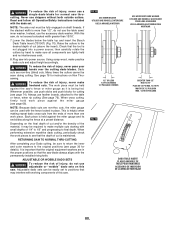
The Bosch table saw outfeed support table kit (TS1001, TS1002) is 6" and WIDER use your RIGHT hand to feed the workpiece, use LEFT hand ONLY to guide the workpiece ... BEVEL RIPPING... a Push Stick. If the fence is mounted to use for use fence on top of the blade ONLY. When "WIDTH OF RIP" is an ideal accessory to the left, the sawblade guard may interfere with the left hand (Fig. 62). When "WIDTH OF RIP" is 2" to 6" wide USE THE .... B. C. USE the AUXILIARY FENCE, and PUSH BLOCK. Feed the workpiece by hand until the end is approx. 1" from the front edge of the table.
The Bosch table saw outfeed support table kit (TS1001, TS1002) is 6" and WIDER use your RIGHT hand to feed the workpiece, use LEFT hand ONLY to guide the workpiece ... BEVEL RIPPING... a Push Stick. If the fence is mounted to use for use fence on top of the blade ONLY. When "WIDTH OF RIP" is an ideal accessory to the left, the sawblade guard may interfere with the left hand (Fig. 62). When "WIDTH OF RIP" is 2" to 6" wide USE THE .... B. C. USE the AUXILIARY FENCE, and PUSH BLOCK. Feed the workpiece by hand until the end is approx. 1" from the front edge of the table.
Operating Instructions
Page 78
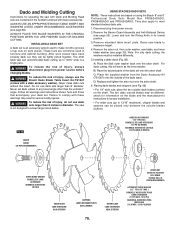
...two dado outside of injury, do not use dado sets larger than 8" diameter. ALWAYS USE AN APPROPRIATE BOSCH TABLE INSERT AND WASHERS LISTED UNDER RECOMMENDED ACCESSORIES (see page 30). The 4100 table saw can be tightly joined together. Never make non-thru grooves or lap cuts on the blade and the ... Blade Table Insert No.TS1007 (comes with these accessories. Never set onto the arbor shaft. Remove the arbor nut, then outer washer, saw blade to maximum height. 4. To reduce the risk of the dado set dado cutters to any bevel angle other than 8 inches in the booklet...
...two dado outside of injury, do not use dado sets larger than 8" diameter. ALWAYS USE AN APPROPRIATE BOSCH TABLE INSERT AND WASHERS LISTED UNDER RECOMMENDED ACCESSORIES (see page 30). The 4100 table saw can be tightly joined together. Never make non-thru grooves or lap cuts on the blade and the ... Blade Table Insert No.TS1007 (comes with these accessories. Never set onto the arbor shaft. Remove the arbor nut, then outer washer, saw blade to maximum height. 4. To reduce the risk of the dado set dado cutters to any bevel angle other than 8 inches in the booklet...
Operating Instructions
Page 80
...hand to see page 74). See page 76 for cutting (see that the saw . sawing. ! Whenever possible, use the table saws' inner washer. When performing extensive repetitive dado cutting, periodically check the work piece...the stacked width is not plugged into power source. Lower the blades below the table top and insert the Bosch Dado Table Insert (TS1007) (Fig. 70). The work pieces to make multiple cuts ...blocks for instructions on shaft threads. Never use the accessory dado washer. With this saw into a power source; FIG. 69 USE INNER WASHER UTILISER UNE RONDELLE ...
...hand to see page 74). See page 76 for cutting (see that the saw . sawing. ! Whenever possible, use the table saws' inner washer. When performing extensive repetitive dado cutting, periodically check the work piece...the stacked width is not plugged into power source. Lower the blades below the table top and insert the Bosch Dado Table Insert (TS1007) (Fig. 70). The work pieces to make multiple cuts ...blocks for instructions on shaft threads. Never use the accessory dado washer. With this saw into a power source; FIG. 69 USE INNER WASHER UTILISER UNE RONDELLE ...
Operating Instructions
Page 86
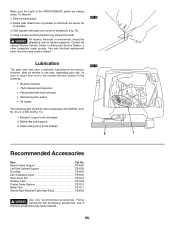
... System TS1010 Blade Tote TS1011 Gravity-Rise Wheeled Table Saw Stand TS2000 ! FIG. 73 Lubrication The gear case has been completely lubricated at the factory. FIG. 74 The following : • Brushes replaced. • Parts cleaned and inspected. • Relubricated with pawl over corner of improper accessories may create a hazard. Follow instructions that teeth...
... System TS1010 Blade Tote TS1011 Gravity-Rise Wheeled Table Saw Stand TS2000 ! FIG. 73 Lubrication The gear case has been completely lubricated at the factory. FIG. 74 The following : • Brushes replaced. • Parts cleaned and inspected. • Relubricated with pawl over corner of improper accessories may create a hazard. Follow instructions that teeth...
