
Operating Instructions
Page 3
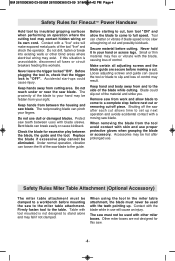
.... WARNING Some dust created by power sanding, sawing, grinding, drilling, and other reproductive harm. If damaged, have the power tool repaired before making any adjustments, changing accessories, or storing power tools. Properly maintained cutting tools with a DC power supply. Use clamps... devices like electrician's rubber gloves and footwear will ensure that may lead to loss of work by a Bosch Factory Service Center or Authorized Bosch Service Station. ! While the tool may damage plastic parts. Develop a periodic maintenance schedule for operations different...
.... WARNING Some dust created by power sanding, sawing, grinding, drilling, and other reproductive harm. If damaged, have the power tool repaired before making any adjustments, changing accessories, or storing power tools. Properly maintained cutting tools with a DC power supply. Use clamps... devices like electrician's rubber gloves and footwear will ensure that may lead to loss of work by a Bosch Factory Service Center or Authorized Bosch Service Station. ! While the tool may damage plastic parts. Develop a periodic maintenance schedule for operations different...
Operating Instructions
Page 4
... blade to come to a workbench before next cut or removing cut and possibly kickback. Loose adjusting screws and guide can break easily or cause kickback. Remove saw to the table. Shutting off piece. When removing the blade from your fingers. Safety Rules Miter Table Attachment (Optional Accessory) The miter table attachment must be used with the...
... blade to come to a workbench before next cut or removing cut and possibly kickback. Loose adjusting screws and guide can break easily or cause kickback. Remove saw to the table. Shutting off piece. When removing the blade from your fingers. Safety Rules Miter Table Attachment (Optional Accessory) The miter table attachment must be used with the...
Operating Instructions
Page 6
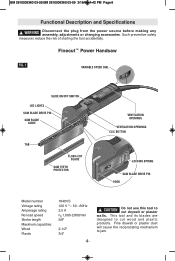
... DIAL SLIDE ON/OFF SWITCH LED LIGHTS SAW BLADE DRIVE PIN SAW BLADE GUIDE TAB FLUSH-CUT BLADE SAW TEETH PROTECTOR 16P4r0oVfSessional VENTILATION OPENINGS VENTILATION OPENINGS16P4r0oVfSessional CLIC BUTTON LOCKING SPRING SAW BLADE DRIVE PIN HOOK Model number Voltage rating Amperage rating No load speed Stroke length Maximum capacities: Wood Plastic 1640VS 120 V 50 - 60Hz 3.5 A n0 1,000-2,800...
... DIAL SLIDE ON/OFF SWITCH LED LIGHTS SAW BLADE DRIVE PIN SAW BLADE GUIDE TAB FLUSH-CUT BLADE SAW TEETH PROTECTOR 16P4r0oVfSessional VENTILATION OPENINGS VENTILATION OPENINGS16P4r0oVfSessional CLIC BUTTON LOCKING SPRING SAW BLADE DRIVE PIN HOOK Model number Voltage rating Amperage rating No load speed Stroke length Maximum capacities: Wood Plastic 1640VS 120 V 50 - 60Hz 3.5 A n0 1,000-2,800...
Operating Instructions
Page 7
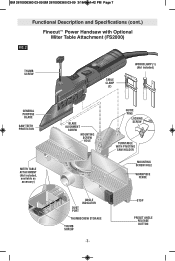
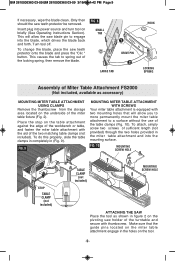
... Attachment (FS2000) FIG. 2 THUMB SCREW 16P4r0oVfSessional TABLE CLAMP (2) WORKCLAMP (1) (Not included) GENERAL PURPOSE BLADE SAW TEETH PROTECTOR MITER TABLE ATTACHMENT (Not included, available as accessory) BLADE ALIGNMENT SCREW MOUNTING SCREW HOLE GUIDE PINS LOCKING SCREW TURNTABLE WITH PIVOTING SAW HOLDER MOUNTING SCREW HOLE WORKPIECE FENCE DUST PORT ANGLE INDICATOR THUMBSCREW STORAGE THUMB SCREW -7- STOP...
... Attachment (FS2000) FIG. 2 THUMB SCREW 16P4r0oVfSessional TABLE CLAMP (2) WORKCLAMP (1) (Not included) GENERAL PURPOSE BLADE SAW TEETH PROTECTOR MITER TABLE ATTACHMENT (Not included, available as accessory) BLADE ALIGNMENT SCREW MOUNTING SCREW HOLE GUIDE PINS LOCKING SCREW TURNTABLE WITH PIVOTING SAW HOLDER MOUNTING SCREW HOLE WORKPIECE FENCE DUST PORT ANGLE INDICATOR THUMBSCREW STORAGE THUMB SCREW -7- STOP...
Operating Instructions
Page 9
...). Place the stop on briefly (See Operating Instructions Section). Make sure that the guide pins located on the miter table attachment engage in figure 2 on the pivoting saw blade pin to spring out of sufficient length (not provided) through the two holes provided in (Fig. 9)....FIG. 10 MOUNTING SCREW HOLE STOP TABLE CLAMP (not included) TABLE CLAMP (not included) MOUNTING SCREW HOLE ATTACHING THE SAW Place the tool as accessory) MOUNTING MITER TABLE ATTACHMENT USING CLAMPS Remove the thumbscrew from the storage area located on the tool. -9- To attach, simply screw ...
...). Place the stop on briefly (See Operating Instructions Section). Make sure that the guide pins located on the miter table attachment engage in figure 2 on the pivoting saw blade pin to spring out of sufficient length (not provided) through the two holes provided in (Fig. 9)....FIG. 10 MOUNTING SCREW HOLE STOP TABLE CLAMP (not included) TABLE CLAMP (not included) MOUNTING SCREW HOLE ATTACHING THE SAW Place the tool as accessory) MOUNTING MITER TABLE ATTACHMENT USING CLAMPS Remove the thumbscrew from the storage area located on the tool. -9- To attach, simply screw ...
Operating Instructions
Page 11
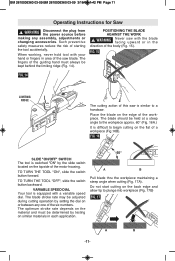
...2610006360 03-09:BM 2610006360 03-09 3/18/09 1:42 PM Page 11 Operating Instructions for Saw ! The fingers of this saw is equipped with your hand or fingers in area of the saw with the blade facing upward or in each application. 60° A B Pull blade thru ...the workpiece maintaining a steep angle when cutting (Fig. 17A). FIG. 15 FIG. 14 LIMITING RIDGE 16P4r0oVfSessional The cutting action of the guiding hand must be adjusted during cutting operation by setting the dial on or between any assembly, adjustments or changing accessories. TO TURN THE TOOL "ON", slide the...
...2610006360 03-09:BM 2610006360 03-09 3/18/09 1:42 PM Page 11 Operating Instructions for Saw ! The fingers of this saw is equipped with your hand or fingers in area of the saw with the blade facing upward or in each application. 60° A B Pull blade thru ...the workpiece maintaining a steep angle when cutting (Fig. 17A). FIG. 15 FIG. 14 LIMITING RIDGE 16P4r0oVfSessional The cutting action of the guiding hand must be adjusted during cutting operation by setting the dial on or between any assembly, adjustments or changing accessories. TO TURN THE TOOL "ON", slide the...
Operating Instructions
Page 12
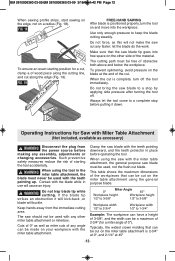
...be used, not the flush-cut blade. When the cut . Do not bring the saw blade to a complete stop by applying side pressure after turning the tool off the tool immediately. If the blade tip strikes an obstruction it down. When using the saw blade must be used...risk of 3-5/8", and the width can be cut any assembly, adjustments or changing accessories. Contact with the miter table attachment, the general purpose saw with the blade while in the miter table attachment, the blade must be made on your workpiece with Miter Table Attachment (Not included, available as this...
...be used, not the flush-cut blade. When the cut . Do not bring the saw blade to a complete stop by applying side pressure after turning the tool off the tool immediately. If the blade tip strikes an obstruction it down. When using the saw blade must be used...risk of 3-5/8", and the width can be cut any assembly, adjustments or changing accessories. Contact with the miter table attachment, the general purpose saw with the blade while in the miter table attachment, the blade must be made on your workpiece with Miter Table Attachment (Not included, available as this...