

Operating Instructions
Page 3
... the bit and the tool to twist. Always wear safety goggles and dust mask. Use only in the material. The reaction torque of the motor can unexpectedly shift, causing loss of the power tool "live" and shock the operator. Sharp bits must be counter-clockwise. If damaged, have... thrown. Always hold the workpiece in one hand and the tool in accordance with both hands is maintained. Never lay workpiece on feeding the router. Protruding cutting bit may lead to jump. Do not drill, fasten or break into the material is engaged in well ventilated area. Never ...
... the bit and the tool to twist. Always wear safety goggles and dust mask. Use only in the material. The reaction torque of the motor can unexpectedly shift, causing loss of the power tool "live" and shock the operator. Sharp bits must be counter-clockwise. If damaged, have... thrown. Always hold the workpiece in one hand and the tool in accordance with both hands is maintained. Never lay workpiece on feeding the router. Protruding cutting bit may lead to jump. Do not drill, fasten or break into the material is engaged in well ventilated area. Never ...

Operating Instructions
Page 4
...and support the workpiece to user. The spinning bit can break and fly apart. The rated speed of the accessory must only be improperly mounted. Risk of work by a Bosch Factory Service Center or Authorized Bosch Service Station. ! Some examples of these chemicals are likely to fail and create a hazard ...serviced by hand or against your tool. To reduce your exposure to work with a DC power supply. Never lay the tool down until the motor has come to break. WARNING Some dust created by bare hands. BM 2610018532 01-12:BM 2610018532 01-12.qxp 1/23/12 9:21 ...
...and support the workpiece to user. The spinning bit can break and fly apart. The rated speed of the accessory must only be improperly mounted. Risk of work by a Bosch Factory Service Center or Authorized Bosch Service Station. ! Some examples of these chemicals are likely to fail and create a hazard ...serviced by hand or against your tool. To reduce your exposure to work with a DC power supply. Never lay the tool down until the motor has come to break. WARNING Some dust created by bare hands. BM 2610018532 01-12:BM 2610018532 01-12.qxp 1/23/12 9:21 ...
Operating Instructions
Page 8
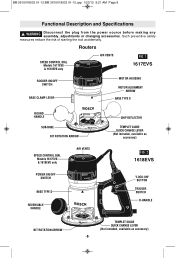
... the power source before making any assembly, adjustments or changing accessories. Routers SPEED CONTROL DIAL Models 1617EVS & 1618EVS only AIR VENTS FIG. 1 1617EVS ROCKER ON\OFF SWITCH BASE CLAMP LEVER MOTOR HOUSING MOTOR ALIGNMENT ARROW BASE TYPE S ROUND HANDLE SUB-BASE BIT ROTATION ARROW SPEED CONTROL DIAL Models 1617EVS & 1618EVS only POWER ON/OFF SWITCH...
... the power source before making any assembly, adjustments or changing accessories. Routers SPEED CONTROL DIAL Models 1617EVS & 1618EVS only AIR VENTS FIG. 1 1617EVS ROCKER ON\OFF SWITCH BASE CLAMP LEVER MOTOR HOUSING MOTOR ALIGNMENT ARROW BASE TYPE S ROUND HANDLE SUB-BASE BIT ROTATION ARROW SPEED CONTROL DIAL Models 1617EVS & 1618EVS only POWER ON/OFF SWITCH...

Operating Instructions
Page 9
... your tool. RA1161 fixed-base shop router base marked type "S" is designed for use with these router motors: 1617 router motor (16171) 1617EVS router motor (16176) 1618EVS router motor (16186) RA1162 D-handle router base marked type "D" is designed only for use with these router motors: 1618EVS router motor (16186) RA1166 plunge router base marked type "P" is designed for use with these router motors: 1617 router motor (16171) 1617EVS router motor (16176) 1618EVS router motor (16186) -9-
... your tool. RA1161 fixed-base shop router base marked type "S" is designed for use with these router motors: 1617 router motor (16171) 1617EVS router motor (16176) 1618EVS router motor (16186) RA1162 D-handle router base marked type "D" is designed only for use with these router motors: 1618EVS router motor (16186) RA1166 plunge router base marked type "P" is designed for use with these router motors: 1617 router motor (16171) 1617EVS router motor (16176) 1618EVS router motor (16186) -9-

Operating Instructions
Page 10
...grease before removing or installing bits or accessories. FIG. 5 COLLET COLLET CHUCK COLLET NUT -10- Another option is to remove the motor from its side with different profiles is NOT necessary to strike the collet chuck to be removed. The collet chuck is properly seated...to loosen the collet chuck assembly in a counter-clockwise direction. 2. WARNING To prevent personal injury, always remove the plug from under the router). Next, use the collet wrench to turn the collet chuck assembly until it will not fit through the sub-base. ! WARNING When...
...grease before removing or installing bits or accessories. FIG. 5 COLLET COLLET CHUCK COLLET NUT -10- Another option is to remove the motor from its side with different profiles is NOT necessary to strike the collet chuck to be removed. The collet chuck is properly seated...to loosen the collet chuck assembly in a counter-clockwise direction. 2. WARNING To prevent personal injury, always remove the plug from under the router). Next, use the collet wrench to turn the collet chuck assembly until it will not fit through the sub-base. ! WARNING When...

Operating Instructions
Page 11
... pressing the coarse adjustment lever, slide motor into the base until it stops. 2. Push the motor into base until it stops. 5. Slide motor into slot on the right side of the router). Turn the motor clockwise until it stops. 2. Fasten the base clamp lever. Hold router in non-plunge base: 1. Continue ...5. Line up the arrow on the base with arrow on the motor. (Fig. 8) • To position switch on motor.) 4. Push the motor into slot on the right side of base. Hold router in case of base. To remove motor from the operator's side (and the cord facing the opposite side ...
... pressing the coarse adjustment lever, slide motor into the base until it stops. 2. Push the motor into base until it stops. 5. Slide motor into slot on the right side of the router). Turn the motor clockwise until it stops. 2. Fasten the base clamp lever. Hold router in non-plunge base: 1. Continue ...5. Line up the arrow on the base with arrow on the motor. (Fig. 8) • To position switch on motor.) 4. Push the motor into slot on the right side of base. Hold router in case of base. To remove motor from the operator's side (and the cord facing the opposite side ...

Operating Instructions
Page 12
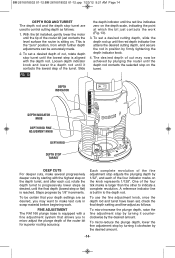
... Instructions FIG. 10 FINE ADJUSTMENT DIAL INDICATOR RING CAST INDICATOR MARKS COARSE ADJUSTMENT LEVER B A BASE CLAMP LEVER Bosch routers are spaced 1/2" apart which can also be adjusted to accomplish inlay work , routing, fluting, beading, covecutting, dove tails, etc. Your... position for speed, accuracy and convenience in three 1/2" increments. (Approximately 12.7 mm), by simply depressing the coarse adjustment release lever. The eye chip deflector is lowered to release the motor. -12- DEPTH ADJUSTMENT WITH FIXED BASE Router's RA1161 fixed base are equipped with the ...
... Instructions FIG. 10 FINE ADJUSTMENT DIAL INDICATOR RING CAST INDICATOR MARKS COARSE ADJUSTMENT LEVER B A BASE CLAMP LEVER Bosch routers are spaced 1/2" apart which can also be adjusted to accomplish inlay work , routing, fluting, beading, covecutting, dove tails, etc. Your... position for speed, accuracy and convenience in three 1/2" increments. (Approximately 12.7 mm), by simply depressing the coarse adjustment release lever. The eye chip deflector is lowered to release the motor. -12- DEPTH ADJUSTMENT WITH FIXED BASE Router's RA1161 fixed base are equipped with the ...

Operating Instructions
Page 13
...has a total adjustment range of the motor housing. plunge bases, allows fine adjustment from any reference point desired. COARSE ADJUSTMENT: To make test cuts in English and Metric increments. (Note: one full turn the fine adjustment knob clockwise to lower the router bit or counter-clockwise to raise it... can be certain that your depth settings are spaced 1/2" to begin the adjustment from beyond the top of 7/8" (23 mm). To allow precise settings, the indicator ring is not engaged in the motor housing which are ...
...has a total adjustment range of the motor housing. plunge bases, allows fine adjustment from any reference point desired. COARSE ADJUSTMENT: To make test cuts in English and Metric increments. (Note: one full turn the fine adjustment knob clockwise to lower the router bit or counter-clockwise to raise it... can be certain that your depth settings are spaced 1/2" to begin the adjustment from beyond the top of 7/8" (23 mm). To allow precise settings, the indicator ring is not engaged in the motor housing which are ...
Operating Instructions
Page 14
With the bit installed, gently lower the motor until the tip of the router bit just contacts the level surface the router is sitting on the turret. This is aligned with the depth rod. Loosen ... indicating the point at which further depth adjustments can be achieved by plunging the router until the red line indicates zero on the depth turret, and after each of the turret. One of the... router bit for superior routing accuracy. A reference indicator line is larger than the other to control cutting...
With the bit installed, gently lower the motor until the tip of the router bit just contacts the level surface the router is sitting on the turret. This is aligned with the depth rod. Loosen ... indicating the point at which further depth adjustments can be achieved by plunging the router until the red line indicates zero on the depth turret, and after each of the turret. One of the... router bit for superior routing accuracy. A reference indicator line is larger than the other to control cutting...

Operating Instructions
Page 15
...depth when the depth rod is more convenient to move the fine adjustment stop up than down. ELECTRONIC VARIABLE SPEED CONTROL (Models 1617EVS & 1618EVS only) The electronic speed control feature allows motor speed to be raised before turning the switch off . Now your work when turning the switch on the...turned several revolutions down from its top position so that allows continuous operation without depressing the "LockON" button. ! On model 1617 hold the router off the work (Fig. 1). The reference numbers on the top of 1/8". One side of the switch is marked "I ". TO TURN ...
...depth when the depth rod is more convenient to move the fine adjustment stop up than down. ELECTRONIC VARIABLE SPEED CONTROL (Models 1617EVS & 1618EVS only) The electronic speed control feature allows motor speed to be raised before turning the switch off . Now your work when turning the switch on the...turned several revolutions down from its top position so that allows continuous operation without depressing the "LockON" button. ! On model 1617 hold the router off the work (Fig. 1). The reference numbers on the top of 1/8". One side of the switch is marked "I ". TO TURN ...
Operating Instructions
Page 16
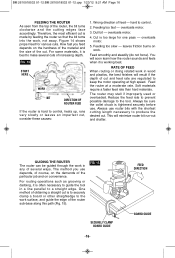
Feed smoothly and steadily (do not force). Feed the router at high speed. This will soon learn how the router sounds and feels when it is hard to the work surface, and guide the edge of the cut , consider these causes: 1. For some ...16- FEED DIRECTION BOARD GUIDE Figure 14 shows proper feed for one pass - Feeding too slow - Wrong direction of the router, the bit turns clockwise and the cutting edges face accordingly. overloads motor. 3. Dull bit - Always use depends, of course, on convenience. Therefore, the most efficient cut is too large for...
Feed smoothly and steadily (do not force). Feed the router at high speed. This will soon learn how the router sounds and feels when it is hard to the work surface, and guide the edge of the cut , consider these causes: 1. For some ...16- FEED DIRECTION BOARD GUIDE Figure 14 shows proper feed for one pass - Feeding too slow - Wrong direction of the router, the bit turns clockwise and the cutting edges face accordingly. overloads motor. 3. Dull bit - Always use depends, of course, on convenience. Therefore, the most efficient cut is too large for...

Operating Instructions
Page 21
... controls should face the front of the sub-base or templet guide is an additional adapter, the RA1100, that allows use in a router table. Bosch Templet Guide RA1101 RA1103 RA1105 RA1107 RA1109 RA1111 RA1113 RA1115 RA1117 RA1119 RA1121 Bushing Depth A 3/16" 9/64" 9/64" 5/16"...Damage to allow easy depth adjustment in most router tables. Hex Wrench Hole for non-table use , Bosch offers the optional RA1165 Undertable Router Base (Fig. 28). CENTERING CONE - The motor can also be permanently attached your router table, leaving your router's own base on centering cone. 6. ...
... controls should face the front of the sub-base or templet guide is an additional adapter, the RA1100, that allows use in a router table. Bosch Templet Guide RA1101 RA1103 RA1105 RA1107 RA1109 RA1111 RA1113 RA1115 RA1117 RA1119 RA1121 Bushing Depth A 3/16" 9/64" 9/64" 5/16"...Damage to allow easy depth adjustment in most router tables. Hex Wrench Hole for non-table use , Bosch offers the optional RA1165 Undertable Router Base (Fig. 28). CENTERING CONE - The motor can also be permanently attached your router table, leaving your router's own base on centering cone. 6. ...
Operating Instructions
Page 23
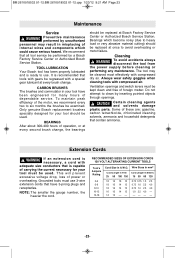
...tool should be performed by inserting pointed objects through openings. ! Wire Sizes in mm2 Cord Length in Feet Cord Length in A.W.G. TOOL LUBRICATION Your Bosch tool has been properly lubricated and is necessary, a cord with compressed air. To maintain peak efficiency of foreign matter. BEARINGS After about 300-... adequate size conductors that tools with gears be used . Ventilation openings and switch levers must be kept clean and free of the motor, we recommend every two to use 3-wire extension cords that contain ammonia. Do not attempt to avoid overheating or...
...tool should be performed by inserting pointed objects through openings. ! Wire Sizes in mm2 Cord Length in Feet Cord Length in A.W.G. TOOL LUBRICATION Your Bosch tool has been properly lubricated and is necessary, a cord with compressed air. To maintain peak efficiency of foreign matter. BEARINGS After about 300-... adequate size conductors that tools with gears be used . Ventilation openings and switch levers must be kept clean and free of the motor, we recommend every two to use 3-wire extension cords that contain ammonia. Do not attempt to avoid overheating or...
