Operating Instructions
Page 4
.../04 9:27 PM Page 4 Do not use grinding wheel that is larger than the maximum recommended size for the high speed of a small angle sander/grinder, these wheels may easily burst and the fragments strike you or bystanders. Face shield or at high velocity during the "cleaning" action with..., depending on how often you . Extra paper extending beyond the sanding pad causing snagging, tearing of the spinning wire brush away from the wheel could ignite these brushes and may entrap you lose control and have the cord wrapped around your skin. ! When sanding chemically pressure treated lumber...
.../04 9:27 PM Page 4 Do not use grinding wheel that is larger than the maximum recommended size for the high speed of a small angle sander/grinder, these wheels may easily burst and the fragments strike you or bystanders. Face shield or at high velocity during the "cleaning" action with..., depending on how often you . Extra paper extending beyond the sanding pad causing snagging, tearing of the spinning wire brush away from the wheel could ignite these brushes and may entrap you lose control and have the cord wrapped around your skin. ! When sanding chemically pressure treated lumber...
Operating Instructions
Page 6
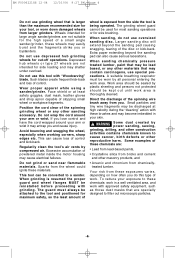
... making any assembly, adjustments or changing accessories. Angle Grinders SWITCH BUTTON SIDE HANDLE VENTILATION OPENINGS SPINDLE LOCK COLLAR SCREW GRINDING WHEEL WHEEL GUARD Model number Maximum Capacities Max. wire cup brush Max. cut off wheel Max. wheel diameter Spindle thread Max. wire wheel Max. dry diamond wheel 1347A 4 1/2" (115mm) 5/8"-11 UNC 4" Dia. 3" Dia. 4 1/2" Dia...
... making any assembly, adjustments or changing accessories. Angle Grinders SWITCH BUTTON SIDE HANDLE VENTILATION OPENINGS SPINDLE LOCK COLLAR SCREW GRINDING WHEEL WHEEL GUARD Model number Maximum Capacities Max. wire cup brush Max. cut off wheel Max. wheel diameter Spindle thread Max. wire wheel Max. dry diamond wheel 1347A 4 1/2" (115mm) 5/8"-11 UNC 4" Dia. 3" Dia. 4 1/2" Dia...
Operating Instructions
Page 8
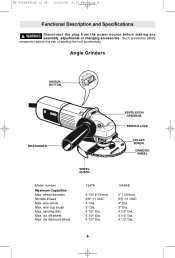
... then tighten the backing pad securely with equal diameters. WARNING Do not use a dry diamond cutting wheel. When cutting, make only small passes through the disc and thread onto the spindle as far as illustrated on its maximum safe operating speed is best to spindle. Keep...Sanding Accessories Assembly BACKING PAD ! TO INSTALL BACKING PAD AND SANDING DISC Disconnect tool from power source. BACKING PAD SANDING DISC LOCK NUT WIRE BRUSH SPINDLE -8- With wheel guard in . WARNING Before attaching a backing pad be sure its top side (spindle up). WARNING Wheel guard may ...
... then tighten the backing pad securely with equal diameters. WARNING Do not use a dry diamond cutting wheel. When cutting, make only small passes through the disc and thread onto the spindle as far as illustrated on its maximum safe operating speed is best to spindle. Keep...Sanding Accessories Assembly BACKING PAD ! TO INSTALL BACKING PAD AND SANDING DISC Disconnect tool from power source. BACKING PAD SANDING DISC LOCK NUT WIRE BRUSH SPINDLE -8- With wheel guard in . WARNING Before attaching a backing pad be sure its top side (spindle up). WARNING Wheel guard may ...
Operating Instructions
Page 10
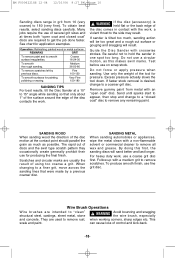
... much as possible. Excess pressure actually slows the tool down. Sand until sparks start to appear, then stop and change to 15° angle while sanding so that were made by previous discs. SANDING METAL When sanding automobiles or appliances, wipe the metal clean with a medium grit ...to remove all wax and grease. Follow-up with a non-flammable solvent or commercial cleaner to remove scratches. Wire Brush Operations Wire brushes are used to 180 (very fine). This scale and paint. REMARKS GRIT To remove paint and to hold the sander in contact with ...
... much as possible. Excess pressure actually slows the tool down. Sand until sparks start to appear, then stop and change to 15° angle while sanding so that were made by previous discs. SANDING METAL When sanding automobiles or appliances, wipe the metal clean with a medium grit ...to remove all wax and grease. Follow-up with a non-flammable solvent or commercial cleaner to remove scratches. Wire Brush Operations Wire brushes are used to 180 (very fine). This scale and paint. REMARKS GRIT To remove paint and to hold the sander in contact with ...
Operating Instructions
Page 11
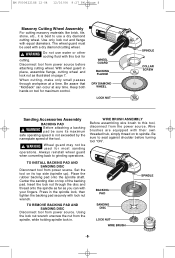
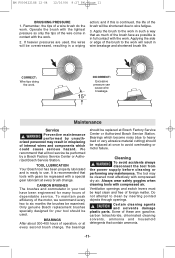
... so only the tips of the brush to six months the brushes be replaced at every second brush change . Maintenance Service ! rized Bosch Service Station. To maintain peak efficiency of operation, or at Bosch Factory Service Center or Authorized Bosch Service Station. BEARINGS After about 300...the work . 15° INCORRECT: Excessive pressure can cause wire breakage. Remember, the tips of foreign matter. Only genuine Bosch replacement brushes specially designed for your tool have been engineered for many hours of these are used . Ventilation openings and switch levers must ...
... so only the tips of the brush to six months the brushes be replaced at every second brush change . Maintenance Service ! rized Bosch Service Station. To maintain peak efficiency of operation, or at Bosch Factory Service Center or Authorized Bosch Service Station. BEARINGS After about 300...the work . 15° INCORRECT: Excessive pressure can cause wire breakage. Remember, the tips of foreign matter. Only genuine Bosch replacement brushes specially designed for your tool have been engineered for many hours of these are used . Ventilation openings and switch levers must ...
Parts List
Page 2
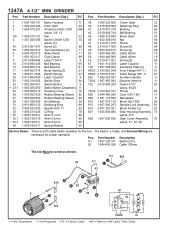
... w/pos. 3/5, 13 Fan 23 Switch On/Off 120V 15 w/pos. 4/1 Screw {2} 89 Terminal Sleeve {2} 11 Strain Relief 11 Cord Clamp 89 Label "1347A" 9 Ball Bearing 60 Ball Bearing 61 Brush Spring {2} 27 Switch Spring 27 Label "Caution" 9 Switch Slide 64 Switch Button 9 Switch Button (Deadman) 9 Housing Cover 70 Rubber Bearing Sleeve 82... 53 + = Not Illustrated * = As Required F/C = Failure Code AW = Refer to AW Labor Time Chart The Switch, a Cable, and Revised Wiring are necessary for this tool. 1347A 4-1/2" MINI GRINDER Pos.
... w/pos. 3/5, 13 Fan 23 Switch On/Off 120V 15 w/pos. 4/1 Screw {2} 89 Terminal Sleeve {2} 11 Strain Relief 11 Cord Clamp 89 Label "1347A" 9 Ball Bearing 60 Ball Bearing 61 Brush Spring {2} 27 Switch Spring 27 Label "Caution" 9 Switch Slide 64 Switch Button 9 Switch Button (Deadman) 9 Housing Cover 70 Rubber Bearing Sleeve 82... 53 + = Not Illustrated * = As Required F/C = Failure Code AW = Refer to AW Labor Time Chart The Switch, a Cable, and Revised Wiring are necessary for this tool. 1347A 4-1/2" MINI GRINDER Pos.