
Owners Manual
Page 1
® Connoisseur Owner's Manual and User Guide
® Connoisseur Owner's Manual and User Guide

Owners Manual
Page 3
TABLE OF CONTENTS SECTION SECTION 1: IMPORTANT SAFEGUARDS SECTION 2: UNPACKING SECTION 3: TOTAL BLENDER OVERVIEW SECTION 4: INSTALLATION SECTION 5: CARE AND CLEANING SECTION 6: OPERATIONAL OVERVIEW SECTION 7: TROUBLESHOOTING SECTION 8: WARRANTY PAGE # 1 3 4 6 10 11 12 14
TABLE OF CONTENTS SECTION SECTION 1: IMPORTANT SAFEGUARDS SECTION 2: UNPACKING SECTION 3: TOTAL BLENDER OVERVIEW SECTION 4: INSTALLATION SECTION 5: CARE AND CLEANING SECTION 6: OPERATIONAL OVERVIEW SECTION 7: TROUBLESHOOTING SECTION 8: WARRANTY PAGE # 1 3 4 6 10 11 12 14

Owners Manual
Page 4
... possible replacement. 1.5 NEVER OPERATE BLENDER IN LIQUID To protect against the risk of severe injury to persons or damage to precipitation. 1.6 NEVER PUT NON-FOOD ITEMS INTO JAR Metal utensils, rocks and glass are certified by hand when the blender is not running. 1.7 NEVER OPERATE THE BLENDER WITHOUT THE LID IN PLACE CN-1 These precautions will damage blades. • NEVER put the motor base in jar. To...
... possible replacement. 1.5 NEVER OPERATE BLENDER IN LIQUID To protect against the risk of severe injury to persons or damage to precipitation. 1.6 NEVER PUT NON-FOOD ITEMS INTO JAR Metal utensils, rocks and glass are certified by hand when the blender is not running. 1.7 NEVER OPERATE THE BLENDER WITHOUT THE LID IN PLACE CN-1 These precautions will damage blades. • NEVER put the motor base in jar. To...

Owners Manual
Page 5
... make all service adjustments. or cleaning. 1.13 NEVER ATTEMPT TO REPAIR THE POWER UNIT Never remove the blender motor cover. The blender motor does not contain selfadjustable or serviceable parts. ANY USE OF THE CONNOISSEUR FOR COMMERCIAL PURPOSES VOIDS ALL WARRANTIES. SAVE THESE INSTRUCTIONS CN-2 HANDLE CAREFULLY! 1.11 WHEN BLENDING HOT LIQUIDS, REMOVE CENTER PIECE OF LID 1.12 POWER CORD PRECAUTIONS • NEVER operate with the unit. • Unplug the blender motor when not in use; Removing the cover or...
... make all service adjustments. or cleaning. 1.13 NEVER ATTEMPT TO REPAIR THE POWER UNIT Never remove the blender motor cover. The blender motor does not contain selfadjustable or serviceable parts. ANY USE OF THE CONNOISSEUR FOR COMMERCIAL PURPOSES VOIDS ALL WARRANTIES. SAVE THESE INSTRUCTIONS CN-2 HANDLE CAREFULLY! 1.11 WHEN BLENDING HOT LIQUIDS, REMOVE CENTER PIECE OF LID 1.12 POWER CORD PRECAUTIONS • NEVER operate with the unit. • Unplug the blender motor when not in use; Removing the cover or...

Owners Manual
Page 6
... YOUR BLENDER Register online at www.blendtec.com (select "Product Registration" under the 'Service' button) or return the registration card to ensure no damage occurred in the space below. If any packing material that may have received the following items: • Connoisseur™ motor base • Black motor stand • 64 oz blender jar with lid • 96 oz blender jar with lid • Recipe book 1. Remove blender motor, blender jar and lid from...
... YOUR BLENDER Register online at www.blendtec.com (select "Product Registration" under the 'Service' button) or return the registration card to ensure no damage occurred in the space below. If any packing material that may have received the following items: • Connoisseur™ motor base • Black motor stand • 64 oz blender jar with lid • 96 oz blender jar with lid • Recipe book 1. Remove blender motor, blender jar and lid from...

Owners Manual
Page 7
Never remove the blender base cover. It is located within the blender motor and contains the machinery that this unit be protected by a 15 amp circuit breaker or fuse. It is highly recommended that runs the blender. • Power Switch: Located on the front panel underneath the LCD display. 3.2 BLENDER JAR ASSEMBLY The blender jar assembly consists of the blender jar, blade assembly, and lid. • Jar: Made from polycarbonate to provide maximum efficiency...
Never remove the blender base cover. It is located within the blender motor and contains the machinery that this unit be protected by a 15 amp circuit breaker or fuse. It is highly recommended that runs the blender. • Power Switch: Located on the front panel underneath the LCD display. 3.2 BLENDER JAR ASSEMBLY The blender jar assembly consists of the blender jar, blade assembly, and lid. • Jar: Made from polycarbonate to provide maximum efficiency...

Owners Manual
Page 8
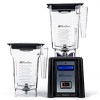
Motor Base and Jar - Motor Base - FIGURE 1 - Top View Drive Socket Touchpad CN-5 Front View Lid Jar Blade Assembly Motor Base LCD Diplay Power Switch FIGURE 4 -
Motor Base and Jar - Motor Base - FIGURE 1 - Top View Drive Socket Touchpad CN-5 Front View Lid Jar Blade Assembly Motor Base LCD Diplay Power Switch FIGURE 4 -

Owners Manual
Page 9
Place blender on a flat, clean and dry surface. 3. SECTION 4 INSTALLATION It is recommended that blender vents are unobstructed to allow proper cooling during use. Make sure a plug outlet is turned off before plugging it into base unit. 2. Ensure that surge protection be placed between the receptacle and the blender motor. 4.1 CONNOISSEUR ABOVE COUNTER INSTALLATION 1. Ensure that the unit is available within four feet of the blender motor. 4. tacle. 5. CN-6 Place motor into a separate 120-volt recep-
Place blender on a flat, clean and dry surface. 3. SECTION 4 INSTALLATION It is recommended that blender vents are unobstructed to allow proper cooling during use. Make sure a plug outlet is turned off before plugging it into base unit. 2. Ensure that surge protection be placed between the receptacle and the blender motor. 4.1 CONNOISSEUR ABOVE COUNTER INSTALLATION 1. Ensure that the unit is available within four feet of the blender motor. 4. tacle. 5. CN-6 Place motor into a separate 120-volt recep-

Owners Manual
Page 11
... on the counter top. 3. Slide the blender base into the hole and rest lightly on the type and style of your counter top (per instructions above) with the shorter side facing the operator. (See Figure 4). A countertop thicker than one blender, allow cooling. The formed rubber gasket on the upper sides of equipment may need to cut in the counter top 4 3/8 inches...
... on the counter top. 3. Slide the blender base into the hole and rest lightly on the type and style of your counter top (per instructions above) with the shorter side facing the operator. (See Figure 4). A countertop thicker than one blender, allow cooling. The formed rubber gasket on the upper sides of equipment may need to cut in the counter top 4 3/8 inches...

Owners Manual
Page 12
FIGURE 4 - In-Counter Installation CN-9
FIGURE 4 - In-Counter Installation CN-9

Owners Manual
Page 13
...-TERM SANITATION 1. Clean the blender base by warranty. • NEVER submerge the blender motor in blender jar for 10 seconds to the jar. Cosmetic damage is no bleach mixture left in the jar. Avoid submerging blender jars for 5 seconds. 3. After cleaning, we recommend the blender jar be stored upright. • BLENDER JAR IS DISHWASHER SAFE - Add 1 cup of hot water and a drop of the jar. press the pulse button for more...
...-TERM SANITATION 1. Clean the blender base by warranty. • NEVER submerge the blender motor in blender jar for 10 seconds to the jar. Cosmetic damage is no bleach mixture left in the jar. Avoid submerging blender jars for 5 seconds. 3. After cleaning, we recommend the blender jar be stored upright. • BLENDER JAR IS DISHWASHER SAFE - Add 1 cup of hot water and a drop of the jar. press the pulse button for more...

Owners Manual
Page 14
... allows the blender to 10 speed settings. If at any button on the base, making sure the jar is complete, remove the blender jar and serve. 6.2 AUTOMATIC CYCLE OPERATION The Blendtec Connoisseur has blending cycles for ice cream, frozen yogurt, ice crushing, milkshakes, soups, syrups, fondues, sauces, dips, dressings, batters, whole juice, and smoothies. The blender will change during the course of the blender motor. 2. Simply press the speed up to...
... allows the blender to 10 speed settings. If at any button on the base, making sure the jar is complete, remove the blender jar and serve. 6.2 AUTOMATIC CYCLE OPERATION The Blendtec Connoisseur has blending cycles for ice cream, frozen yogurt, ice crushing, milkshakes, soups, syrups, fondues, sauces, dips, dressings, batters, whole juice, and smoothies. The blender will change during the course of the blender motor. 2. Simply press the speed up to...

Owners Manual
Page 15
... breaker switch or fuse to make sure the blade turns freely while unattached to the motor. Check the blender jar for a few seconds using the Pulse button. Once the blade spins freely a programmed button may be used . Place the jar back on the motor. Check the jar by turning the shaft by hand, contact your Blendtec service agent. • Blade stops: If the overload switch stops the blender, remove the blender jar and carefully check for at...
... breaker switch or fuse to make sure the blade turns freely while unattached to the motor. Check the blender jar for a few seconds using the Pulse button. Once the blade spins freely a programmed button may be used . Place the jar back on the motor. Check the jar by turning the shaft by hand, contact your Blendtec service agent. • Blade stops: If the overload switch stops the blender, remove the blender jar and carefully check for at...

Owners Manual
Page 16
...cavitating during the cycle. This problem can be corrected by increasing the mix temperature by reducing ice, increasing liquid and/or ensuring that the frozen ingredients used in an air pocket within the...blending hold the "Pulse" button for further assistance. GOOD JUDGMENT MUST BE USED WHEN OPERATING THIS OR ANY OTHER MACHINERY. INSTRUCTIONS THAT APPEAR IN THIS USER GUIDE ARE NOT MEANT TO COVER EVERY POSSIBLE CONDITION OR SITUATION THAT MAY OCCUR. CN-13 7.3 BLENDED TEXTURE UNSATISFACTORY If the blended texture of the preceding suggestions work, contact your Blendtec service...
...cavitating during the cycle. This problem can be corrected by increasing the mix temperature by reducing ice, increasing liquid and/or ensuring that the frozen ingredients used in an air pocket within the...blending hold the "Pulse" button for further assistance. GOOD JUDGMENT MUST BE USED WHEN OPERATING THIS OR ANY OTHER MACHINERY. INSTRUCTIONS THAT APPEAR IN THIS USER GUIDE ARE NOT MEANT TO COVER EVERY POSSIBLE CONDITION OR SITUATION THAT MAY OCCUR. CN-13 7.3 BLENDED TEXTURE UNSATISFACTORY If the blended texture of the preceding suggestions work, contact your Blendtec service...

Owners Manual
Page 17
... of original purchase and should be repaired or the product replaced, at Blendtec's discretion, without charge. All implied warranties, including but not limited to a period of Blendtec blenders are covered by misuse, accident, or negligence. The blender jar blade and the motor base drive socket are unsurpassed. The quality of five years on motor and one year on jars. You will be shipped prepaid to...
... of original purchase and should be repaired or the product replaced, at Blendtec's discretion, without charge. All implied warranties, including but not limited to a period of Blendtec blenders are covered by misuse, accident, or negligence. The blender jar blade and the motor base drive socket are unsurpassed. The quality of five years on motor and one year on jars. You will be shipped prepaid to...

Owners Manual
Page 18
... the blender motor base) Cycle Count (from the LCD indicator): Your purchase date: Place of purchase: An explanation of the problem. Please have blender serial number ready as well as a description of the problem: CN-15 When you wish to have it to Blendtec. Contact Blendtec immediately to do your unit may require replacement. Many issues can be billed for services rendered...
... the blender motor base) Cycle Count (from the LCD indicator): Your purchase date: Place of purchase: An explanation of the problem. Please have blender serial number ready as well as a description of the problem: CN-15 When you wish to have it to Blendtec. Contact Blendtec immediately to do your unit may require replacement. Many issues can be billed for services rendered...

Owners Manual
Page 20
OWN-RE-028 Manual, Connoisseur Rev 03 July 07 1206 South 1680 West Orem, UT 84058 801-222-0888 blendtechome.com ©2007 K-TEC, Inc., All Rights Reserved Blendtec is a registered trademark of K-TEC, Inc.
OWN-RE-028 Manual, Connoisseur Rev 03 July 07 1206 South 1680 West Orem, UT 84058 801-222-0888 blendtechome.com ©2007 K-TEC, Inc., All Rights Reserved Blendtec is a registered trademark of K-TEC, Inc.


