Owners Manual
Page 5
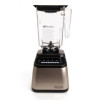
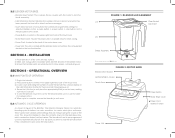
... in the blender. 2. SECTION 4 - Make sure a plug outlet is complete, remove the blender jar and serve. 5.2 AUTOMATIC CYCLE OPERATION As shown in Figure 3, the Blendtec Total Blender Designer Series has automatic blending cycles for manual control. 6. Ensure that run its cycle, press the stop the ... Power Cord: Located at any point you want to stop button. 8 FIGURE 1: BLENDER JAR ASSEMBLY Lid Clear Vented Cap Insert Jar Blade Assembly The jar shown above is the WildSide Jar FIGURE 2: MOTOR BASE Blender Drive Socket LED Information Center Touch Area Power Button Motor Base ...
... in the blender. 2. SECTION 4 - Make sure a plug outlet is complete, remove the blender jar and serve. 5.2 AUTOMATIC CYCLE OPERATION As shown in Figure 3, the Blendtec Total Blender Designer Series has automatic blending cycles for manual control. 6. Ensure that run its cycle, press the stop the ... Power Cord: Located at any point you want to stop button. 8 FIGURE 1: BLENDER JAR ASSEMBLY Lid Clear Vented Cap Insert Jar Blade Assembly The jar shown above is the WildSide Jar FIGURE 2: MOTOR BASE Blender Drive Socket LED Information Center Touch Area Power Button Motor Base ...
