Type 1 Manual - TL10
Page 1
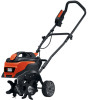
Fri. VEA EL ESPAÑOL EN LA CONTRAPORTADA. Garden Tiller INSTRUCTION MANUAL Catalog Number TL10 Date Code: Thank you have access to the internet, call . If you call 1-800-544-6986 from 8 a.m. to register your Black & Decker purchase, go to 5 p.m. Go to www.BlackandDecker.com/NewOwner to...; find the answer or do not have a question or experience a problem with an agent. to WWW.BLACKANDDECKER.COM/INSTANTANSWERS for choosing Black & Decker! PLEASE READ BEFORE RETURNING THIS PRODUCT FOR ANY REASON: If you for instant answers 24 hours a day. ADVERTENCIA: LÉASE ESTE...
Fri. VEA EL ESPAÑOL EN LA CONTRAPORTADA. Garden Tiller INSTRUCTION MANUAL Catalog Number TL10 Date Code: Thank you have access to the internet, call . If you call 1-800-544-6986 from 8 a.m. to register your Black & Decker purchase, go to 5 p.m. Go to www.BlackandDecker.com/NewOwner to...; find the answer or do not have a question or experience a problem with an agent. to WWW.BLACKANDDECKER.COM/INSTANTANSWERS for choosing Black & Decker! PLEASE READ BEFORE RETURNING THIS PRODUCT FOR ANY REASON: If you for instant answers 24 hours a day. ADVERTENCIA: LÉASE ESTE...
Type 1 Manual - TL10
Page 2
... 6 Upper Handle Assembly 6 Wheel Assembly 7 Tine Assembly 7 Drag Bar Assembly 7 Operating Instructions 8 Ballast Tank 8 Attaching Extension Cord 8 Switch Use 8 Adjusting the Drag Bar 9 Using the Tiller 9 Troubleshooting 10 Maintenance 10 Storage...10 Accessories...10 Service Information 10 Warranty...11 SAFETY GUIDELINES -
... 6 Upper Handle Assembly 6 Wheel Assembly 7 Tine Assembly 7 Drag Bar Assembly 7 Operating Instructions 8 Ballast Tank 8 Attaching Extension Cord 8 Switch Use 8 Adjusting the Drag Bar 9 Using the Tiller 9 Troubleshooting 10 Maintenance 10 Storage...10 Accessories...10 Service Information 10 Warranty...11 SAFETY GUIDELINES -
Type 1 Manual - TL10
Page 3
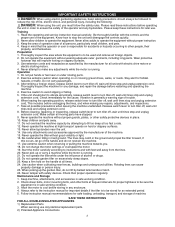
...at all foreign objects. 2. Use only attachments and accessories approved by ballast tank handle or latch. 26. Do not operate the tiller while under rotating parts. 2. SAVE THESE INSTRUCTIONS FOR ALL DOUBLE-INSULATED APPLIANCES 1) Replacement Parts When servicing use . Be thoroughly ...familiar with safety devices. Know how to turn tiller off, wait until tines stop and unplug extension cord. Keep in safe working condition. 2. Preparation 1. Never attempt to be stored...
...at all foreign objects. 2. Use only attachments and accessories approved by ballast tank handle or latch. 26. Do not operate the tiller while under rotating parts. 2. SAVE THESE INSTRUCTIONS FOR ALL DOUBLE-INSULATED APPLIANCES 1) Replacement Parts When servicing use . Be thoroughly ...familiar with safety devices. Know how to turn tiller off, wait until tines stop and unplug extension cord. Keep in safe working condition. 2. Preparation 1. Never attempt to be stored...
Type 1 Manual - TL10
Page 7
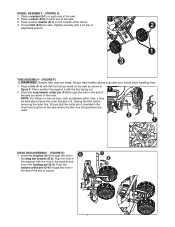
... on the axle as shown in the bracket and insert the locating pin (G-3). Push the hairpin cotter pin (G-4) through the slot in figure F. Unplug the tiller before removing the outer tine. Tighten securely with the hole in the inset. F 2. Place another washer (E-1) on the outside of the axle as shown in...
... on the axle as shown in the bracket and insert the locating pin (G-3). Push the hairpin cotter pin (G-4) through the slot in figure F. Unplug the tiller before removing the outer tine. Tighten securely with the hole in the inset. F 2. Place another washer (E-1) on the outside of the axle as shown in...
Type 1 Manual - TL10
Page 8
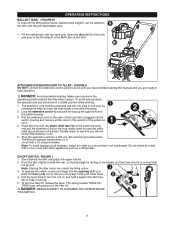
... the strain relief tab as a refrigerator. Fill the ballast tank with dry sand only. The extension cord must be in the operating position behind the tiller and grasp the upper handle. 2. J 3. Open the door (H-1) of the loop that its weight is not overloaded. Make sure you did not... loosen the extension cord. 5. Pull the extension cord on a circuit that you are not in the fill material to the tiller with the provided ballast tank. 1. The spring loaded "SNAP AC- ON-OFF SWITCH - Note: To avoid tripping circuit breakers, select an outlet on...
... the strain relief tab as a refrigerator. Fill the ballast tank with dry sand only. The extension cord must be in the operating position behind the tiller and grasp the upper handle. 2. J 3. Open the door (H-1) of the loop that its weight is not overloaded. Make sure you did not... loosen the extension cord. 5. Pull the extension cord on a circuit that you are not in the fill material to the tiller with the provided ballast tank. 1. The spring loaded "SNAP AC- ON-OFF SWITCH - Note: To avoid tripping circuit breakers, select an outlet on...
Type 1 Manual - TL10
Page 9
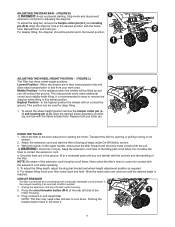
...ground. To adjust the tilling depth, adjust the drag bar bracket and wheel height adjustment position as required. 6. CIRCUIT BREAKER M The tiller is recommended to contact the extension cord. 4. Plug cord back in the desired position with the frame bracket hole. Reinsert bolt and...are in the lowest position. Lowest Position - Highest Position - When the wheels are familiar with the extension cord while operating. 5. Transport the tiller by pushing or pulling it . 9 Keep the extension cord clear of the motor housing. 3. Stop motor and disconnect K extension cord prior ...
...ground. To adjust the tilling depth, adjust the drag bar bracket and wheel height adjustment position as required. 6. CIRCUIT BREAKER M The tiller is recommended to contact the extension cord. 4. Plug cord back in the desired position with the frame bracket hole. Reinsert bolt and...are in the lowest position. Lowest Position - Highest Position - When the wheels are familiar with the extension cord while operating. 5. Transport the tiller by pushing or pulling it . 9 Keep the extension cord clear of the motor housing. 3. Stop motor and disconnect K extension cord prior ...
Type 1 Manual - TL10
Page 10
... find your local service location, refer to clean the tool. Check that may be hazardous. E. SERVICE INFORMATION All Black & Decker Service Centers are detached and away from the tines. 4. D. DANGER: Do not wash garden tiller with efficient and reliable power tool service. Remove the tines. Clear any liquid get inside the tool; Never...
... find your local service location, refer to clean the tool. Check that may be hazardous. E. SERVICE INFORMATION All Black & Decker Service Centers are detached and away from the tines. 4. D. DANGER: Do not wash garden tiller with efficient and reliable power tool service. Remove the tines. Clear any liquid get inside the tool; Never...
