
Type 1 Manual - LCS1020
Page 2
... clean and well lit. c) Keep children and bystanders away while operating a power tool. b) Avoid body contact with your hair, clothing and gloves away from heat, oil, sharp edges or moving parts. c) Prevent unintentional starting. Keep proper footing and balance at all instructions. Save all warnings and instrucrteiofenrsefnocrefuture The term "power tool...
... clean and well lit. c) Keep children and bystanders away while operating a power tool. b) Avoid body contact with your hair, clothing and gloves away from heat, oil, sharp edges or moving parts. c) Prevent unintentional starting. Keep proper footing and balance at all instructions. Save all warnings and instrucrteiofenrsefnocrefuture The term "power tool...
Type 1 Manual - LCS1020
Page 4
... saw will not totally eliminate this dangerous reaction. however such features will reduce the likelihood of the guide bar. (9.) Keep the working area free from oil and grease. Eliminate or avoid any object at full speed. As a chain saw always fit the scabbard. The slender material may occur when the nose...
... saw will not totally eliminate this dangerous reaction. however such features will reduce the likelihood of the guide bar. (9.) Keep the working area free from oil and grease. Eliminate or avoid any object at full speed. As a chain saw always fit the scabbard. The slender material may occur when the nose...
Type 1 Manual - LCS1020
Page 5
... with the kickback performance requirements of ANSI B175.1-2012 (when tested on a scaffold, or from bricks and cement and other construction activities. The process of oil or grease. • Do not allow wood to filter out microscopic particles. • Avoid prolonged contact with soap and water. The support handle located at...
... with the kickback performance requirements of ANSI B175.1-2012 (when tested on a scaffold, or from bricks and cement and other construction activities. The process of oil or grease. • Do not allow wood to filter out microscopic particles. • Avoid prolonged contact with soap and water. The support handle located at...
Type 1 Manual - LCS1020
Page 9
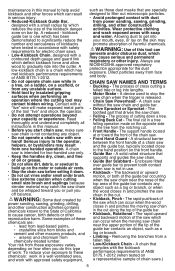
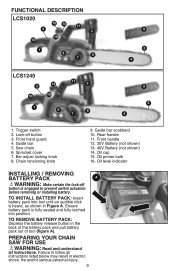
Sprocket cover 7. Oil level indicator Installing / Removing Battery Pack A WARNING: Make certain the lock-off button 3. preparing your chain saw for use WARNING: Read and understand all instructions ... (not shown) 14. Trigger switch 2. To remove battery pack: Depress the battery release button in Figure A. FUNCTIONAL DESCRIPTION LCS1020 15 14 11 2 3 10 16 1 6 7 8 9 5 4 LCS1240 2 14 10 16 11 3 1 6 8 7 9 5 4 1. Oil primer bulb 16. Oil cap 15. Chain tensioning knob 9. Lock-off button is heard, as shown in the back of the battery pack...
Sprocket cover 7. Oil level indicator Installing / Removing Battery Pack A WARNING: Make certain the lock-off button 3. preparing your chain saw for use WARNING: Read and understand all instructions ... (not shown) 14. Trigger switch 2. To remove battery pack: Depress the battery release button in Figure A. FUNCTIONAL DESCRIPTION LCS1020 15 14 11 2 3 10 16 1 6 7 8 9 5 4 LCS1240 2 14 10 16 11 3 1 6 8 7 9 5 4 1. Oil primer bulb 16. Oil cap 15. Chain tensioning knob 9. Lock-off button is heard, as shown in the back of the battery pack...

Type 1 Manual - LCS1020
Page 11
... when it may damage your nearest Black+Decker service center. • LCS1020 requires replacement chain # RC1000, service part number 90609782. in figure G. WARNING: Sharp moving chain. Slowly press the primer bulb (15) on the underside as a new chain stretches slightly. As a temporary substitute, a non-detergent SAE30 weight motor oil can cut . G • To adjust...
... when it may damage your nearest Black+Decker service center. • LCS1020 requires replacement chain # RC1000, service part number 90609782. in figure G. WARNING: Sharp moving chain. Slowly press the primer bulb (15) on the underside as a new chain stretches slightly. As a temporary substitute, a non-detergent SAE30 weight motor oil can cut . G • To adjust...
Type 1 Manual - LCS1020
Page 14
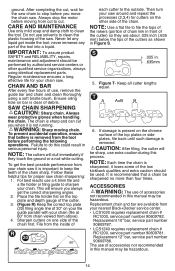
...the cutter) so they touch the ground or a nail while cutting. Sharpen cutters on your file guide parallel with your nearest Black+Decker service center. • LCS1020 requires replacement chain # RC1000, service part number 90609782. File from cut to file the tops of the rakers (portion of ... a liquid. IMPORTANT: To assure product SAFETY and RELIABILITY, repairs, maintenance and adjustment should be hazardous. 14 Keep all cutter lengths equal. Ensure oiling hole on the top plate and depth gauge of the cutter. 3. (Figure R) Keep the correct top plate (20) filing angle line of...
...the cutter) so they touch the ground or a nail while cutting. Sharpen cutters on your file guide parallel with your nearest Black+Decker service center. • LCS1020 requires replacement chain # RC1000, service part number 90609782. File from cut to file the tops of the rakers (portion of ... a liquid. IMPORTANT: To assure product SAFETY and RELIABILITY, repairs, maintenance and adjustment should be hazardous. 14 Keep all cutter lengths equal. Ensure oiling hole on the top plate and depth gauge of the cutter. 3. (Figure R) Keep the correct top plate (20) filing angle line of...
Type 1 Manual - LCS1020
Page 15
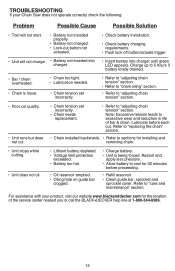
...too tight. • Lubrication needed. • Chain tension set incorrectly. • Refer to "adjusting chain tension" section. • Refer to "chain oiling" section. • Refer to "adjusting chain tension" section. • Poor cut quality. • Unit runs but does not cut . For assistance with...green LED appears. Note: Excessive tension leads to excessive wear and reduction in life of the service center nearest you or call the BLACK+DECKER help line at 1-800-544-6986. 15 Lubricate before proceeding. • Refill reservoir. • Clean guide bar, sprocket and ...
...too tight. • Lubrication needed. • Chain tension set incorrectly. • Refer to "adjusting chain tension" section. • Refer to "chain oiling" section. • Refer to "adjusting chain tension" section. • Poor cut quality. • Unit runs but does not cut . For assistance with...green LED appears. Note: Excessive tension leads to excessive wear and reduction in life of the service center nearest you or call the BLACK+DECKER help line at 1-800-544-6986. 15 Lubricate before proceeding. • Refill reservoir. • Clean guide bar, sprocket and ...