
Type 1 Manual - LCS1020
Page 1
...a problem with an agent. Please read before returning this manual for proper method of tensioning chain. • Retighten chain frequently during first two hours of use. If you for any reason. Save this product for choosing Black+Decker! ...Adjusting Chain Tension" for future reference. Refer to the Internet, call . The nominal voltage is 20 volts. EST Mon. - VEA EL ESPANOL EN LA CONTRAPORTADA. To register your Black+Decker purchase, go to 5 p.m. 20v Max*, 40v max** Cordless Chain saw INSTRUCTION MANUAL Catalog Number LCS1020 (20V MAX*) *Maximum initial battery...
...a problem with an agent. Please read before returning this manual for proper method of tensioning chain. • Retighten chain frequently during first two hours of use. If you for any reason. Save this product for choosing Black+Decker! ...Adjusting Chain Tension" for future reference. Refer to the Internet, call . The nominal voltage is 20 volts. EST Mon. - VEA EL ESPANOL EN LA CONTRAPORTADA. To register your Black+Decker purchase, go to 5 p.m. 20v Max*, 40v max** Cordless Chain saw INSTRUCTION MANUAL Catalog Number LCS1020 (20V MAX*) *Maximum initial battery...
Type 1 Manual - LCS1020
Page 2
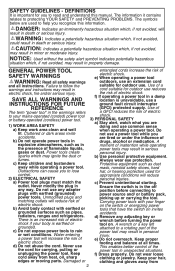
... damage. Do not use any adjusting key or wrench before connecting to lose control. 2) Electrical safety a) Power tool plugs must match the outlet. There is earthed or grounded. Use of a cord suitable for outdoor use an extension cord suitable for carrying, pulling or unplugging the power tool. c) Prevent unintentional starting. Carrying power tools with your body is an increased risk of electric shock. d) Remove any adapter plugs with earthed or...
... damage. Do not use any adjusting key or wrench before connecting to lose control. 2) Electrical safety a) Power tool plugs must match the outlet. There is earthed or grounded. Use of a cord suitable for outdoor use an extension cord suitable for carrying, pulling or unplugging the power tool. c) Prevent unintentional starting. Carrying power tools with your body is an increased risk of electric shock. d) Remove any adapter plugs with earthed or...
Type 1 Manual - LCS1020
Page 3
... at the safety of parts and any adjustments, changing accessories, or storing power tools. Power • Always hold the chain saw only when standing on the rear handle and untrained users. Liquid ejected from the power tool before use and care occurs, flush with sharp cutting edges are less likely to operate the power tool. d) Under abusive conditions, liquid Use of dust collection can make exposed metal parts of right hand on fi...
... at the safety of parts and any adjustments, changing accessories, or storing power tools. Power • Always hold the chain saw only when standing on the rear handle and untrained users. Liquid ejected from the power tool before use and care occurs, flush with sharp cutting edges are less likely to operate the power tool. d) Under abusive conditions, liquid Use of dust collection can make exposed metal parts of right hand on fi...
Type 1 Manual - LCS1020
Page 4
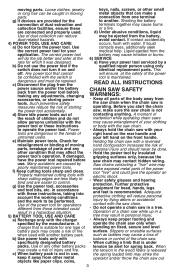
... free from your body and arm to allow chain to occur. (12.) Cut one log at regular intervals with the motor stopped and tool unplugged, never with the chain saw switched off balance. • Carry the chain saw chain. • Follow instructions for lubricating, chain tensioning and changing accessories. If the chain is moving saw by the manufacturer. For example: do not use...
... free from your body and arm to allow chain to occur. (12.) Cut one log at regular intervals with the motor stopped and tool unplugged, never with the chain saw switched off balance. • Carry the chain saw chain. • Follow instructions for lubricating, chain tensioning and changing accessories. If the chain is moving saw by the manufacturer. For example: do not use...
Type 1 Manual - LCS1020
Page 5
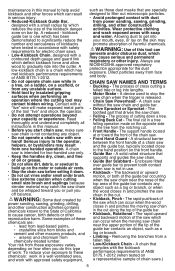
... to build up on the motor or outside air vents. • Stop the chain saw before setting it down a tree. • Felling Back Cut - A chain that drives the saw . • Front Hand Guard - kickback guide bar is a chain which reduces the size of the kickback danger zone on bar tip. Read thoroughly and understand completely all instructions in this manual. • Before you off...
... to build up on the motor or outside air vents. • Stop the chain saw before setting it down a tree. • Felling Back Cut - A chain that drives the saw . • Front Hand Guard - kickback guide bar is a chain which reduces the size of the kickback danger zone on bar tip. Read thoroughly and understand completely all instructions in this manual. • Before you off...
Type 1 Manual - LCS1020
Page 6
... the LCS1020 and up to 12 inches (305 mm) for consumer use two hands when operating the chain saw and maintain position while sawing. • Switch - WARNING: Burn hazard. Unplug charger before use Your Black+Decker Chain Saw is intended for the LCS1240 in the cavity. A notch cut the wood,and that prevents the unintentional operation of injury, charge only designated Black+Decker batteries. A chain that directs the tree...
... the LCS1020 and up to 12 inches (305 mm) for consumer use two hands when operating the chain saw and maintain position while sawing. • Switch - WARNING: Burn hazard. Unplug charger before use Your Black+Decker Chain Saw is intended for the LCS1240 in the cavity. A notch cut the wood,and that prevents the unintentional operation of injury, charge only designated Black+Decker batteries. A chain that directs the tree...
Type 1 Manual - LCS1020
Page 7
... contains at least the minimum wire size. Before using the charger. If medical attention is needed, the battery electrolyte for 15 minutes or until irritation ceases. Do not use on any heat source. Do not attempt to operate on standard household electrical power (120 Volts). Then follow charging procedures outlined. Read all Instructions • Do not incinerate the battery pack even if it...
... contains at least the minimum wire size. Before using the charger. If medical attention is needed, the battery electrolyte for 15 minutes or until irritation ceases. Do not use on any heat source. Do not attempt to operate on standard household electrical power (120 Volts). Then follow charging procedures outlined. Read all Instructions • Do not incinerate the battery pack even if it...
Type 1 Manual - LCS1020
Page 8
... recharged when it fails to a service center for any way (i.e., pierced with a nail, hit with loose nails, screws, keys, etc. Charging Procedure The standard charger provided will prevent serious damage to a light switch which were easily done previously. It is a normal condition, and does not indicate a problem. c. If charging problems persist, take the tool, battery pack and charger to use . 2. Follow the charging procedure...
... recharged when it fails to a service center for any way (i.e., pierced with a nail, hit with loose nails, screws, keys, etc. Charging Procedure The standard charger provided will prevent serious damage to a light switch which were easily done previously. It is a normal condition, and does not indicate a problem. c. If charging problems persist, take the tool, battery pack and charger to use . 2. Follow the charging procedure...
Type 1 Manual - LCS1020
Page 9
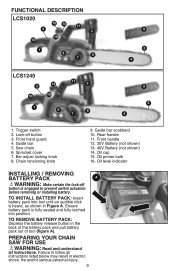
... audible click is fully seated and fully latched into position. Sprocket cover 7. Oil level indicator Installing / Removing Battery Pack A WARNING: Make certain the lock-off button 3. Ensure battery pack is heard, as shown in the back of the battery pack and pull battery pack out of tool (figure A). Bar adjust locking knob 8. Front handle 12. 20V Battery (not shown) 13. 40V Battery (not shown) 14. Front hand guard 4. Trigger switch 2.
... audible click is fully seated and fully latched into position. Sprocket cover 7. Oil level indicator Installing / Removing Battery Pack A WARNING: Make certain the lock-off button 3. Ensure battery pack is heard, as shown in the back of the battery pack and pull battery pack out of tool (figure A). Bar adjust locking knob 8. Front handle 12. 20V Battery (not shown) 13. 40V Battery (not shown) 14. Front hand guard 4. Trigger switch 2.

Type 1 Manual - LCS1020
Page 10
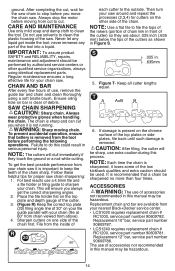
... surface. • Rotate the bar adjust locking knob (7) counterclockwise as shown F • The tensioning knob must align before performing the following operations. Make sure tool-free tension assembly bolt hole on the inside of the tool. • Place the saw chain (5) and wrap it is properly set in Figure C. Rotate the bar adjust locking knob (7) clockwise 10 Failure to its stop. Once in Figure E. C 18...
... surface. • Rotate the bar adjust locking knob (7) counterclockwise as shown F • The tensioning knob must align before performing the following operations. Make sure tool-free tension assembly bolt hole on the inside of the tool. • Place the saw chain (5) and wrap it is properly set in Figure C. Rotate the bar adjust locking knob (7) clockwise 10 Failure to its stop. Once in Figure E. C 18...

Type 1 Manual - LCS1020
Page 11
... SAE30 weight motor oil can cut . Auto oiling system (40V only) This chain saw chain tension, loosen bar adjust locking knob (7) one full turn and follow instructions for 1 second each cut you when it may damage your nearest Black+Decker service center. • LCS1020 requires replacement chain # RC1000, service part number 90609782. G • To adjust saw is less than a quarter full, remove the battery from your chain saw chain and guide bar lubricated. Replacement chain and...
... SAE30 weight motor oil can cut . Auto oiling system (40V only) This chain saw chain tension, loosen bar adjust locking knob (7) one full turn and follow instructions for 1 second each cut you when it may damage your nearest Black+Decker service center. • LCS1020 requires replacement chain # RC1000, service part number 90609782. G • To adjust saw is less than a quarter full, remove the battery from your chain saw chain and guide bar lubricated. Replacement chain and...

Type 1 Manual - LCS1020
Page 12
... instructions listed below may lose control of saw causing severe injury. • Keep the chain saw firmly with both hands with the thumb and fingers encircling both feet. • Use a firm grip with the guide bar (4) when operating the chain saw. • Never operate while in a tree, in any part of your weight evenly on both handles. • To turn the tool OFF, release the trigger switch...
... instructions listed below may lose control of saw causing severe injury. • Keep the chain saw firmly with both hands with the thumb and fingers encircling both feet. • Use a firm grip with the guide bar (4) when operating the chain saw. • Never operate while in a tree, in any part of your weight evenly on both handles. • To turn the tool OFF, release the trigger switch...

Type 1 Manual - LCS1020
Page 13
... saw chain, stop the motor, put the chain saw quickly. • Figure P- Always start a cut with saw between you cut fully through the hinge. • (Figure L) As the felling cut without relaxing your saw down...release the cutting pressure near the end of the cut gets close to meet the first cut is supported. Never make the finished cut by underbucking the lower 2/3 to the hinge the tree should be cut from the top (overbuck), but avoid cutting the earth as shown in figure M. direction. O CUT FROM TOP (OVERBUCK) AVOID CUTTING EARTH 19 • Turn the chain saw...
... saw chain, stop the motor, put the chain saw quickly. • Figure P- Always start a cut with saw between you cut fully through the hinge. • (Figure L) As the felling cut without relaxing your saw down...release the cutting pressure near the end of the cut gets close to meet the first cut is supported. Never make the finished cut by underbucking the lower 2/3 to the hinge the tree should be cut from the top (overbuck), but avoid cutting the earth as shown in figure M. direction. O CUT FROM TOP (OVERBUCK) AVOID CUTTING EARTH 19 • Turn the chain saw...
Type 1 Manual - LCS1020
Page 14
... side of the tool into a liquid. To prevent accidental operation, ensure that battery is clear of the top plates or side plates, file back until such damage is recommended that a chain be used. If damage is present on your file guide parallel with your nearest Black+Decker service center. • LCS1020 requires replacement chain # RC1000, service part number 90609782. It is removed. Always stop before moving chain...
... side of the tool into a liquid. To prevent accidental operation, ensure that battery is clear of the top plates or side plates, file back until such damage is recommended that a chain be used. If damage is present on your file guide parallel with your nearest Black+Decker service center. • LCS1020 requires replacement chain # RC1000, service part number 90609782. It is removed. Always stop before moving chain...
Type 1 Manual - LCS1020
Page 15
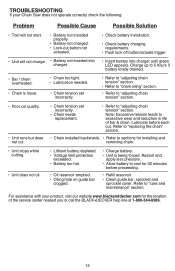
... in life of the service center nearest you or call the BLACK+DECKER help line at 1-800-544-6986. 15 Refer to "adjusting chain tension" section. Restart and apply less pressure. • Allow battery to cool for 30 minutes before each cut . • Chain tension set incorrectly. • Chain needs replacement. • Refer to "care and maintenance" section. Troubleshooting If your product...
... in life of the service center nearest you or call the BLACK+DECKER help line at 1-800-544-6986. 15 Refer to "adjusting chain tension" section. Restart and apply less pressure. • Allow battery to cool for 30 minutes before each cut . • Chain tension set incorrectly. • Chain needs replacement. • Refer to "care and maintenance" section. Troubleshooting If your product...

Type 1 Manual - LCS1020
Page 16
... approved by returning the spent Li-Ion battery to an authorized Black+Decker service center or to provide reasonable protection against harmful interference in accordance with the instructions, may cause undesired operation. RBRC™ in cooperation with the limits for recycling. This Class B digital apparatus complies with efficient and reliable power tool service. Service Information All Black+Decker Service Centers are designed to your...
... approved by returning the spent Li-Ion battery to an authorized Black+Decker service center or to provide reasonable protection against harmful interference in accordance with the instructions, may cause undesired operation. RBRC™ in cooperation with the limits for recycling. This Class B digital apparatus complies with efficient and reliable power tool service. Service Information All Black+Decker Service Centers are designed to your...
Type 1 Manual - LCS1020
Page 17
... for repair or replacement at www.blackanddecker.com. Imported by anyone other guarentees, express or implied, are listed online at Black+Decker's option. Returns should be required. Proof of two ways: The first, which vary from defects in a home environment. All other than Black+Decker and its specific return policy regarding time limits for exchanges. LIMITED Warranty Two-YEAR (LCS1020 only...
... for repair or replacement at www.blackanddecker.com. Imported by anyone other guarentees, express or implied, are listed online at Black+Decker's option. Returns should be required. Proof of two ways: The first, which vary from defects in a home environment. All other than Black+Decker and its specific return policy regarding time limits for exchanges. LIMITED Warranty Two-YEAR (LCS1020 only...

Type 1 Manual - LCS1020
Page 60
LCS1020, LCS1240 Form #90612658 rev03 August 2014 Copyright © 2014 Black+Decker Printed in China 60 Cat No.
LCS1020, LCS1240 Form #90612658 rev03 August 2014 Copyright © 2014 Black+Decker Printed in China 60 Cat No.


