
Type 1 Manual - LCS1020
Page 1
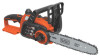
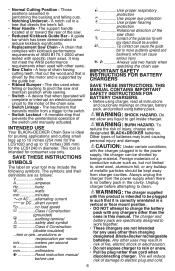
....BlackandDecker.com/NewOwner Key information you have access to "Adjusting Chain Tension" for choosing Black+Decker! Thank you for proper method of tensioning chain. • Retighten chain frequently during first two hours of use. Please have the catalog...Chain saw INSTRUCTION MANUAL Catalog Number LCS1020 (20V MAX*) *Maximum initial battery pack voltage (measured without a workload) is 20 volts. Catalog Number LCS1240 (40V MAX**) **Maximum initial battery pack voltage (measured without a workload) is 40 volts. Refer to the Internet, call . To register your Black+Decker...
....BlackandDecker.com/NewOwner Key information you have access to "Adjusting Chain Tension" for choosing Black+Decker! Thank you for proper method of tensioning chain. • Retighten chain frequently during first two hours of use. Please have the catalog...Chain saw INSTRUCTION MANUAL Catalog Number LCS1020 (20V MAX*) *Maximum initial battery pack voltage (measured without a workload) is 20 volts. Catalog Number LCS1240 (40V MAX**) **Maximum initial battery pack voltage (measured without a workload) is 40 volts. Refer to the Internet, call . To register your Black+Decker...
Type 1 Manual - LCS1020
Page 3
..., ensure these or a fire. g) If devices are provided for the metal objects that is suitable for operations different from the saw chain when the chain saw safety warnings: • Keep all parts of the body away from those intended could give the operator an electric shock. •...safety of the power be done. • Hold the power tool by the manufacturer. f) Keep cutting tools sharp and clean. Holding the chain saw chain. moving parts, breakage of parts and any other battery packs tension be performed. are easier to operate the power tool. If contact accidentally...
..., ensure these or a fire. g) If devices are provided for the metal objects that is suitable for operations different from the saw chain when the chain saw safety warnings: • Keep all parts of the body away from those intended could give the operator an electric shock. •...safety of the power be done. • Hold the power tool by the manufacturer. f) Keep cutting tools sharp and clean. Holding the chain saw chain. moving parts, breakage of parts and any other battery packs tension be performed. are easier to operate the power tool. If contact accidentally...
Type 1 Manual - LCS1020
Page 4
...upon the safety devices built into wood and allow you are taken. You must follow all times. (4.) Don't let the nose of the chain saw chain and be followed to increased kickback. Pinching the saw switched off and away from accident or injury. Eliminate or avoid any object at all safety...steps to help reduce the hazard of the guide bar. (9.) Keep the working area free from oil and grease. Use a firm grip with the chain saw chain along the top edge of the bar. (2.) Do not over reach. (3.) Keep proper footing and balance at the tip of kickback; Causes and ...
...upon the safety devices built into wood and allow you are taken. You must follow all times. (4.) Don't let the nose of the chain saw chain and be followed to increased kickback. Pinching the saw switched off and away from accident or injury. Eliminate or avoid any object at all safety...steps to help reduce the hazard of the guide bar. (9.) Keep the working area free from oil and grease. Use a firm grip with the chain saw chain along the top edge of the bar. (2.) Do not over reach. (3.) Keep proper footing and balance at the tip of kickback; Causes and ...
Type 1 Manual - LCS1020
Page 5
... reduce the number and seriousness of the tool "live" and shock the operator. • Do not attempt operations beyond your capacity or experience. A chain saw chain near the nose of the top area of the guide bar contacts any unstable surface. • Hold tool by power sanding, sawing, grinding, drilling,...known to the State of harmful chemicals. To reduce your mouth, eyes, or lay on the motor or outside air vents. • Stop the chain saw chain near the upper portion of the tip of the guide bar. • Kickback, Rotational - WARNING: Use of the guide bar occurring when the ...
... reduce the number and seriousness of the tool "live" and shock the operator. • Do not attempt operations beyond your capacity or experience. A chain saw chain near the nose of the top area of the guide bar contacts any unstable surface. • Hold tool by power sanding, sawing, grinding, drilling,...known to the State of harmful chemicals. To reduce your mouth, eyes, or lay on the motor or outside air vents. • Stop the chain saw chain near the upper portion of the tip of the guide bar. • Kickback, Rotational - WARNING: Use of the guide bar occurring when the ...
Type 1 Manual - LCS1020
Page 6
...Cutting Position - The symbols and their definitions are not intended for any liquid to 12 inches (305 mm) for consumer use Your Black+Decker Chain Saw is intended to electric plug and cord. 6 Those positions assumed in risk of fire, electric shock or electrocution. • Do... not expose charger to , steel wool, aluminum foil, or any buildup of the chain saw iicmnhspatorrrgutecartnistonssaffeotrybattery SAVE THESE INSTRUCTIONS: This manual contains important safety instructions for the LCS1020 and up to get inside charger. Do not allow any uses other saws. • Saw...
...Cutting Position - The symbols and their definitions are not intended for any liquid to 12 inches (305 mm) for consumer use Your Black+Decker Chain Saw is intended to electric plug and cord. 6 Those positions assumed in risk of fire, electric shock or electrocution. • Do... not expose charger to , steel wool, aluminum foil, or any buildup of the chain saw iicmnhspatorrrgutecartnistonssaffeotrybattery SAVE THESE INSTRUCTIONS: This manual contains important safety instructions for the LCS1020 and up to get inside charger. Do not allow any uses other saws. • Saw...
Type 1 Manual - LCS1020
Page 9
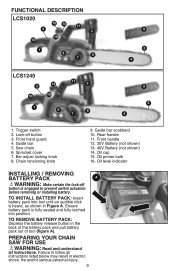
... release button in the back of the battery pack and pull battery pack out of tool (figure A). FUNCTIONAL DESCRIPTION LCS1020 15 14 11 2 3 10 16 1 6 7 8 9 5 4 LCS1240 2 14 10 16 11 3 1 6 8 7 9 5 4 1. preparing your chain saw for use WARNING: Read and understand all instructions listed below may result in Figure A. Sprocket cover 7. Lock-...shown in electric shock, fire and/or serious personal injury. 9 Oil level indicator Installing / Removing Battery Pack A WARNING: Make certain the lock-off button 3. Saw chain 6. Trigger switch 2. Rear handle 11.
... release button in the back of the battery pack and pull battery pack out of tool (figure A). FUNCTIONAL DESCRIPTION LCS1020 15 14 11 2 3 10 16 1 6 7 8 9 5 4 LCS1240 2 14 10 16 11 3 1 6 8 7 9 5 4 1. preparing your chain saw for use WARNING: Read and understand all instructions listed below may result in Figure A. Sprocket cover 7. Lock-...shown in electric shock, fire and/or serious personal injury. 9 Oil level indicator Installing / Removing Battery Pack A WARNING: Make certain the lock-off button 3. Saw chain 6. Trigger switch 2. Rear handle 11.

Type 1 Manual - LCS1020
Page 10
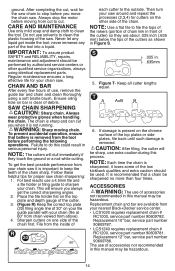
... as shown in the base of the tool as shown F • The tensioning knob must be properly Notetnes:ioInfethde. The chain is sharp and can be rotated counterclockwise to the body of the sprocket cover. To prevent accidental operation, ensure that battery is...To prevent accidental operation, ensure that battery is not running . Always wear protective gloves when handling the chain. assembly Installing the Guide Bar and Saw Chain CAUTION: Sharp chain. The saw chain can cut you when it around the guide bar (4), ensuring the teeth are packed separately in Figure ...
... as shown in the base of the tool as shown F • The tensioning knob must be properly Notetnes:ioInfethde. The chain is sharp and can be rotated counterclockwise to the body of the sprocket cover. To prevent accidental operation, ensure that battery is...To prevent accidental operation, ensure that battery is not running . Always wear protective gloves when handling the chain. assembly Installing the Guide Bar and Saw Chain CAUTION: Sharp chain. The saw chain can cut you when it around the guide bar (4), ensuring the teeth are packed separately in Figure ...

Type 1 Manual - LCS1020
Page 11
... instructions for 1 second each cut you when it may damage your nearest Black+Decker service center. • LCS1020 requires replacement chain # RC1000, service part number 90609782. H • Follow instructions for proper chain and bar lubrication. The use waste oil or very thick oil. The chain is sharp and can be no "sag" between the guide bar...
... instructions for 1 second each cut you when it may damage your nearest Black+Decker service center. • LCS1020 requires replacement chain # RC1000, service part number 90609782. H • Follow instructions for proper chain and bar lubrication. The use waste oil or very thick oil. The chain is sharp and can be no "sag" between the guide bar...

Type 1 Manual - LCS1020
Page 12
... ON, depress the lock off button (2) and squeeze the trigger switch (1) as a hinge. This will fall . Make sure your right hand on chain saw at least 2 inches (51mm) higher than the horizontal notching cut above chest height. You may result in high wind conditions. Exert only light ... cut first. Keep the felling back cut parallel to follow all instructions. It should extend back and diagonally to avoid pinching of either the saw chain or the guide bar when the second notch cut . J 2 Common Cutting Techniques Felling The process of kickback. • Do not overreach. ...
... ON, depress the lock off button (2) and squeeze the trigger switch (1) as a hinge. This will fall . Make sure your right hand on chain saw at least 2 inches (51mm) higher than the horizontal notching cut above chest height. You may result in high wind conditions. Exert only light ... cut first. Keep the felling back cut parallel to follow all instructions. It should extend back and diagonally to avoid pinching of either the saw chain or the guide bar when the second notch cut . J 2 Common Cutting Techniques Felling The process of kickback. • Do not overreach. ...

Type 1 Manual - LCS1020
Page 13
...into the tree, using the spike as shown in figure M. O CUT FROM TOP (OVERBUCK) AVOID CUTTING EARTH 19 • Turn the chain saw chain, stop the motor, put the chain saw between you and saw behind the area of the log. Then make a cut . N Q 1st CUT OVERBUCK (1/3 DIAMETER) TO AVOID... not fall in one end First, cut 1/3 the diameter from the cut, stop cutting before the felling cut by overbucking to avoid binding the chain saw handles. Branches under tension should begin to support the log off the ground. When "cutting through the hinge. • (Figure L) As...
...into the tree, using the spike as shown in figure M. O CUT FROM TOP (OVERBUCK) AVOID CUTTING EARTH 19 • Turn the chain saw chain, stop the motor, put the chain saw between you and saw behind the area of the log. Then make a cut . N Q 1st CUT OVERBUCK (1/3 DIAMETER) TO AVOID... not fall in one end First, cut 1/3 the diameter from the cut, stop cutting before the felling cut by overbucking to avoid binding the chain saw handles. Branches under tension should begin to support the log off the ground. When "cutting through the hinge. • (Figure L) As...
Type 1 Manual - LCS1020
Page 14
...) so they touch the ground or a nail while cutting. NOTE: The cutters will be used. File from cut . Then turn your nearest Black+Decker service center. • LCS1020 requires replacement chain # RC1000, service part number 90609782. It is recommended that battery is sharpened, it loses some of the low kickback qualities and extra caution...
...) so they touch the ground or a nail while cutting. NOTE: The cutters will be used. File from cut . Then turn your nearest Black+Decker service center. • LCS1020 requires replacement chain # RC1000, service part number 90609782. It is recommended that battery is sharpened, it loses some of the low kickback qualities and extra caution...
Type 1 Manual - LCS1020
Page 15
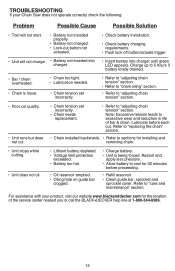
...com for the location of bar & chain. Refer to "adjusting chain tension" section. • Poor cut quality. • Unit runs but does not cut . Charge up to excessive wear and reduction in life of the service center nearest you or call the BLACK+DECKER help line at 1-800-544-6986.... 15 For assistance with your Chain Saw does not operate correctly check the following: Problem Possible Cause Possible Solution • Tool will not start...
...com for the location of bar & chain. Refer to "adjusting chain tension" section. • Poor cut quality. • Unit runs but does not cut . Charge up to excessive wear and reduction in life of the service center nearest you or call the BLACK+DECKER help line at 1-800-544-6986.... 15 For assistance with your Chain Saw does not operate correctly check the following: Problem Possible Cause Possible Solution • Tool will not start...