
Type 1 Manual - GH900
Page 3
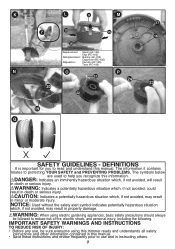
... injury, including the following. IMPORTANT SAFETY WARNINGS AND INSTRUCTIONS TO REDUCE RISK OF INJURY: • • BiSnaesvftoreurecthtiaeonsnyes uiansnsetdr,uobctethioesnrusrineafonerdvmerraeytvoiioennwecuforseniqntaugientnehtdilsyitnprirmtihomristeomruarseneaudaasln. K L 9 M 17 7 15 15 18 16 Replacement: Spool (AF-100) Cap (RC-100) Remplacement : Bobine (AF-100) Capuchon (RC-100) Repuestos: Carrete (AF-100) Tapa (RC-100) N O P 21 24 23 20 22 19...
... injury, including the following. IMPORTANT SAFETY WARNINGS AND INSTRUCTIONS TO REDUCE RISK OF INJURY: • • BiSnaesvftoreurecthtiaeonsnyes uiansnsetdr,uobctethioesnrusrineafonerdvmerraeytvoiioennwecuforseniqntaugientnehtdilsyitnprirmtihomristeomruarseneaudaasln. K L 9 M 17 7 15 15 18 16 Replacement: Spool (AF-100) Cap (RC-100) Remplacement : Bobine (AF-100) Capuchon (RC-100) Repuestos: Carrete (AF-100) Tapa (RC-100) N O P 21 24 23 20 22 19...
Type 1 Manual - GH900
Page 4
... close to solid objects and where necessary, do edging or trimming by hand. • AVOID ACCIDENTALLY STARTING - seCctiAonUwTillIOvoNid:wFaarrilaunrety.to comply with a broken hub or spool. • DAMAGE TO Cord - at all times. • THE ROTATING LINE PERFORMS A CUTTING FUNCTION - Keep proper footing and balance at all times when this trimmer...
... close to solid objects and where necessary, do edging or trimming by hand. • AVOID ACCIDENTALLY STARTING - seCctiAonUwTillIOvoNid:wFaarrilaunrety.to comply with a broken hub or spool. • DAMAGE TO Cord - at all times. • THE ROTATING LINE PERFORMS A CUTTING FUNCTION - Keep proper footing and balance at all times when this trimmer...
Type 1 Manual - GH900
Page 6
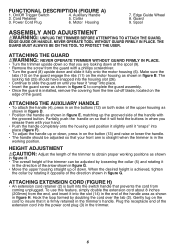
... lower the handle. • The handle should have snapped into place (figure F). • To adjust the handle up or down at the spool (9). • Remove the screw from coming unplugged. When the desired height is built into the slot (14) in the end of the arrow... to slide the guard on both sides of the handle with a phillips screwdriver. • Turn the guard (8) upside down . Cord Retainer 5. Guard 3. Spool ASSEMBLY and Adjustment WARNING: Unplug the trimmer before attempting to complete the guard assembly. • Once the guard is installed, remove the covering from the...
... lower the handle. • The handle should have snapped into place (figure F). • To adjust the handle up or down at the spool (9). • Remove the screw from coming unplugged. When the desired height is built into the slot (14) in the end of the arrow... to slide the guard on both sides of the handle with a phillips screwdriver. • Turn the guard (8) upside down . Cord Retainer 5. Guard 3. Spool ASSEMBLY and Adjustment WARNING: Unplug the trimmer before attempting to complete the guard assembly. • Once the guard is installed, remove the covering from the...
Type 1 Manual - GH900
Page 7
... inch (1.65 mm) diameter, ROUND nylon line. During use, the tips of the nylon lines will become entangled in the rotating line or spool. The advanced automatic line feeding mechanism senses when more feeding if the cutting or edging is equipped with Smart Edge Technology that conforms to 10... will only rotate in trimming mode or edging mode to avoid any wire which could become frayed and worn and the special self feeding spool will automatically shift to edging mode WARNING: Disconnect the plug from the power source before making any adjustments. Be particularly careful to trim ...
... inch (1.65 mm) diameter, ROUND nylon line. During use, the tips of the nylon lines will become entangled in the rotating line or spool. The advanced automatic line feeding mechanism senses when more feeding if the cutting or edging is equipped with Smart Edge Technology that conforms to 10... will only rotate in trimming mode or edging mode to avoid any wire which could become frayed and worn and the special self feeding spool will automatically shift to edging mode WARNING: Disconnect the plug from the power source before making any adjustments. Be particularly careful to trim ...
Type 1 Manual - GH900
Page 8
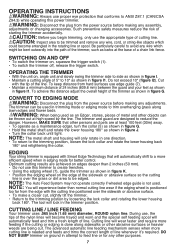
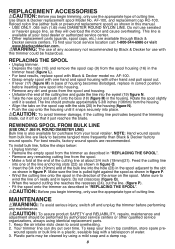
... as shown in figure P. • Wind the cutting line onto the spool in the direction of the arrow on neatly and in the spool adjacent to become tangled more frequently than Black & Decker factory wound spools. Make sure the line is available at about 3/4 inch (19mm)(21).... time. To keep your local dealer or authorized service center. • Other replacement parts (guards, spool caps, etc.) are available through Black & Decker service centers. NOTE: Hand wound spools from your local service location call: 1-800-544-6986 or visit wWwAwR.bNlacINkaGn:ddTehcekuesre.coofma.ny accessory...
... as shown in figure P. • Wind the cutting line onto the spool in the direction of the arrow on neatly and in the spool adjacent to become tangled more frequently than Black & Decker factory wound spools. Make sure the line is available at about 3/4 inch (19mm)(21).... time. To keep your local dealer or authorized service center. • Other replacement parts (guards, spool caps, etc.) are available through Black & Decker service centers. NOTE: Hand wound spools from your local service location call: 1-800-544-6986 or visit wWwAwR.bNlacINkaGn:ddTehcekuesre.coofma.ny accessory...
Type 1 Manual - GH900
Page 9
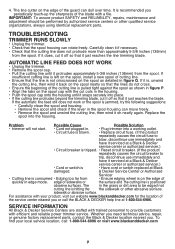
...work • Unplug the trimmer. • Remove the spool cap. • Pull the cutting line until it protrudes approximately 5-3/8 inches (136mm) from the spool. sidewalk or abrasive surface. Service Information All Black & Decker Service Centers are staffed with trained personnel to provide customers...or genuine factory replacement parts, contact the Black & Decker location nearest you periodically touch-up the sharpness of the cutting line is jammed, try the following suggestions: • Carefully clean the spool and housing. • Remove the spool and check if the lever in figure ...
...work • Unplug the trimmer. • Remove the spool cap. • Pull the cutting line until it protrudes approximately 5-3/8 inches (136mm) from the spool. sidewalk or abrasive surface. Service Information All Black & Decker Service Centers are staffed with trained personnel to provide customers...or genuine factory replacement parts, contact the Black & Decker location nearest you periodically touch-up the sharpness of the cutting line is jammed, try the following suggestions: • Carefully clean the spool and housing. • Remove the spool and check if the lever in figure ...

Parts Diagram
Page 2
All Rights Reserved. Parts list, pricing, and availability subject to change. Please visit www.dewaltservicenet.com for LST220 Type 1 Description Qty Required LEVER ASSEMBLY 1 AUX.HANDLE ASSY 1 SCREW 1 COVER 1 EDGE GUIDE 1 GUARD ASSEMBLY 1 REPLACEMENT SPOOL 1 SPRING 1 BATTERY PACK 2 CHARGER 1 COPYRIGHT© 2005. Page 1 Item Number 3 4 5 6 7 8 9 10 866 871 Part Number 90567077 90559902 747329 385022-03 90559834 90560170 AF-100 90566944 90587070 90590282 Parts List for current parts information.
All Rights Reserved. Parts list, pricing, and availability subject to change. Please visit www.dewaltservicenet.com for LST220 Type 1 Description Qty Required LEVER ASSEMBLY 1 AUX.HANDLE ASSY 1 SCREW 1 COVER 1 EDGE GUIDE 1 GUARD ASSEMBLY 1 REPLACEMENT SPOOL 1 SPRING 1 BATTERY PACK 2 CHARGER 1 COPYRIGHT© 2005. Page 1 Item Number 3 4 5 6 7 8 9 10 866 871 Part Number 90567077 90559902 747329 385022-03 90559834 90560170 AF-100 90566944 90587070 90590282 Parts List for current parts information.


