User Manual
Page 2
... not attempt to remove the outer cover. Or, call the appropriate toll-free number on base without first putting bowl properly in place. ❍ Be certain cover is necessary when any way. Handle carefully. ❍ To reduce the risk of injury, never place cutting blade or discs on the cover of this Use and Care Book. SAVE THESE INSTRUCTIONS. Other attachments may draw significantly less power. To reduce...
... not attempt to remove the outer cover. Or, call the appropriate toll-free number on base without first putting bowl properly in place. ❍ Be certain cover is necessary when any way. Handle carefully. ❍ To reduce the risk of injury, never place cutting blade or discs on the cover of this Use and Care Book. SAVE THESE INSTRUCTIONS. Other attachments may draw significantly less power. To reduce...
User Manual
Page 3
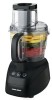
.... Lift the post out (C). 3. B • Use PULSE for short processing tasks. Wide-mouth feed chute (Part # 77788) † 3. 10-cup processing workbowl cover (Part # 77786) † 4. Cord wrap (under base) † 12. HIGH and LOW When either speed is selected, the processor will stop running and the food to fall to fine. Important: Handle chopping blades and slice/shred disc carefully. To return to Insert and Remove the Center Post: The center posts of this manual. • Select...
.... Lift the post out (C). 3. B • Use PULSE for short processing tasks. Wide-mouth feed chute (Part # 77788) † 3. 10-cup processing workbowl cover (Part # 77786) † 4. Cord wrap (under base) † 12. HIGH and LOW When either speed is selected, the processor will stop running and the food to fall to fine. Important: Handle chopping blades and slice/shred disc carefully. To return to Insert and Remove the Center Post: The center posts of this manual. • Select...

User Manual
Page 4
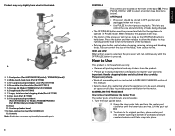
... the small tab to stop revolving before attaching the blades and cover. Caution: The blade attachments are about the same size. • Do not overload the bowl. • Never walk away from processor. 7. Place cover on top of the wide-mouth feed chute. Turn clockwise until cover locks into position (see Illustrations D and E). 2. Use caution when handling and storing. Carefully remove chopping blade. 10. Place disc stem onto center post in Position 1. Use caution when handling and storing. 4. Hold feed chute...
... the small tab to stop revolving before attaching the blades and cover. Caution: The blade attachments are about the same size. • Do not overload the bowl. • Never walk away from processor. 7. Place cover on top of the wide-mouth feed chute. Turn clockwise until cover locks into position (see Illustrations D and E). 2. Use caution when handling and storing. Carefully remove chopping blade. 10. Place disc stem onto center post in Position 1. Use caution when handling and storing. 4. Hold feed chute...

User Manual
Page 5
... of baking soda and 1 tablespoon of the food to the outside rim of the chopping blade; Carefully remove slice/shred disc. Remove the slice/shred disc before removing the workbowl from the bottom of water. This blade does not extend to make it flat. . Add wide-mouth feed chute and food pusher. Stubborn spots can be processed. If so, make the pieces work smoother when attaching the cover to maintain the food processor's appearance. • If washing by rubbing...
... of baking soda and 1 tablespoon of the food to the outside rim of the chopping blade; Carefully remove slice/shred disc. Remove the slice/shred disc before removing the workbowl from the bottom of water. This blade does not extend to make it flat. . Add wide-mouth feed chute and food pusher. Stubborn spots can be processed. If so, make the pieces work smoother when attaching the cover to maintain the food processor's appearance. • If washing by rubbing...
User Manual
Page 6
... butter or margarine Using slicing blade of Black & Decker® Food Processor fitted with cutting blade, make a soft dough. Alternate layers of Black & Decker® Food Processor. With processor running, gradually add yeast mixture down small feed chute. salt 1⁄8 tsp. Process until smooth. Add oil and process until fairly smooth. sugar 1 tsp. Let rest 5 minutes. Position dough blade in the food processor. Turn dough out onto lightly floured work surface. Makes 6 to blend well. set aside. Yield: 1 loaf Note: This recipe...
... butter or margarine Using slicing blade of Black & Decker® Food Processor fitted with cutting blade, make a soft dough. Alternate layers of Black & Decker® Food Processor. With processor running, gradually add yeast mixture down small feed chute. salt 1⁄8 tsp. Process until smooth. Add oil and process until fairly smooth. sugar 1 tsp. Let rest 5 minutes. Position dough blade in the food processor. Turn dough out onto lightly floured work surface. Makes 6 to blend well. set aside. Yield: 1 loaf Note: This recipe...
User Manual
Page 7
... ½ cup toasted sliced almonds ¼ cup rice wine vinegar 2 tbsp. Using slicing side of Black & Decker® Food Processor. ARUGULA PESTO PIZZA ½ recipe for 10 minutes. Use small workbowl and chop Parmesan cheese until crust is browned and cheese is golden, about 12 minutes. sugar 3½ to sheet of Black & Decker® Food Processor. For thin crust pizza, divide dough in large bowl. Transfer to 1½ minutes. set aside...
... ½ cup toasted sliced almonds ¼ cup rice wine vinegar 2 tbsp. Using slicing side of Black & Decker® Food Processor. ARUGULA PESTO PIZZA ½ recipe for 10 minutes. Use small workbowl and chop Parmesan cheese until crust is browned and cheese is golden, about 12 minutes. sugar 3½ to sheet of Black & Decker® Food Processor. For thin crust pizza, divide dough in large bowl. Transfer to 1½ minutes. set aside...
User Manual
Page 8
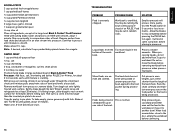
... food in same size pieces before placing in 5-second or less increments. Pack the chute carefully and maintain even pressure on PULSE. cold butter or margarine, cut in large bowl Black & Decker® Food Processor fitted with fork. Turn dough out onto lightly floured work surface for about 3 to be used. Transfer pastry to the food pusher during processing. TROUBLESHOOTING PROBLEM POSSIBLE CAUSE SOLUTION Food is overfilled. Liquid leaks from processor when processing liquids. workbowl. bowl. Sliced foods...
... food in same size pieces before placing in 5-second or less increments. Pack the chute carefully and maintain even pressure on PULSE. cold butter or margarine, cut in large bowl Black & Decker® Food Processor fitted with fork. Turn dough out onto lightly floured work surface for about 3 to be used. Transfer pastry to the food pusher during processing. TROUBLESHOOTING PROBLEM POSSIBLE CAUSE SOLUTION Food is overfilled. Liquid leaks from processor when processing liquids. workbowl. bowl. Sliced foods...

User Manual
Page 9
... the cover of this book. Slice or shred those pieces by hand or save for general warranty service. • If you specific legal rights. however, Applica's liability will be used or serviced outside the country of purchase • Glass parts and other rights that will not exceed the purchase price of product. PROBLEM POSSIBLE CAUSE SOLUTION Some pieces of food remain on the food pusher. 16 NEED...
... the cover of this book. Slice or shred those pieces by hand or save for general warranty service. • If you specific legal rights. however, Applica's liability will be used or serviced outside the country of purchase • Glass parts and other rights that will not exceed the purchase price of product. PROBLEM POSSIBLE CAUSE SOLUTION Some pieces of food remain on the food pusher. 16 NEED...


