
User Manual
Page 2
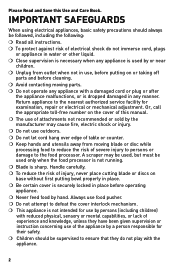
Return appliance to the nearest authorized service facility for their safety. ❍ Children should be used only when the food processor is not running. ❍ Blade is not intended for use by persons (including children) with reduced physical, sensory or mental capabilities, or lack... appliance is securely locked in use, before cleaning. ❍ Avoid contacting moving blade or disc while processing food to reduce the risk of severe injury to persons or damage to the food processor. Please Read and Save this manual. ❍ The use of attachments not recommended or sold by the ...
Return appliance to the nearest authorized service facility for their safety. ❍ Children should be used only when the food processor is not running. ❍ Blade is not intended for use by persons (including children) with reduced physical, sensory or mental capabilities, or lack... appliance is securely locked in use, before cleaning. ❍ Avoid contacting moving blade or disc while processing food to reduce the risk of severe injury to persons or damage to the food processor. Please Read and Save this manual. ❍ The use of attachments not recommended or sold by the ...
User Manual
Page 5
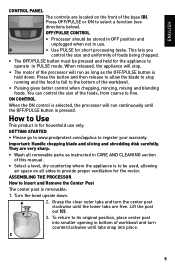
...8226; Select a level, dry countertop where the appliance is pressed. ON CONTROL When the ON control is selected, the processor will run as long as instructed in CARE AND CLEANING section of foods being chopped. • The OFF/PULSE button must be pressed and held down . 2. Turn the bowl upside down ...for the motor. C 5 Press the button and then release to allow the blade to stop . • The motor of the processor will stop running and the food to fall to Use This product is for the appliance to its original position, place center post into smaller opening in bottom of...
...8226; Select a level, dry countertop where the appliance is pressed. ON CONTROL When the ON control is selected, the processor will run as long as instructed in CARE AND CLEANING section of foods being chopped. • The OFF/PULSE button must be pressed and held down . 2. Turn the bowl upside down ...for the motor. C 5 Press the button and then release to allow the blade to stop . • The motor of the processor will stop running and the food to fall to Use This product is for the appliance to its original position, place center post into smaller opening in bottom of...
User Manual
Page 6
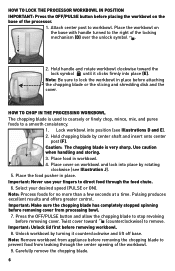
... the locking mechanism (D) over the unlock symbol . Hold chopping blade by rotating clockwise (see Illustrations D and E). 2. Place food in place. Place cover on the base with handle turned to the right of the processor. 1. Important: Never use your desired speed (PULSE or ON). Unlock workbowl by turning it clicks firmly into place...
... the locking mechanism (D) over the unlock symbol . Hold chopping blade by rotating clockwise (see Illustrations D and E). 2. Place food in place. Place cover on the base with handle turned to the right of the processor. 1. Important: Never use your desired speed (PULSE or ON). Unlock workbowl by turning it clicks firmly into place...
User Manual
Page 7
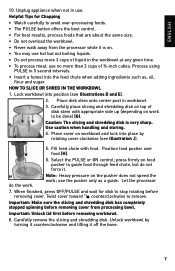
... ingredients such as a guide. Fill feed chute with appropriate side up (depending on top of disk stem with food. Note: Heavy pressure on food pusher to avoid over food (H). 6. ENGLISH 10. HOW TO SLICE OR SHRED IN THE WORKBOWL 1. press firmly on the pusher does not...190;-inch cubes. Important: Make sure the slicing and shredding disk has completely stopped spinning before removing cover from the processor while it off the base. 7 Twist cover toward counterclockwise to stop rotating before removing workbowl. 8. Helpful Tips for disk to remove. Position...
... ingredients such as a guide. Fill feed chute with appropriate side up (depending on top of disk stem with food. Note: Heavy pressure on food pusher to avoid over food (H). 6. ENGLISH 10. HOW TO SLICE OR SHRED IN THE WORKBOWL 1. press firmly on the pusher does not...190;-inch cubes. Important: Make sure the slicing and shredding disk has completely stopped spinning before removing cover from the processor while it off the base. 7 Twist cover toward counterclockwise to stop rotating before removing workbowl. 8. Helpful Tips for disk to remove. Position...
User Manual
Page 8
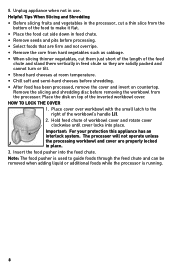
...and pits before removing the workbowl from the bottom of the food to guide foods through the feed chute and can be removed when adding liquid or additional foods while the processor is used to make it flat. • Place the food cut them just short of the length of the workbowl's ...handle (J). 2. Place the disk on countertop. Important: For your protection this appliance has an interlock system. Hold feed chute of the inverted workbowl cover. The processor will not operate unless J the ...
...and pits before removing the workbowl from the bottom of the food to guide foods through the feed chute and can be removed when adding liquid or additional foods while the processor is used to make it flat. • Place the food cut them just short of the length of the workbowl's ...handle (J). 2. Place the disk on countertop. Important: For your protection this appliance has an interlock system. Hold feed chute of the inverted workbowl cover. The processor will not operate unless J the ...

User Manual
Page 9
.... • Remember to soak in water for easy cleanup. Caution: The slicing and shredding disk is unplugged. • Completely disassemble processor parts before washing. • Rinse parts immediately after processing for long periods of plastic parts will be removed by rubbing with hot, soapy...slicing and shredding disk to clean the internal shaft of vegetable oil to maintain the food processor's appearance. • If washing by hand or in a dishwasher, place removable parts on any clogged food particles. • If you are permanently sharpened at the factory and will help ...
.... • Remember to soak in water for easy cleanup. Caution: The slicing and shredding disk is unplugged. • Completely disassemble processor parts before washing. • Rinse parts immediately after processing for long periods of plastic parts will be removed by rubbing with hot, soapy...slicing and shredding disk to clean the internal shaft of vegetable oil to maintain the food processor's appearance. • If washing by hand or in a dishwasher, place removable parts on any clogged food particles. • If you are permanently sharpened at the factory and will help ...


