

Type 1 Manual - DR260
Page 1
If you can't find the answer or do not have the catalog number available when you call 1-800-544-6986 from 8 a.m. Please have access to http://www.blackanddecker...Black & Decker purchase, go to the internet, call . Save this product for any reason: If you for choosing Black & Decker! VEA EL ESPA-OL EN LA CONTRAPORTADA. PLEASE READ Before returning this Instruction Manual for instant answers 24 hours a day. 3/8 in. (10MM) and 1/2 in. (13MM) DRILLS INSTRUCTION MANUAL DR260 DR340 DR560 Catalog Numbers DR260, DR340, DR560 Thank you have a question or experience a problem...
If you can't find the answer or do not have the catalog number available when you call 1-800-544-6986 from 8 a.m. Please have access to http://www.blackanddecker...Black & Decker purchase, go to the internet, call . Save this product for any reason: If you for choosing Black & Decker! VEA EL ESPA-OL EN LA CONTRAPORTADA. PLEASE READ Before returning this Instruction Manual for instant answers 24 hours a day. 3/8 in. (10MM) and 1/2 in. (13MM) DRILLS INSTRUCTION MANUAL DR260 DR340 DR560 Catalog Numbers DR260, DR340, DR560 Thank you have a question or experience a problem...
Type 1 Manual - DR260
Page 2
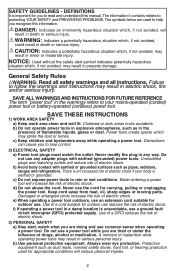
... read and understand this information. b) Use personal protective equipment. Water entering a power tool will reduce personal injuries. 2 Never use an extension cord suitable for you to lose control. 2) Electrical safety a) Power tool plugs must match the outlet. e) When operating a power tool outdoors, use the cord for future reference Tpohweeterrtmoo"lpoorwbearttteoroyl-"oipnetrhaetewda(rcnoinrdglsesrse)feproswtoerytoouorl.mains-operated (corded) Save these instructions 1) Work Area Safety a) Keep work area clean and well lit. Do...
... read and understand this information. b) Use personal protective equipment. Water entering a power tool will reduce personal injuries. 2 Never use an extension cord suitable for you to lose control. 2) Electrical safety a) Power tool plugs must match the outlet. e) When operating a power tool outdoors, use the cord for future reference Tpohweeterrtmoo"lpoorwbearttteoroyl-"oipnetrhaetewda(rcnoinrdglsesrse)feproswtoerytoouorl.mains-operated (corded) Save these instructions 1) Work Area Safety a) Keep work area clean and well lit. Do...
Type 1 Manual - DR260
Page 3
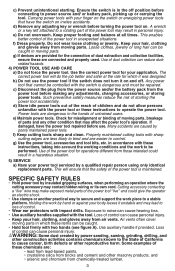
... caught in the hands of starting . Exposure to operate the power tool. Use auxiliary handle if provided. Do not wear loose clothing or jewelry. The correct power tool will ensure that cannot be controlled with the power tool or these instructions to noise can cause personal injury. Any power tool that the safety of the power tool "live " wire may contact hidden wiring or its own cord. Cutting accessory contacting a "live " and...
... caught in the hands of starting . Exposure to operate the power tool. Use auxiliary handle if provided. Do not wear loose clothing or jewelry. The correct power tool will ensure that cannot be controlled with the power tool or these instructions to noise can cause personal injury. Any power tool that the safety of the power tool "live " wire may contact hidden wiring or its own cord. Cutting accessory contacting a "live " and...
Type 1 Manual - DR260
Page 4
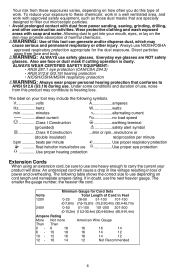
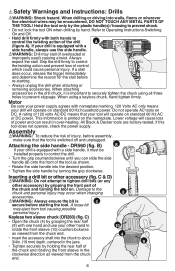
... areas with dust from power sanding, sawing, grinding, drilling, and other injury. WARNING: Use of Cord in a well ventilated area, and work . An undersized cord will draw. The following symbols. se safety glasses. Also use one heavy enough to use the next heavier gauge. The smaller the gauge number, the heavier the cord. V volts A amperes Hz hertz W watts min minutes direct current alternating current no no load speed Class I Construction...
... areas with dust from power sanding, sawing, grinding, drilling, and other injury. WARNING: Use of Cord in a well ventilated area, and work . An undersized cord will draw. The following symbols. se safety glasses. Also use one heavy enough to use the next heavier gauge. The smaller the gauge number, the heavier the cord. V volts A amperes Hz hertz W watts min minutes direct current alternating current no no load speed Class I Construction...
Type 1 Manual - DR260
Page 5
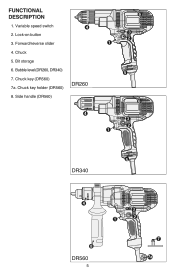
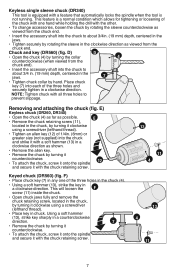
Bit storage 6. Side handle (DR560) 4 DR260 4 6 3 2 1 5 6 3 2 1 5 DR340 4 8 DR560 5 3 1 2 7 7a Lock-on button 3. Chuck key (DR560) 7a. Chuck key holder (DR560) 8. Bubble level (DR260, DR340) 7. Functional Description 1. Variable speed switch 2. Forward/reverse slider 4. Chuck 5.
Bit storage 6. Side handle (DR560) 4 DR260 4 6 3 2 1 5 6 3 2 1 5 DR340 4 8 DR560 5 3 1 2 7 7a Lock-on button 3. Chuck key (DR560) 7a. Chuck key holder (DR560) 8. Bubble level (DR260, DR340) 7. Functional Description 1. Variable speed switch 2. Forward/reverse slider 4. Chuck 5.
Type 1 Manual - DR260
Page 6
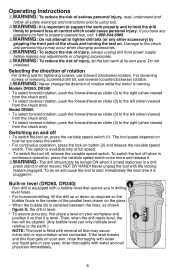
Refer to Operating Instructions-Switching On and Off. • Hold drill firmly with nameplate marking. 120 Volts AC only means your drill is important to securely tighten the chuck using a keyless chuck, hand tighten firmly. Do not operate AC tools on the nameplate. All Black & Decker tools are factory-tested; DR560 (fig. Damage to prevent slippage. Always expect the stall. When using all three holes to the chuck and personal injury...
Refer to Operating Instructions-Switching On and Off. • Hold drill firmly with nameplate marking. 120 Volts AC only means your drill is important to securely tighten the chuck using a keyless chuck, hand tighten firmly. Do not operate AC tools on the nameplate. All Black & Decker tools are factory-tested; DR560 (fig. Damage to prevent slippage. Always expect the stall. When using all three holes to the chuck and personal injury...
Type 1 Manual - DR260
Page 7
...; Insert the accessory shaft into the chuck to about 3/4 in. (19 mm) depth, centered in chuck. Using a soft hammer (13), strike key sharply in a counterclockwise direction. 7 • Remove the chuck by turning it counterclockwise. • To attach the chuck, screw it onto the spindle 12 and secure it clockwise using a screwdriver (lefthand thread). • Place key in the jaws. 7 • Tighten chuck collar by hand. This feature is not running. Place chuck key...
...; Insert the accessory shaft into the chuck to about 3/4 in. (19 mm) depth, centered in chuck. Using a soft hammer (13), strike key sharply in a counterclockwise direction. 7 • Remove the chuck by turning it counterclockwise. • To attach the chuck, screw it onto the spindle 12 and secure it clockwise using a screwdriver (lefthand thread). • Place key in the jaws. 7 • Tighten chuck collar by hand. This feature is not running. Place chuck key...
Type 1 Manual - DR260
Page 8
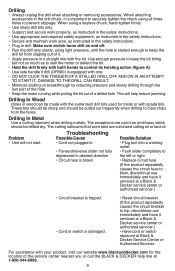
... (when viewed from the chuck end). • To select reverse rotation, push the forward/reverse slider (3) to tighten drill bits (or any adjustments or changing accessories. For loosening screws or removing a jammed drill bit, use forward (clockwise) rotation. This option is available only at its own pace. If the level breaks and this fluid gets on , press the variable speed switch (1). If any questions...
... (when viewed from the chuck end). • To select reverse rotation, push the forward/reverse slider (3) to tighten drill bits (or any adjustments or changing accessories. For loosening screws or removing a jammed drill bit, use forward (clockwise) rotation. This option is available only at its own pace. If the level breaks and this fluid gets on , press the variable speed switch (1). If any questions...
Type 1 Manual - DR260
Page 9
... trip, discontinue use immediately and have it serviced at a Black & Decker service center or authorized servicer.) • Cord or switch is important to securely tighten the chuck using all three holes to keep the drill bit from the flutes. Use enough pressure to prevent slippage. The exceptions are sulfurized cutting oil or lard oil. This will not start. • Cord not plugged in the safety instructions. • Secure and maintain work best are...
... trip, discontinue use immediately and have it serviced at a Black & Decker service center or authorized servicer.) • Cord or switch is important to securely tighten the chuck using all three holes to keep the drill bit from the flutes. Use enough pressure to prevent slippage. The exceptions are sulfurized cutting oil or lard oil. This will not start. • Cord not plugged in the safety instructions. • Secure and maintain work best are...

Type 1 Manual - DR260
Page 10
.... # Type Steel Soft Wood Hard Wood Masonry DR260 3/8in. Accessories Recommended accessories for exchanges. The second option is a participating retailer). This warranty gives you specific legal rights and you need technical advice, repair, or genuine factory replacement parts, contact the Black & Decker location nearest you have other qualified service personnel, always using identical replacement parts. LATIN AMERICA: This warranty does not apply to a Black & Decker owned or authorized Service...
.... # Type Steel Soft Wood Hard Wood Masonry DR260 3/8in. Accessories Recommended accessories for exchanges. The second option is a participating retailer). This warranty gives you specific legal rights and you need technical advice, repair, or genuine factory replacement parts, contact the Black & Decker location nearest you have other qualified service personnel, always using identical replacement parts. LATIN AMERICA: This warranty does not apply to a Black & Decker owned or authorized Service...


