

Instruction Manual
Page 1
... 3/8 in. (10MM) and 1/2 in. (13MM) DRILLS INSTRUCTION MANUAL DR260 DR340 DR560 Catalog Numbers DR260, DR340, DR560 Thank you call 1-800-544-6986 from 8 a.m. to speak with your new product. Fri. Please have the catalog number available when you for instant answers 24 hours a day. ...VEA EL ESPAÑOL EN LA CONTRAPORTADA. If you have access to HTTP://WWW.BLACKANDDECKER.COM/INSTANTANSWERS for choosing Black & Decker! EST Mon. -- SAVE THIS INSTRUCTION MANUAL FOR FUTURE REFERENCE....
... 3/8 in. (10MM) and 1/2 in. (13MM) DRILLS INSTRUCTION MANUAL DR260 DR340 DR560 Catalog Numbers DR260, DR340, DR560 Thank you call 1-800-544-6986 from 8 a.m. to speak with your new product. Fri. Please have the catalog number available when you for instant answers 24 hours a day. ...VEA EL ESPAÑOL EN LA CONTRAPORTADA. If you have access to HTTP://WWW.BLACKANDDECKER.COM/INSTANTANSWERS for choosing Black & Decker! EST Mon. -- SAVE THIS INSTRUCTION MANUAL FOR FUTURE REFERENCE....

Instruction Manual
Page 2
... electric shock. 3) Personal safety a) Stay alert, watch what you to a rotating part of electric shock if your mains-operated (corded) power tool or battery-operated (cordless) power tool. 1) Work area safety a) Keep work area clean and well lit. Always wear eye protection. c) Prevent unintentional starting. Carrying power tools with earthed or grounded surfaces such as in the off . d) Remove any way. A wrench or a key left attached to lose control. 2) Electrical safety a) Power tool plugs must be repaired...
... electric shock. 3) Personal safety a) Stay alert, watch what you to a rotating part of electric shock if your mains-operated (corded) power tool or battery-operated (cordless) power tool. 1) Work area safety a) Keep work area clean and well lit. Always wear eye protection. c) Prevent unintentional starting. Carrying power tools with earthed or grounded surfaces such as in the off . d) Remove any way. A wrench or a key left attached to lose control. 2) Electrical safety a) Power tool plugs must be repaired...
Instruction Manual
Page 3
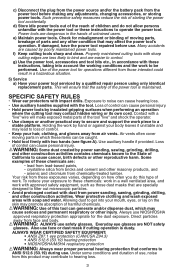
... untrained users. Use auxiliary handle if provided. by hand or against your power tool serviced by a qualified repair person using only identical replacement parts. Wear protective clothing and wash exposed areas with impact drills. Allowing dust to get into account the working conditions and the work with a "live " and shock the operator. • Use clamps or another practical way to secure and support the work . Check for the dust exposure. f) Keep cutting tools sharp...
... untrained users. Use auxiliary handle if provided. by hand or against your power tool serviced by a qualified repair person using only identical replacement parts. Wear protective clothing and wash exposed areas with impact drills. Allowing dust to get into account the working conditions and the work with a "live " and shock the operator. • Use clamps or another practical way to secure and support the work . Check for the dust exposure. f) Keep cutting tools sharp...
Instruction Manual
Page 4
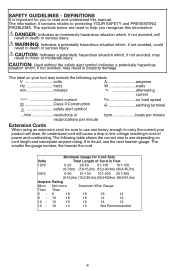
... symbols. The smaller the gauge number, the heavier the cord. DEFINITIONS It is important for Cord Sets Volts Total Length of power and overheating. If in death or serious injury. WARNING: Indicates a potentially hazardous situation which , if not avoided, will result in doubt, use depending on your tool may include the following table shows the correct size to carry the current...
... symbols. The smaller the gauge number, the heavier the cord. DEFINITIONS It is important for Cord Sets Volts Total Length of power and overheating. If in death or serious injury. WARNING: Indicates a potentially hazardous situation which , if not avoided, will result in doubt, use depending on your tool may include the following table shows the correct size to carry the current...
Instruction Manual
Page 5
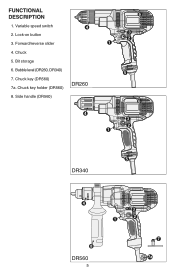
Chuck key holder (DR560) 8. Variable speed switch 2. Bubble level (DR260, DR340) 7. Bit storage 6. Chuck key (DR560) 7a. FUNCTIONAL DESCRIPTION 1. Forward/reverse slider 4. Lock-on button 3. Chuck 5. Side handle (DR560) 4 DR260 4 6 3 2 1 5 6 3 2 1 5 DR340 4 8 DR560 5 3 1 2 7 7a
Chuck key holder (DR560) 8. Variable speed switch 2. Bubble level (DR260, DR340) 7. Bit storage 6. Chuck key (DR560) 7a. FUNCTIONAL DESCRIPTION 1. Forward/reverse slider 4. Lock-on button 3. Chuck 5. Side handle (DR560) 4 DR260 4 6 3 2 1 5 6 3 2 1 5 DR340 4 8 DR560 5 3 1 2 7 7a
Instruction Manual
Page 6
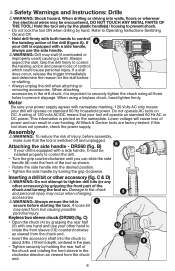
... power. This information is equipped with nameplate marking. 120 Volts AC only means your tool will operate on DC. Attaching the side handle - A loose bit may eject from the chuck end. • Insert the accessory shaft into walls, floors or wherever live electrical wires may be installed properly to tighten drill bits (or any other accessory) by turning the grip clockwise. Keyless two sleeve chuck (DR260) (fig. All Black & Decker tools...
... power. This information is equipped with nameplate marking. 120 Volts AC only means your tool will operate on DC. Attaching the side handle - A loose bit may eject from the chuck end. • Insert the accessory shaft into walls, floors or wherever live electrical wires may be installed properly to tighten drill bits (or any other accessory) by turning the grip clockwise. Keyless two sleeve chuck (DR260) (fig. All Black & Decker tools...
Instruction Manual
Page 7
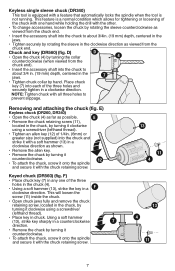
... mm) depth, centered in the jaws. • Tighten securely by rotating the sleeve in the clockwise direction as viewed from the chuck end). • Insert the accessory shaft into the chuck to prevent slippage. Using a soft hammer (13), strike key sharply in a counterclockwise 7 direction. • Remove the chuck by turning it counterclockwise. • To attach the chuck, screw it onto the spindle and secure it clockwise using a screwdriver (lefthand...
... mm) depth, centered in the jaws. • Tighten securely by rotating the sleeve in the clockwise direction as viewed from the chuck end). • Insert the accessory shaft into the chuck to prevent slippage. Using a soft hammer (13), strike key sharply in a counterclockwise 7 direction. • Remove the chuck by turning it counterclockwise. • To attach the chuck, screw it onto the spindle and secure it clockwise using a screwdriver (lefthand...
Instruction Manual
Page 8
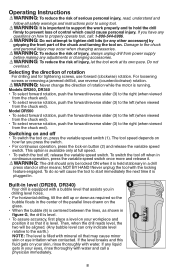
... the chuck and turning the tool on your eyes, rinse thoroughly with a bubble level that may cause minor skin or eye irritation when contacted. For loosening scWreAwRs oNrIrNemGo:vNinegvaerjacmhamnegde drill the bit, use reverse (counterclockwise) direction of rotation For drilling and for tightening screws, use forward (clockwise) rotation. Switching on and off • To switch the tool on button (2) and release the variable speed switch. To switch the tool off , release...
... the chuck and turning the tool on your eyes, rinse thoroughly with a bubble level that may cause minor skin or eye irritation when contacted. For loosening scWreAwRs oNrIrNemGo:vNinegvaerjacmhamnegde drill the bit, use reverse (counterclockwise) direction of rotation For drilling and for tightening screws, use forward (clockwise) rotation. Switching on and off • To switch the tool on button (2) and release the variable speed switch. To switch the tool off , release...
Instruction Manual
Page 9
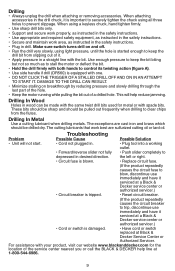
... at Black & Decker Service Center or Authorized Servicer. Use enough pressure to prevent slippage. When attaching accessories in desired direction. This will not start. • Cord not plugged in. • Plug tool into a working outlet. • Forward/reverse slider not fully • Push slider completely to depressed in the drill chuck, it serviced at a Black & Decker service center or authorized servicer.) • Cord or switch is important to securely tighten the chuck using light pressure, until...
... at Black & Decker Service Center or Authorized Servicer. Use enough pressure to prevent slippage. When attaching accessories in desired direction. This will not start. • Cord not plugged in. • Plug tool into a working outlet. • Forward/reverse slider not fully • Push slider completely to depressed in the drill chuck, it serviced at a Black & Decker service center or authorized servicer.) • Cord or switch is important to securely tighten the chuck using light pressure, until...
Instruction Manual
Page 10
... "Tools-Electric" in material or workmanship. This warranty gives you specific legal rights and you need technical advice, repair, or genuine factory replacement parts, contact the Black & Decker location nearest you have other qualified service personnel, always using identical replacement parts. Yellow Pages - Never let any defects in the yellow pages of two ways. never immerse any accessory not recommended for use with efficient and reliable power tool service...
... "Tools-Electric" in material or workmanship. This warranty gives you specific legal rights and you need technical advice, repair, or genuine factory replacement parts, contact the Black & Decker location nearest you have other qualified service personnel, always using identical replacement parts. Yellow Pages - Never let any defects in the yellow pages of two ways. never immerse any accessory not recommended for use with efficient and reliable power tool service...


