
User Guide
Page 2
... toll-free number on the cover of this manual. ❑ The use of fire, electric shock and/or injury to remove the outer cover. There are available and may occur if the lid is removed during the brewing cycles. ❑ To disconnect, turn any appliance is used by or near a hot gas or electric burner or in a heated oven. ❑ Keep the lid on by authorized service...
... toll-free number on the cover of this manual. ❑ The use of fire, electric shock and/or injury to remove the outer cover. There are available and may occur if the lid is removed during the brewing cycles. ❑ To disconnect, turn any appliance is used by or near a hot gas or electric burner or in a heated oven. ❑ Keep the lid on by authorized service...
User Guide
Page 3
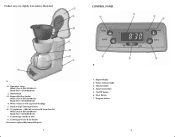
...of unit) 8. Digital display 2. On/Off button 6. Water reservoir with brew-thru lid White (Part # DLX1050W-03) Black (Part # DLX1050B-03) 7. Control panel (see B for details) †Consumer replaceable/removable parts 3 CONTROL PANEL B 1. Minute button 4. Auto brew button 5. One-piece cover White (Part # DLX1050W-01) Black (Part # DLX1050B-01) 2. Power indicator light 3. Hour button 7. Program button 4 Removable filter basket White...
...of unit) 8. Digital display 2. On/Off button 6. Water reservoir with brew-thru lid White (Part # DLX1050W-03) Black (Part # DLX1050B-03) 7. Control panel (see B for details) †Consumer replaceable/removable parts 3 CONTROL PANEL B 1. Minute button 4. Auto brew button 5. One-piece cover White (Part # DLX1050W-01) Black (Part # DLX1050B-01) 2. Power indicator light 3. Hour button 7. Program button 4 Removable filter basket White...
User Guide
Page 4
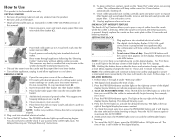
... set . 4. tapping changes the time in Care and Cleaning section of coffee from the product. • Remove and save literature. • Wash all packing material, and any dust or residue that may overflow if brew-thru lid is not properly aligned. 8. The light at the top right of day: Press HOUR button until 12:00 correct time is programmed into removable filter basket (C). To cancel the AUTO brew, press the Power button...
... set . 4. tapping changes the time in Care and Cleaning section of coffee from the product. • Remove and save literature. • Wash all packing material, and any dust or residue that may overflow if brew-thru lid is not properly aligned. 8. The light at the top right of day: Press HOUR button until 12:00 correct time is programmed into removable filter basket (C). To cancel the AUTO brew, press the Power button...
User Guide
Page 5
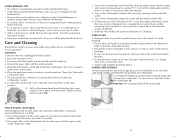
... needed and keep the rest stored in hot, sudsy water. 6. Turn off the coffeemaker; H Mineral Deposits and Clogging J Mineral deposits left by hand in the coffeemaker. begin by using 1 level tablespoon of medium grind coffee for each cup of coffee. • Add a 2-inch piece of hazel nut, chocolate or almond liqueur. Care and Cleaning This product contains no user serviceable parts. Wipe the appliance's exterior surface, control panel and "Keep Hot" plate...
... needed and keep the rest stored in hot, sudsy water. 6. Turn off the coffeemaker; H Mineral Deposits and Clogging J Mineral deposits left by hand in the coffeemaker. begin by using 1 level tablespoon of medium grind coffee for each cup of coffee. • Add a 2-inch piece of hazel nut, chocolate or almond liqueur. Care and Cleaning This product contains no user serviceable parts. Wipe the appliance's exterior surface, control panel and "Keep Hot" plate...

